background image

11

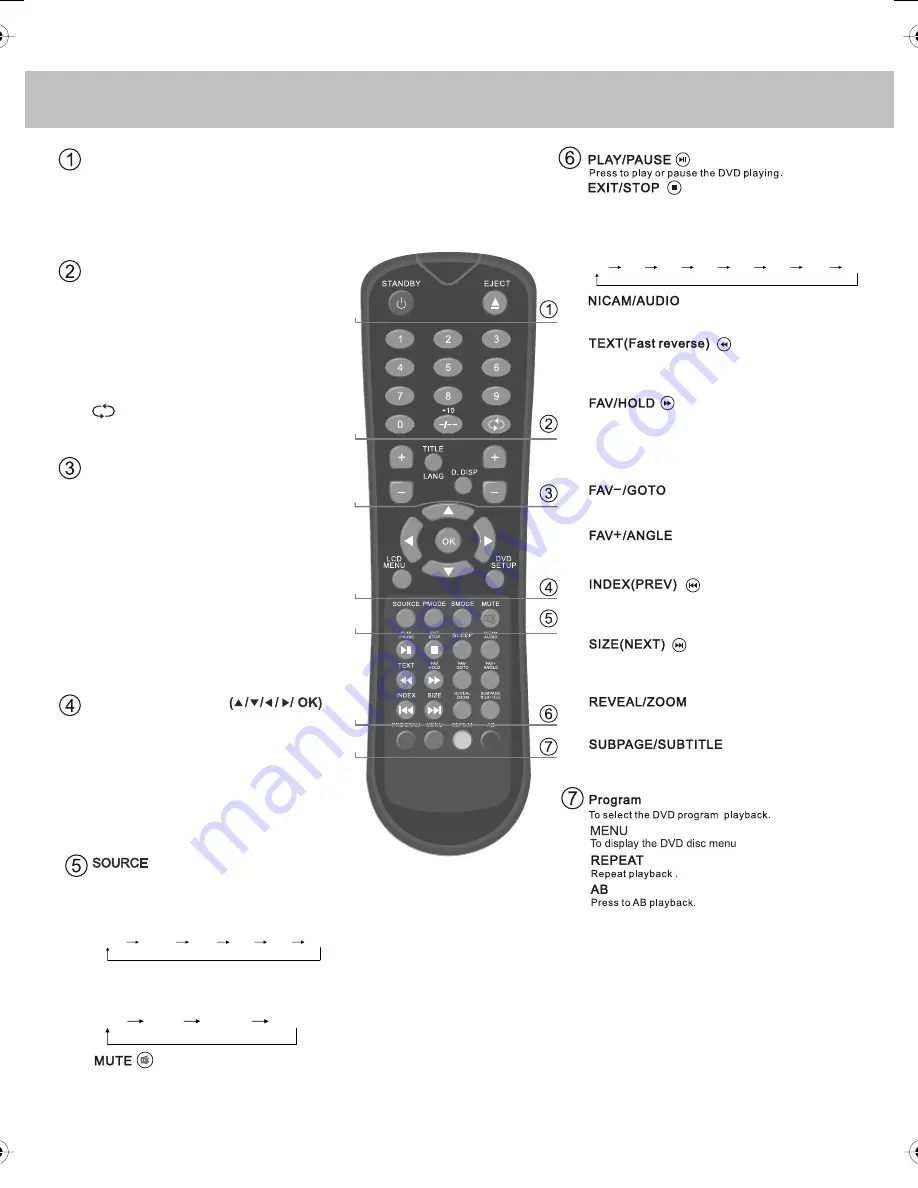
REMOTE CONTROL BUTTONS

Digital mode: Exit the Digital menu.
DVD mode: Stop the DVD playing.

DVD mode: select the zoom to change  picture size.

Teletext mode: change the display size.
DVD mode: press to advance forward to the next
                    chapter.

Teletext mode: request the index page.
DVD mode: press to replay the current program from
                    the previous chapter.

Digital mode: increase fav channel.
DVD mode: select different angle of DVD

Digital mode: decrease fav channel.
DVD mode: press to go to DVD.

Digital mode: press to display FAV menu.
Teletext mode: press hold on or off for current page
                        display.
DVD mode: press to play a DVD program in fast
                    forward mode

Teletext mode: press to enter the teletext mode.
DVD mode: press to play a DVD program in fast
                    rewind mode.

Digital mode: press to select NICAM.
DVD mode: press to select DVD audio channels.

Teletext mode: To reveal or hide the hidden words.

Teletext mode: Sub coded page access.
Digital mode: To switch the dialogue at the bottom
off the screen

PICTURE

FORMAT

INFO

VOL

CH

GUIDE

STANDBY

Switch on TV when on standby or vice versa

EJECT / INFO

DVD mode: To eject disc
Digital/analogue mode: To display channel 
information

NUMBER BUTTONS

Digital/analogue mode:  0 – 9 to select a 
TV channel directly. 
The channel will change after 2 seconds.
Teletext mode: To enter a page number

-/--

Analogue mode: To enter a channel of 2 digits 
i.e. channel 15

Digital/analogue mode: To return to the previous 
channel viewed

VOL+/-

To increase / decrease the sound level

TITLE/LANG

DVD mode: To display the DVD title menu
Digital mode: To change the audio language 
(if available)

D.DISP/GUIDE

DVD mode: To display the current disc 
information
Digital mode : To open the TV Guide menu

CH +/-

To increase or decrease the channel being 
watched

NAVIGATION BUTTONS

Allows you to navigate the on-screen menus 
and adjust the system settings to your preference

LCD MENU

To display OSD menu 

DVD SETUP/PICTURE FORMAT

DVD mode: To display the DVD setup menu
All other modes: to switch the screen between
the different picture formats

PMODE

Press repeatedly to cycle through the available 
picture modes

SMODE

Press repeatedly to cycle through the available 
sound modes

SLEEP

Press repeatedly to cycle through the sleep options 

Press to display the source menu

Press to mute the sound and press again to
restore

15min

45min

30min

75min

60min

90min

105min

120min

Standard

Movie

Personal

Mild

Sport

Game

Voice

Theatre

Music

Personal

19_17 english manual 11.pdf   28. 7. 2009   16:12:18

Summary of Contents for X23/50C-BB-FTCD-UK

Page 1: ...FULL HD 1080p DIGITAL LCD TV DVD USER GUIDE 23 Model X23 50C BB FTCD UK X23 50C BS FTCD UK...

Page 2: ......

Page 3: ...then return it to you If we believe we cannot offer a permanent repair we will replace the item Sky Media UK LTD Helpline Information Telephone 0871 2000 463 Email service skymediauk co uk Internet w...

Page 4: ...2...

Page 5: ...s menu quickly followed by 8 8 8 8 so press the number 8 four times You will now enter the First time installation mode if you do not please refer to the section called getting started later in this u...

Page 6: ...eed to be replaced ensure that any replacement is of the same amperage and approved with the BSI mark Never try and replace the mains plug unless you have adequate qualifications and are legally autho...

Page 7: ...5...

Page 8: ...6...

Page 9: ...icture Format 19 Blue Screen 19 System Lock 19 First Time Installation 20 Reset Television to Factory Settings 20 CHANNEL SERVICES Using Electronic Program Guide 20 Using Digital TV teletext 21 Using...

Page 10: ...Stand 1x 3 5mm jack to phono cable 1x RF lead Please save your packaging as you will need this in the event of warranty service repair or support We are unable to carry out warranty service if you are...

Page 11: ...d will now come off Wall Mounting the TV 1 Remove the four screws highlighted below 2 The wall mount can now be easily attached to the mounting holes on the rear of the TV These holes are indicated in...

Page 12: ...ecieve all of the channels available The most economical way to do this is by purchasing and connecting a signal booster in between the TV and the TV aerial socket If this does not solve the problem y...

Page 13: ...nalogue mode To display channel information NUMBER BUTTONS Digital analogue mode 0 9 to select a TV channel directly The channel will change after 2 seconds Teletext mode To enter a page number Analog...

Page 14: ...oosing Mode Source To switch between the different connections is very easy Using the buttons on the remote control 1 Press SOURCE The following will appear 2 Press or to select the input you require...

Page 15: ...RT CONNECTING A HIGH DEFINITION DEVICE OPTION A HDMI OPTION B COMPONENT AUDIO CABLES Source should be set to HDMI Source should be set to YPbPr COMPONENT CONNECTING A CAMERA OR CAMCORDER Source should...

Page 16: ...o enter menu 2 Press to highlight Contrast 3 Press to increase the contrast or to decrease the contrast 4 Press EXIT to exit Adjusting Brightness Only available when Picture Mode is set to Personal In...

Page 17: ...lour Temperature only available on some sources There are 3 presets for colour temperature 1 Press LCD MENU to enter menu 2 Press to highlight Colour Temperature 3 Press to navigate through the variou...

Page 18: ...menu 2 Press to move to Sound Settings Menu 3 Press to highlight Bass 4 Press to increase the bass or to decrease the bass 5 Press EXIT to exit Adjusting Treble To adjust the amount of treble within...

Page 19: ...uning 4 Press to enter manual tuning 5 Press to highlight Start Screen 6 Press to start 7 Press EXIT to exit Program Edit Changing Channel Position Only Freeview Analague TV modes You can change the a...

Page 20: ...to exit TIMER SETTINGS MENU Lets you adjust the OSD timing and the sleep timer Sleep Timer Lets you set the sleep timer so the television automatically switches off after a certain amount of time 1 Pr...

Page 21: ...up source and limit the maximum volume 1 Press LCD MENU to enter menu 2 Press to move to General Settings Menu 3 Press to highlight System Lock 4 Press to enter System Lock menu 5 To enter this menu...

Page 22: ...Installation Country Language Please ensure that the aerial is connected to the connector labelled RF In on the rear of the TV Ensure that OK is highlighted in yellow and press OK on your remote If a...

Page 23: ...o the page indicated on screen for each colour 3 To exit Teletext press TEXT twice at any time Other buttons SIZE this increases or decreases the size of the text on screen INDEX some pages are more t...

Page 24: ...at of the television move the slider 5 Left click your mouse on Advance Advance Settings and left click on Monitor 6 Left click on the drop down for Screen refresh rate and select 60 Hertz 7 Click on...

Page 25: ...ENU to enter menu 2 Press to select PC settings 3 Press to select Clock 4 Then press or to increase or decrease the clock 5 Press EXIT to exit Horizontal Position Changes the horizontal position of th...

Page 26: ...ght NTSC PAL or AUTO 5 Press OK to confirm 6 Press DVD SETUP to exit Adjusting Picture Format This lets you select the format of the picture that is being shown between 16 9 4 3 LetterBox and 4 3 1 Pr...

Page 27: ...ifference between the maximum and minimum volume 1 Press DVD SETUP to enter menu 2 Press twice to select Digital Set Up 3 Press to select Dynamic Range 4 Press to enter menu 5 Press or to increase or...

Page 28: ...OTE CONTROL BSKYB OR UNIVERSAL REMOTE CONTROL You may wish to use your Sky Digital or a universal remote control to operate some of the functions of this TV For this you require a code that needs to b...

Page 29: ...e should be set to SCART Option 2 Connecting via HDMI cable If you are supplied with a HDMI cable is the easiest option A HDMI cable can output both video and audio and enables you to enjoy digital qu...

Page 30: ...lent Freeview coverage you may be able to use a loft type aerial but it is highly likely that you will also need to connect a booster between the back of the TV and the TV aerial wall socket Unfortuna...

Page 31: ...A m h o 5 7 F R Video 1 x SCART 1 x S Video 1 x Component YPbPr 1080p Sound 1 x 3 5mm jack for PC audio input 1 x 3 5mm jack shared for S Video YPbPr component audio input 80p 0 1 o t p u 1 I M D H 3...

Page 32: ...software codes to operate both your Sky Box as well as this TV these are available to order from the helpline or web site Our Sky Sky remote controls operate your Sky or Sky box in exactly the same w...

Page 33: ......

Page 34: ......

Page 35: ......

Page 36: ...X21 MAN 0004 ver 1 0...

Reviews: