background image

19

CONNECTING TO A PC - WINDOWS XP 

IMPORTANT— Before connecting to 
a PC you must ensure that the settings 
of the PCs output are correct for the new 
LCD Monitor.

You need to do the following with your 
old monitor connected

1) Switch on your PC
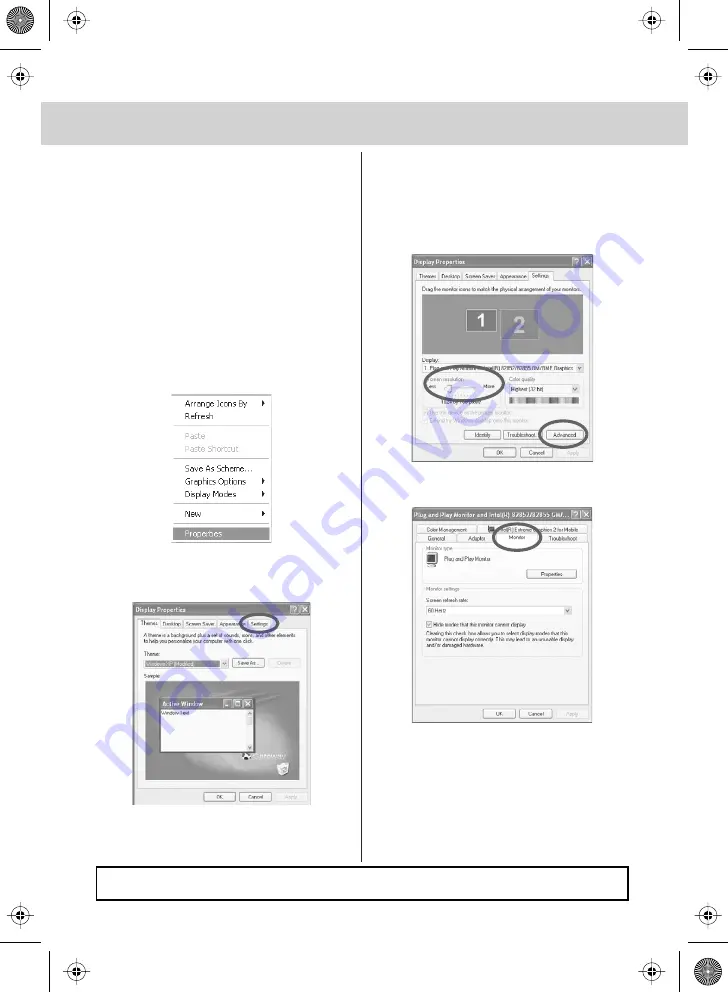
2) When finished booting up, right click 
    your mouse anywhere on the screen, 
    the below will appear

3) left click your mouse on Properties, 
this screen will appear

4) Left mouse click on Settings, this screen will 
    appear. Check the Screen Resolution is set 
    to 1024 by 768 pixel. You can adjust the resolution 
    by moving the slider on screen.

5) Left mouse click on Advance, this screen will 
    appear, click on tab called ‘Monitor’

6) Left click on the drop down for Screen refresh rate 
    and select 60 Hertz.
7) Finally click Apply, then click Yes and the settings 
    will be saved.
8) Turn off your PC.
9) Connect up your LCD TV to your PC and switch on.
10) Switch on your PC, Windows will automatically 
      Install the LCD TV.

For Windows Vista operating system the process is very similar to the above. 

If you require additional support please contact the helpline.

Summary of Contents for L19/7TCD

Page 1: ...19 LCD TV Model L19 7TCD USER GUIDE...

Page 2: ......

Page 3: ...ng a dry or slightly damp cloth You should not use an alcohol based cleaner Safety For your safety this appliance is fitted with a fused moulded 3 pin mains plug Should the fuse need to be replaced en...

Page 4: ...ty or retailer for recycling advice Examples of images that you need to watch out for are as follows this is not an all inclusive list TV Channel Logos e g Shopping channel logos and pricing displays...

Page 5: ...ed channels 15 Manual tuning 15 Changing channel position 16 Changing country settings 16 Auto search 16 TV MENU OPERATION CONTINUED GENERAL SETTINGS 17 Adjusting Blue Screen 17 Noise Reduction 17 Adj...

Page 6: ...AA batteries 1x AC mains lead 1x Power Adapter Please save your packaging as you will need this in the event of warranty service repair or support We are unable to carry out warranty service if you a...

Page 7: ...he channels services may be available in your region Over the coming months as coverage increases more services and channels may become available Every few months follow point 5 to re scan for new cha...

Page 8: ...fer to the Manual 4 Yes should be highlighted Press OK The TV channels will now tune in After tuning is complete the below screen will appear You may wish to change the order of the channels 5 Press R...

Page 9: ...BPAGE press to subpage again to cancel INDEX go to index Colour buttons short cuts follow the coloured links in the text load eject DVD disc play pause DVD program stop DVD program DVD fast forward DV...

Page 10: ...NU To display the main menu on the screen or return to the screen from a menu screen PROG FREEVIEW program up down LANGUAGE To select FREEVIEW audio language TV FORMAT To change the aspect ratio of th...

Page 11: ...C The following will appear 2 Press or to select the input you require 3 Press OK Connecting HD Ready Devices There are two options for HD 1 By connecting via HDMI cable not included this provides bot...

Page 12: ...ss DVB MENU twice to exit Create Edit Favourite List You may wish to create a favourite list so you can easily access the channels you enjoy 1 Press DVB MENU 2 Press to select favourite list 3 Press O...

Page 13: ...gs see page 17 Press twice Press OK Enter old pin code default is 888888 Enter new pin code Enter again Press OK to confirm Software update This mode is so a service engineer can perform software upda...

Page 14: ...highlighted 4 Press or to move through the days of the week In the top right hand corner will appear information about the program you have selected 5 Press DVB MENU to exit Electronic Program Guide...

Page 15: ...twice to select Contrast 3 Then press or to increase or decrease the Contrast 4 Press TV MENU twice to exit Adjusting Colour Increase or decrease the Red Green Blue which make up the picture 1 Press T...

Page 16: ...ice to exit Selecting Audio Preset Switch between different preset sound options THEATRE Provides live and full sound for movies MUSIC Emphasises music over voices VOICE Emphasises voices over other s...

Page 17: ...hannel that you do not wish to view you can add Skip to that channel When you press P or P it will skip past this channel 1 Press until Skip is highlighted and 2 Press to change to ON Automatic Freque...

Page 18: ...ountry you will need to change the region The TV s default is UK 1 Press TV MENU to enter menu 2 Press twice to go to Tuning menu 3 Press 3 times to select Country 4 Then press or to change between th...

Page 19: ...ting Input Source You may wish to change the input which is being used 1 Press TV MENU to enter menu 2 Press twice to go to General menu 3 Press 3 times to select Input Source 4 Then press or to chang...

Page 20: ...colour buttons these will take you to the page indicated at the foot of the screen for each colour c Press CH or CH these will take you to next page i e if you are on page 150 and you press PGDN the p...

Page 21: ...creen will appear Check the Screen Resolution is set to 1024 by 768 pixel You can adjust the resolution by moving the slider on screen 5 Left mouse click on Advance this screen will appear click on ta...

Page 22: ...ast Adjust the balance between black white 1 Press TV MENU to enter menu 2 Press twice to select contrast 3 Then press or to increase or decrease the contrast 4 Press TV MENU twice to exit Adjusting C...

Page 23: ...Press TV MENU twice to exit Vertical Position Changes the vertical position of the picture 1 Press TV MENU to enter menu 2 Press to select PC settings 3 Press 3 times to select V Position 4 Then press...

Page 24: ...ess or to highlight NTSC PAL or AUTO 5 Press OK to confirm 6 Press DVD SETUP to exit Adjusting Picture Format This lets you select the format of the picture that is being shown between 16 9 4 3 Letter...

Page 25: ...nfirm 8 Press DVD SETUP to exit DIGITAL SET UP Adjusting Dynamic Range This is the difference between the quietest and loudest sounds This setting works only with DVD discs recorded in Dolby digital F...

Page 26: ...o screws highlighted below 2 The stand will now come off Wall Mounting the TV 1 Remove the four screws highlighted below 2 The wall mount can now be easily attached to the mounting holes on the rear o...

Page 27: ...n use i e channel 6 7 Press 7 times to select Manual Search 8 Press to enter 9 Press to select Up 10 Press to start search 11 Once tuned in Press TV MENU 3 times to exit Manually tune until you locate...

Page 28: ...ow use the analogue TV until the signal becomes stronger in your area Go into the sound settings menu as shown earlier in the manual and increase the level of the bass and decrease the treble Check th...

Page 29: ...n reconnect If fault is found please make a note of the following information as you will need this when you contact the helpline Model Number Can be found on the rear of the TV Serial Number Can be f...

Page 30: ...Fine tuning 15 Frequently Asked Questions 26 Helpline and Warranty Information 27 Horizontal Position 21 Index 28 Input Source 17 Manual tuning TV 15 Name Rename Channels 15 Noise Reduction 17 Parenta...

Page 31: ......

Page 32: ...L19 MAN 0006...

Reviews: