


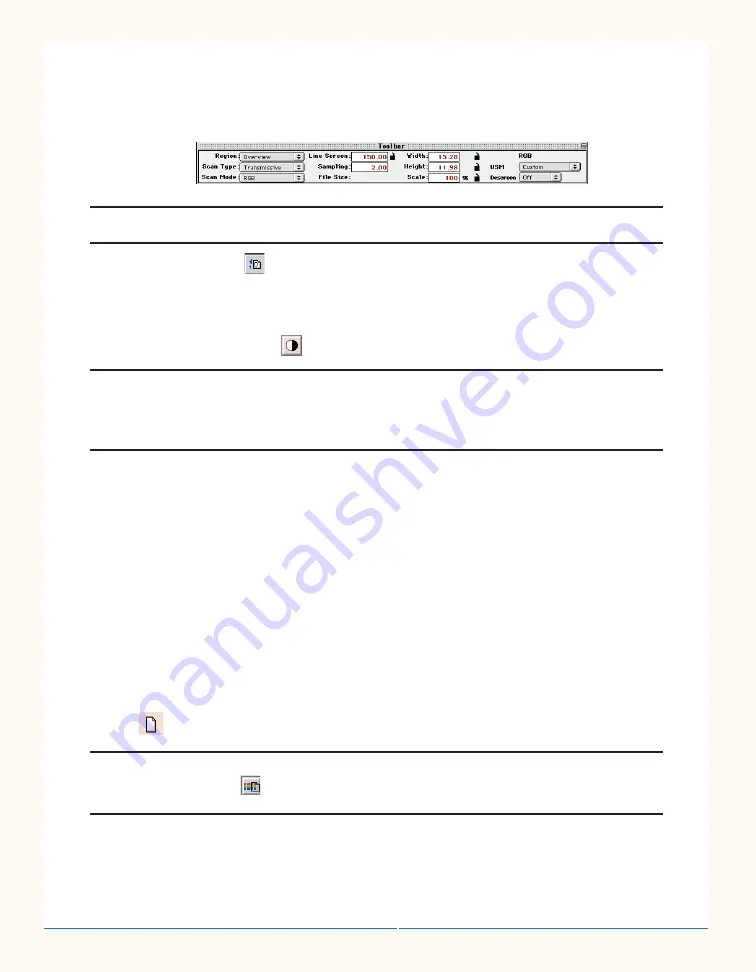
9. In the Tool Bar Window, when Inches is selected as default, the default values are 150 for Line
Screen, 2.00 for sampling, and 100% for scale. The Width and Height dimensions reflect the
final dimensions of the Crop Area. The File Size is dependent on the Crop Area, the Sampling
resolution, and the Scale value. These functions are further discussed in the manual.
When adjusting the Line Screen, hit enter or click on another setting inside the Toolbar window
for the change to take effect.
10. Choose Recall Default
from the Settings drop down menu or click the Recall Default
button in the Control Bar. When the Settings dialog box appears, check Color, Tone & Cast
Histogram, and UnSharp Masking. Click OK.
11. Click the Auto Range button
, the half-black, half-white circle in the Control Bar Window.
The Auto Range automatically sets the Highlight and Shadow points on the image, effectively
increasing the amount of contrast. The color engine will only evaluate the data inside of the
Crop Area. Sticky Densitometers are set for the Highlight and Shadow points, and can be
moved to a new location by holding the mouse button down over the densitometer and drag-
ging it to the new location. To do this, the Pointer from the Control Bar must be selected.
12. Now that the image has been Auto Ranged, it is ready for color correction. Select the Pointer
from the Control Bar Window, then the Color tab within the RGB Controls window. To open
the RGB Controls window, select Color from the Correction drop down menu. Click on the
area of the image that you wish to adjust. The Color Sliders will now change in color, and
allow you to accurately adjust the color of the image. This can be repeated invarious areas of
the image until you are satisfied with the result.
13. The last step to perform is adjustment of Unsharp Masking, or USM. The USM is applied by
selecting a pre-set value in the Tool Bar Window (Heavy, Medium or Light), or by selecting
Custom, and applying your own custom settings.
14. The image is ready for a Final Scan. Double check the parameters in your Tool Bar. In the
Queue Manager, select the Cropped Region you wish to scan, and click on the white page
symbol
in the lower right corner of the region. The image will be scanned to disk.
To Batch Scan all of the images at the same time, click on the third button to the right in the
Queue Manager Window
. This will cause all of the Cropped Regions to be scanned to disk
in the order that they appear in the Queue Manager.
15. To switch to the Press scanning package, select Press as your Separator from the
Preferences window, choose CMYK scan mode from the Toolbar. For more information on
how to scan using the Press mode, please refer to your PowerColor User’s Guide.
UMAX PowerColor Quick Start Guide
Performing a Scan
7
Summary of Contents for PowerColor
Page 1: ......