background image

USER MANUAL — 200-9011-ENG R1  

21

OPERATING INSTRUCTIONS

IMPORTANT

Read and understand all information covered in this manual before operating the equipment. Users shall be 

knowledgeable about inherent hazards related to use of electric beds.

Power up and modes of operation

The bed is intended to operate while being connected to AC power through a hospital grade wall outlet. The bed 

offers a battery powered mode as a convenience system to allow bed adjustments while in transit between rooms.

ATTENTION

•  On battery powered mode, speed of movement and battery depletion rate highly depend on the weight 

charge applied on the bed sleep surface. It is recommended to leave the bed connected at all time when in 

use. If not followed, the battery may deplete after a few cycles when a significant charge is applied on bed 

surface; this may lead to internal battery damage when fully depleted.

If the bed operates on batteries, the patient and caregiver controls for bed-motion will remain functional. A lockout 

on siderail motion control will be saved. 

Powered mode: 

Powered mode is activated if the bed is power supplied or if power returns after 

failure. All bed functionalities will operate if bed is power supplied. If battery level 

requires recharge, the battery pictogram with integrated LED will be flashing green.

Screen sleep mode: Activated after 1 minute of bed inactivity; screen brightness will 

decrease by half. After 2 minutes of bed inactivity, screen will turn off completely and 

get in sleep mode. If a screen saver is activated, the information will be displayed 

while in sleep mode. To get out of sleep mode, press on screen or on screen buttons 

to access the home screen.

!

Summary of Contents for ook "snow" all 200-0000

Page 1: ...2 0 1 8 0 7 2 0 0 9 0 1 1 E N G R 1 User manual 200 0000 ALL...

Page 2: ......

Page 3: ...2 0 1 8 0 7 2 0 0 9 0 1 1 E N G R 1 User manual 200 0000 ALL...

Page 4: ...rmission of the publisher except in the case of brief quotations embodied in critical reviews and certain other noncommercial uses permitted by copyright law For permission request write to the publis...

Page 5: ...power outlets and USB port optional 27 Communication port 28 Control on frame 28 Nightlights 28 Lateral bed extension 29 Head and foot ends siderails 30 Backrest section angle degree indicator 30 Posi...

Page 6: ...emovable patient control 6 functions 200 0151 68 PREVENTIVE MAINTENANCE 69 Preventive maintenance annual checklist 70 CLEANING 71 Cleaning 71 Disinfection 71 Mattress mattress extension and siderail p...

Page 7: ...rmal usage and maintenance is 10 years Product intended use The ook snow ALL model 200 0000 is designed for use in the following environments intensive and critical care bariatric care acute care outp...

Page 8: ...9 Drainage bag support 10 Siderail release handle 11 Patient siderail control 12 Footboard 13 Footboard control 14 Bumper 15 Frame control optional 16 Lateral bed extender handle 17 Patient restraint...

Page 9: ...1 31 7 12 7 76 2 cm 27 9 cm 80 5 cm 32 3 cm Patient sleep surface width length 35 47 80 84 84 88 88 9 cm 119 4 cm 203 2 cm 213 4 cm 213 4 cm 223 5 cm Under bed central zone clearance 5 12 7 cm Angulat...

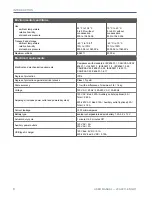
Page 10: ...CAN CSA C22 2 60601 1 UL60601 1 IEC60601 1 2 IEC60601 2 52 CAN CSA C22 2 60601 2 52 IEC60601 1 6 2010 CAN CSA C22 2 60601 1 6 11 Degree of protection IPX4 Degree of protection against electrical shock...

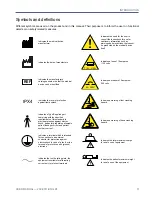
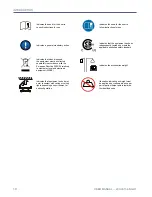
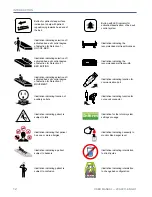
Page 11: ...s a breaker of 5 amperes 250 volts Indicates a terminal which is intended for connection to an external conductor for protection against electric shock in case of a fault or the terminal of protective...

Page 12: ...6 relatively to waste electrical and electronic equipment WEEE Indicates that the equipment has been independently tested and meets the applicable published safety standard Indicates the need for the...

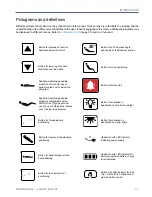
Page 13: ...on indicating possible activation of Backrest section AND OR the Thigh Section per use of one or both buttons located over or below the pictogram Illustration indicating possible activation of Hi Lo p...

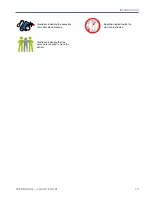
Page 14: ...ion indicating interdiction to change bed configuration Illustration indicating necessity to monitor blood sugar level Illustration indicating patient is subject to falls Illustration indicating selec...

Page 15: ...MANUAL 200 9011 ENG R1 13 Illustration indicating that two person are required to move the patient Illustration indicating the necessity to monitor blood pressure Illustration indicating that no visi...

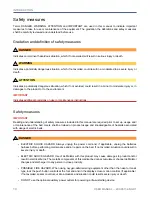
Page 16: ...g of safety measures included in this manual are required prior to set up usage and or maintenance of the bed Users shall be trained on product usage and knowledgeable of hazards associated with usage...

Page 17: ...ame If foot section requires to be actuated accessory will follow the foot section angle and will be tilted or moved away from patient Always ensure proper clearance under the bed prior to use hoists...

Page 18: ...utlet prior to move bed If situation is not avoided damages to bed and or to environment could occur Always ensure of power cord proper condition prior to plug it into power outlet Always ensure that...

Page 19: ...cal specifications like but not limited to power drawn leakage currents or electromagnetic compliance for electromedical systems IEC60601 1 2005 At least two person are recommended to move the bed whe...

Page 20: ......

Page 21: ...to reach a minimum battery charge In case of complete discharge bed may need a 24 hour plugging for a full recharge 7 On the footboard ensure that the green LED beside the power cord pictogram is ON T...

Page 22: ...essing the Cancel button Procedure 1 Bed is electrically powered up Ensure sleep surface is completely flat and put the bed elevation system at intended height of use Apply the brakes 2 From the displ...

Page 23: ...ery may deplete after a few cycles when a significant charge is applied on bed surface this may lead to internal battery damage when fully depleted If the bed operates on batteries the patient and car...

Page 24: ...rate 30 backrest positioning and vascular positioning bed exit control or scale system and display screen The battery charge level is accessible on the footboard control or on the optional back up con...

Page 25: ...electrical box at head end of the bed or through the nurse call system it indicates that the bed exit system has detected a movement from the patient or that the patient has pressed the nurse call but...

Page 26: ...ositioning when pedals at head and foot ends are in flat position 2 Press down pedal on required side for brake or steer Engage steer 1 To engage steer put pedal in fully lower position on the green a...

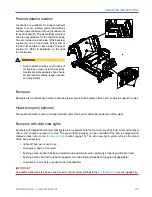
Page 27: ...to support IV poles Head bumpers optional Two optional bumpers can be installed at head end of the bed for additional protection of the walls Bumpers with side view lights Bumpers with integrated side...

Page 28: ...age shall be restricted to emergencies To avoid injuries or product damages ensure total clearance around product prior to usage ATTENTION Usage shall be limited to emergency situations only An over u...

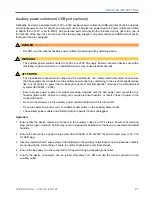
Page 29: ...leakage currents or electromagnetic compliance for electromedical systems IEC60601 1 2005 Ensure proper power supply and proper grounding reliability with the bed power cord connected to a hospital g...

Page 30: ...trols in case the bed footboard is removed lockouts of head or foot section motion lockouts of hi lo Trendelenburg reverseTrendelenburg bed exit system activation deactivation battery charge level Do...

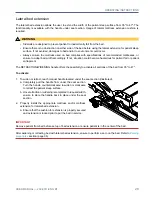
Page 31: ...l or patient entrapment The RETRACTION WIDENING handle offers the possibility to activate all sections of the bed from 35 to 47 To activate 1 To widen or retract reach manual handle located under the...

Page 32: ...Reading from 15o to 75o Positioning siderail Bed is equipped with 2 head siderails and of 2 foot siderails Each siderail operates with a release handle located at the bottom center Raise a foot or he...

Page 33: ...caused by patient fall ATTENTION Patient monitoring and patient authorized bed functionalities are the responsibility of the facility IMPORTANT A click confirms a patient mobilization helper in locke...

Page 34: ...ons offer motion of thigh and foot sections Motion can be simultaneous To activate 1 Press and hold button 2 Release button when the required position is reached Patient control with optional features...

Page 35: ...range from 11 to 30 depending on caster option To activate 1 Press and hold button 2 Release button when the required position is reached Caregiver control with optional features In addition of standa...

Page 36: ...l 2 functions page 67 for plugging instructions IMPORTANT Refer to the pictograms and definitions section page 11 to support identification The control lock from the footboard control will lock the fu...

Page 37: ...amages Pictograms inform the user of positioning possibilities and features IMPORTANT Refer to the pictograms and definitions section page 11 to support identification Power up and battery charge leve...

Page 38: ...ffer one touch positioning for a 16o Trendelenburg position and 16o reverse Trendelenburg position vascular foot position selection of audio signal level selection of audio signal type selection of be...

Page 39: ...ol is activated If the patient is not in bed or Auto mode is not set the menu display will turn flashing orange in alarm If bed is equipped of bumpers with side view lights they will turn ON solid gre...

Page 40: ...isarm the Auto Arm detection option 3 When selecting the Auto Arm option AUTO will appear on the upper right corner of the Arm Detection button on the screen 4 When Auto Arm is activated and patient i...

Page 41: ...e to 5 min to reset the time to a total of 5 minutes Close to keep the remaining time the same and to return to the Home Screen When Auto Arm is activated and the pause finishes the system will start...

Page 42: ...condition Width monitoring to set bed width configuration extension width alarm settings and an alarm to the nurse call station Close to exit menu IMPORTANT A simplified interface displaying less opt...

Page 43: ...the bed exit detection when patient ingresses in bed Auto arm button turns green when activated and AUTO displays on Arm Disarm button in Home screen Arm Disarm Select to arm or disarm the bed exit c...

Page 44: ...ent turn reminder notification A delay of 2 hours can be activated An audible signal with configurable tones and volume levels indicates when time has ended Press on Patient turned once patient is pos...

Page 45: ...after two minutes of inactivity Select Start to display the screen saver with selected settings Activate Disable to activate or disable the display on screen saver or to disable the feature associate...

Page 46: ...set up YES will take you to Inform menu and NO will bring back to the configuration options 3 When setting up the siderails configuration the options chosen will appear on the bed image on the screen...

Page 47: ...elect to select a menu Select Maintenance to access the errors log load cell values units selection calibration factory settings software version password settings and interface settings If PIN protec...

Page 48: ...r Sideview lights brightness and select one of three levels of intensity or set to OFF Close to exit lights configuration menu and return to preference menu Date time screen By default the Date and Ho...

Page 49: ...rn to the Preference screen Navigate and select Color to get to the Identification color screen Select one color to give a colored label to the display screen or select None Select Close to save or no...

Page 50: ...operate if bed is on battery mode or if footboard is removed Ensure that the proper settings according to the patient s condition are in place If activated in Factory settings menu total lockout will...

Page 51: ...l appear answer YES to change the auto contour settings answer NO to cancel and return to Preference menu Motion interrupt optional The motion interrupt system offers the possibility to interrupt a do...

Page 52: ...inute the bed is still not at the right selected preset width the notification will return Close to return to Preference screen Edit width screen Select DOWN arrow to navigate through the different fe...

Page 53: ...ncel command If weight on bed is more than 489 8 kg an overload mention will be displayed instead of the weight when Weigh button is selected When annual calibration is required the weight is displaye...

Page 54: ...last 4 zeros are recorded with the date on which they were performed and can be selected Select UP DOWN arrows to navigate through the four displayed zeros Apply Zero to select and apply one of the 4...

Page 55: ...taken when using compatible accessories in foot section accessory sockets Foot section accessory sockets are attached to the moving part of the frame If foot section requires to be actuated accessory...

Page 56: ...ails controls Refer to the Standard configuration in the Headboard and footboard section page 32 2 Completely raise the head and foot end siderails 3 Slip the siderail pad over the head extremity of t...

Page 57: ...pad over the head extremity of the siderail closest to the bed s head Ensure the clear window is on the outside of the bed 4 Stretch the pad and slip it over the other extremity of the siderail towar...

Page 58: ...g bed or if lighting or ceiling is low IV pole will move with bed when elevation system activated Ensure proper clearance Installation 1 Remove screw from bottom of IV pole 2 Insert the fixed IV pole...

Page 59: ...vated Ensure proper clearance Installation 1 Remove screw from bottom of IV pole and from the IV pole storage support 2 Insert the folding IV pole in one of both corner bumpers of head end and insert...

Page 60: ...bed or if lighting or ceiling is low IV pole will move with bed when elevation system activated Ensure proper clearance Installation 1 Remove screw from bottom of IV pole 2 Insert the fixed IV pole in...

Page 61: ...31 if transporting bed or if lighting or ceiling is low IV pole will move with bed when elevation system activated Ensure proper clearance Installation 1 Remove screw from bottom of IV pole 2 Insert...

Page 62: ...recommended in order to prevent potential dammages to the walls Installation 1 Remove screw from bottom of IV pole and from the IV pole storage support 2 Insert the folding IV pole in the 1 left socke...

Page 63: ...s recommended in order to prevent potential dammages to the walls Installation 1 Remove screw from bottom of IV pole and from the IV pole storage support 2 Insert the folding IV pole in 1 right socket...

Page 64: ...is intended to be installed on the footboard to support pumps It has a maximum safe load capacity of 70 lb 31 kg ATTENTION Remove accessory when not in use Installation and removal 1 Insert or remove...

Page 65: ...talled at the bed head end it has a maximum safe load capacity of 35 lb 16 kg Installation and operation 1 If applicable remove the retaining pin from bottom of support bar 2 Insert the support bar in...

Page 66: ...d is increased Ensure to leave 9 22 9 cm between head end of bed and the wall to protect the wall Installation and operation on corner bumpers 1 If applicable remove retaining pin from bottom of suppo...

Page 67: ...r ceiling lights Installation 1 Insert the lower section into both 1 1 2 sockets located at head end The plunger on the lower section of the patient helper must be on the outside of the bed 2 Ensure i...

Page 68: ...NT The urinal installed on the support could come in contact with the ground if the bed is at minimum height and siderails are completely lowered If use of the scale is required ensure that the bottle...

Page 69: ...MPORTANT Refer to the pictograms and definitions section page 11 to support identification The control lock from the footboard control will lock the functions of the patient control To plug unplug pat...

Page 70: ...e 11 to support identification Do not use sharp or small pointed objects on membranes to avoid permanent damages WARNING Always ensure that patient is capable of proper usage of all functionalities of...

Page 71: ...hall perform preventive maintenance and servicing on this equipment If not avoided situation could result in electrical or electronic misconnection and lead to shock or fire hazards IMPORTANT Batterie...

Page 72: ...l Power cord Nightlight Actuators Battery Bumpers if applicable Mattress retainers Siderails mechanism Siderails control membranes and LED lights if applicable Headboard and footboard Bed extender if...

Page 73: ...aces with a soft cloth moistened with warm soapy water Avoid build up and over saturation of water or any cleaning solution Ensure that cleaning solution does not stay on surface longer than manufactu...

Page 74: ......
Page 75: ...continued products are not subject to return Limited warranty Umano Medical warrants to the original purchaser that the products shall be free of structural defects in material and workmanship for a d...

Page 76: ...Drainage bag support 6 24 F Footboard 6 28 35 Footboard control 6 22 35 36 Frame control 6 H Headboard 6 35 I Integrated pump holder 35 IV pole 5 56 57 58 59 60 61 M Mattress extension 71 N Nightligh...

Page 77: ...Umano Medical Inc 230 boulevard Nilus Leclerc L Islet QC G0R 2C0 CANADA 418 247 3986 844 409 4030 u m a n o m e d i c a l c o m...

Reviews: