background image

32 

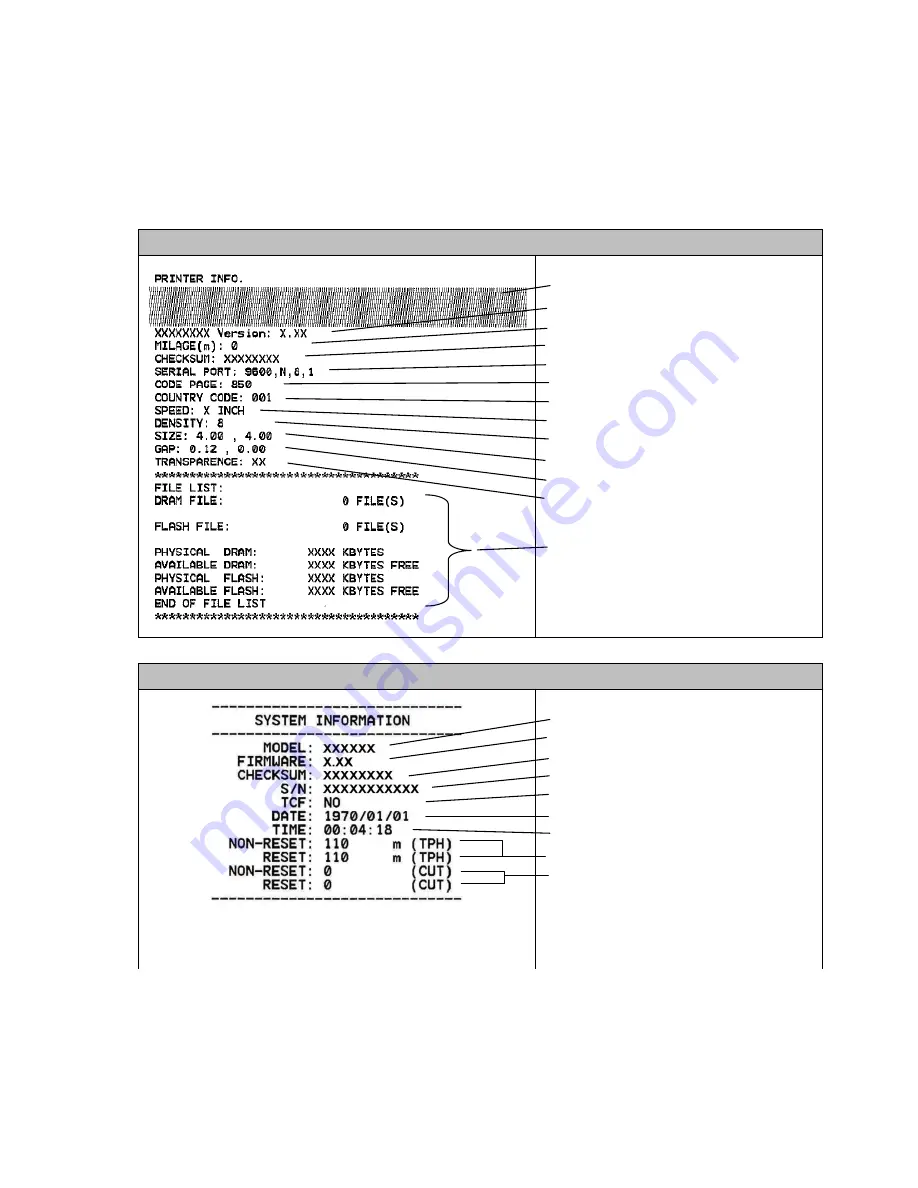
Self-test


Printer will print the printer configuration after 

gap/black mark sensor calibration. 

Self-test printout can be used to check if there is any dot damage on the heater 

element, printer configurations and available memory space. 

Self-test printout


Print head check pattern 
Model name and F/W version 
Printed mileage (meter) 
Firmware checksum 
Serial port configuration 
Code page 
Country code 
Print speed (inch/sec) 
Print darkness 
Label size (inch) 
Gap distance (inch) 
Gap/black mark sensor sensitivity 

Numbers of download files 
Total & available memory space


Self-test printout (with printer firmware V7.0 and later version)


Model name 
F/W version 
Firmware checksum 
Printer S/N 

UT

 configuration file 

System date 
System time 
Printed mileage (meter) 
Cutting counter 

Summary of Contents for UltraLabel PRO

Page 1: ...USER S MANUAL UltraLabel PRO Thermal Transfer and Direct Thermal Printer...

Page 2: ...22 3 8 1 Start the Diagnostic Tool 22 3 8 2 Printer Function Calibrate sensor Ethernet setup RTC setup 23 3 9 Setting Ethernet by Diagnostic Utility Option 24 3 9 1 Using USB interface to setup Ethern...

Page 3: ...ii 5 1 Cleaning 38 6 Troubleshooting 40 6 1 LED Status 40 6 2 Print Quality 41 7 LED and Button Operation 43 7 1 LED 43 7 2 Button Operation 43...

Page 4: ...Class B ANSI C63 4 2003 Canadian ICES 003 T V Safety EN60950 2000 Wichtige Sicherheits Hinweise 1 Bitte lesen Sie diese Hinweis sorgf ltig durch 2 Heben Sie diese Anleitung f r den sp teren Gebrauch a...

Page 5: ...FINGER AND OTHER BODY PARTS AWAY 2 THE MAIN BOARD INCLUDES REAL TIME CLOCK FEATURE HAS LITHIUM BATTERY CR2032 INSTALLED RISK OF EXPLOSION IF BATTERY IS REPLACED BY AN INCORRECT TYPE 3 DISPOSE OF USED...

Page 6: ...ype font capability You will enjoy high throughput for printing labels with this printer 2 Getting Started 2 1 Unpacking and Inspection This printer has been specially packaged to withstand damage dur...

Page 7: ...the linerless cutter all regular heavy duty care label cutters DO NOT cut on media with glue Main board integrated with internal Ethernet Internal Ethernet print server module User option KP 200 KU 00...

Page 8: ...efer to the product specification for the interfaces availability Top Cover Open Lever LED Indicator Feed Button Printer Top Cover Ribbon Access Cover Clear Window 1 2 3 4 5 6 1 USB Interface 2 Centro...

Page 9: ...tronics or USB cable 4 Plug the power cord into the power supply connector at the rear of the printer and then plug the power cord into a properly grounded receptacle Fig 3 Attach power supply to prin...

Page 10: ...sh down on the ribbon access window to unlatch and open the cover 2 Place a paper core onto the ribbon rewind spindle 3 Mount the ribbon rewind paper core on the front hubs 4 Install a ribbon on the r...

Page 11: ...6 Fig 5 Ribbon installation II Rear Hub Ribbon Lead Tape Ribbon supply spindle Ribbon Rewind Spindle with Paper Core...

Page 12: ...top cover A top cover support at the rear of the printer will hold the printer top cover open Fig 7 Pull the lever to open the cover 3 Place a roll of paper onto the center of the paper roll mount 4 F...

Page 13: ...e hands are not placed between printer top cover and lower cover when close the top cover 1 Do not free fall the top cover 2 Failure to securely close and lock the cover will result in poor print qual...

Page 14: ...inter top cover Install a roll of paper on the external paper roll mount 3 Feed the paper to the external paper feed opening through the rear paper guide Fig 10 External roll mount label installation...

Page 15: ...10 then push down the top cover gently Fig 11 External roll mount label installation II Paper Guide Platen Rear Paper Guide Top Cover Support...

Page 16: ...down and push backward the top cover support then push backward the top cover 3 Use a screwdriver to screw off 6 screws on the lower inner cover Fig 13 Remove 6 screws from lower inner cover 4 Upside...

Page 17: ...ble through the bezel Connect the peel off panel cable to the 5 pin socket on printer PCB Fig 14 Connect peel off sensor cable to main board Fig 15 Peel off sensor cable installation 7 Insert the peel...

Page 18: ...ft up the peel off panel to the lower cover to close it 10 Use a screwdriver to screw down whole screws on the lower inner cover and the lower cover 11 Close the top cover by arranging the top cover s...

Page 19: ...p cover support will hold the printer top cover Fig 18 Open the top cover 3 Install the paper roll on the paper roll mount 4 Open the peel off panel by pulling it out Fig 19 Open the peel off panel 5...

Page 20: ...beneath the roller 8 Push the peel off panel back to the printer 9 Close the top cover by lifting up the top cover support and close the top cover slowly Note 1 Pull the label outward tightly after cl...

Page 21: ...lever to open the cover 3 Open the top cover and hold it and push down and push backward the top cover support then push backward the top cover 4 Use a screwdriver to screw off 6 screws on the lower i...

Page 22: ...o hold the lower cover and index fingers to lift up the top cover open levers to separate the lower inner cover and the lower cover 8 Arrange the cable through the bezel Connect the cutter module cabl...

Page 23: ...ion 11 Use a screwdriver to screw whole screws on the lower inner cover and the lower cover 12 Close the top cover by arranging the top cover support back to the flute and push it forward then close t...

Page 24: ...the paper guide and pass over the platen 5 Lead the paper through the cutter paper opening 6 Adjust the paper guide by removing left or right to fit the paper width Fig 27 Label installation in cutte...

Page 25: ...on 1 you must lift the cover higher than the stopping point at position 1 and gently lower the cover to stop position 1 DO NOT free fall the top cover 3 Fully open the top cover and gently lower it to...

Page 26: ...p cover 5 Do not force the cover If you are not sure if top cover is fixed at stop position please do not push top cover to close it or the top cover will be damaged Please open the top cover to the u...

Page 27: ...this convenient tool you can explore the printer status and settings and troubleshoot the printer Note This utility works with printer firmware V6 00 and later versions 3 8 1 Start the Diagnostic Tool...

Page 28: ...the IP address subnet mask gateway for the on board Ethernet Please refer to next section RTC Time Synchronize printer Real Time Clock with PC Print Test Page Print a test page Reset Printer Reboot pr...

Page 29: ...ce 1 Connect the USB cable between the computer and the printer 2 Turn on the printer power 3 Start the Diagnostic Utility by double clicking on the icon Note This utility works with printer firmware...

Page 30: ...the icon Note This utility works with printer firmware V6 00 and later versions 4 Select COM as interface then click on the Setup button to setup the serial port baud rate parity check data bits stop...

Page 31: ...versions 4 Select Ethernet as the interface then click on the Setup button to setup the IP address subnet mask and gateway for the on board Ethernet 5 Click the Discover Device button to explore the p...

Page 32: ...printer will reset to take effect the settings 8 Click Exit button to exit the Ethernet interface setup and go back to Diagnostic Tool main screen Factory Default button This function will reset the...

Page 33: ...cification SD card spec SD card capacity Approved SD card manufacturer V1 0 V1 1 128 MB SanDisk Transcend V1 0 V1 1 256 MB SanDisk Transcend Panasonic V1 0 V1 1 512 MB SanDisk Transcend Panasonic V1 0...

Page 34: ...Panasonic V1 0 V1 1 miniSD 256 MB Transcend Panasonic V1 0 V1 1 miniSD 512 MB Transcend Panasonic V1 0 V1 1 miniSD 1 GB Transcend Panasonic V2 0 SDHC CLASS 4 miniSD 4 GB Transcend V2 0 SDHC CLASS 6 m...

Page 35: ...sensitivity should be calibrated at the following conditions 1 A brand new printer 2 Change label stock 3 Printer initialization Please follow the steps below to calibrate the ribbon and gap black ma...

Page 36: ...button then turn on the power switch 3 Release the button when LED becomes amber and blinking Any amber will do during the 5 blinks The LED color will be changed as following order Amber red 5 blinks...

Page 37: ...rn Model name and F W version Printed mileage meter Firmware checksum Serial port configuration Code page Country code Print speed inch sec Print darkness Label size inch Gap distance inch Gap black m...

Page 38: ...ode ZPL setting information Print darkness Print speed inch sec Label size Control prefix Format prefix Delimiter prefix Printer power up motion Printer head close motion Note ZPL is emulating for Zeb...

Page 39: ...g The left side characters are received from your system and right side data are the corresponding hexadecimal value of the characters It allows users or engineers to verify and debug the program Fig...

Page 40: ...Amber red 5 blinks amber 5 blinks green 5 blinks green amber 5 blinks red amber 5 blinks solid green Printer configuration will be restore to defaults as below after initialization Parameter Default s...

Page 41: ...Please follow the steps as below 1 Turn off the power switch 2 Hold on the button then turn on the power switch 3 Release the button when LED turns red amber after 5 green amber blinks Any red amber w...

Page 42: ...on power 3 Release the FEED button when LED becomes solid green The LED color will be changed as following Amber red 5 blinks amber 5 blinks green 5 blinks green amber 5 blinks red amber 5 blinks soli...

Page 43: ...ng the print head 2 Allow the print head to cool for a minimum of one minute 3 Use a cotton swab Head cleaner pen and 100 ethanol to clean the print head surface Clean the print head when changing a n...

Page 44: ...by hand If you touch it careless please use ethanol to clean it Please use 100 Ethenol DO NOT use medical alcohol which may damage the printer head Regularly clean the print head and supply sensors on...

Page 45: ...is lit on power supply If it is not lit on power supply is broken Check both power connections from the power cord to the power supply and from the power supply to the printer power jack if they are c...

Page 46: ...thernet IP subnet mask gateway is not configured properly Configure the IP subnet mask and gateway No print on the label Label or ribbon loaded not correctly Follow the instructions in loading the med...

Page 47: ...ation Check if dust or adhesives are accumulated on the print head Clean the print head Check if print density is set properly Adjust the print density and print speed Check print head test pattern if...

Page 48: ...t feeds the label to the beginning of the next label Pause Press the feed button during printing The printing job is suspended Ribbon Sensor and Gap Black Mark Sensor Calibration 1 Turn off the power...

Page 49: ...ease refer to TSPL2 programming manual Printer Initialization 1 Turn off the power switch 2 Hold on the button then turn on the power switch 3 Release the button when LED turns green after 5 amber bli...

Page 50: ...ill be changed as following Amber red 5 blinks amber 5 blinks green 5 blinks green amber 5 blinks red amber 5 blinks solid green Skip AUTO BAS 1 Turn off printer power 2 Press the FEED button and then...

Page 51: ...NOTES...

Page 52: ...47 9770 SW Wilsonville Rd Wilsonville OR 97070 503 427 2880 www cleanrootape com 11 2013...

Reviews: