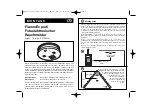
1. PRODUCT FEATURES
•
Sealed in ten year battery.
•
Bespoke software maximises detection ability, false alarm rejection and
Alarm Silence operation.
•
Power automatically switched on as alarm is installed onto its mounting
plate and switched off when it is removed.
•
Red LED flashes approximately every minute confirming the alarm is
receiving power and ready to detect fire conditions.
•
End of life low battery warning beeps once every minute.
•
Low battery warning silence allows you to silence the warning at night
and replace the alarm during the following day.
•
Extra large test button for ease of use to test sensitivity, circuitry, battery
and alarm sounder.
•
Loud 85 dB piezo-electric sounder automatically resets when hazardous
situation has passed.
•
Alarm Silence feature allows you to silence nuisance alarms by pressing
the test button, ideal in non-emergency situations. The red LED
flashes every 2-3 seconds while the alarm is in the silenced mode and
automatically resets in approximately ten minutes.
•
Easy installation: Fixing screw kit supplied and there is no need to fit the
batteries!
2. CHOICE AND LOCATION OF ALARMS
NOTE:
When installing heat alarms in living and working accommodation
they should always be interlinked to smoke alarms and should not be used in
escape routes from the building.
Heat alarms are most suitable for kitchens, boiler rooms workshops and
garages where dirt and dust contaminate smoke alarms causing nuisance
alarms and in some cases a failure to detect a fire early.
Photoelectric (Optical) Smoke Alarms are best for sensing smouldering fires
and are therefore most suitable for rooms containing soft furnishings, carpets
bedding and clothes, such as hallways, living rooms and bedrooms.
Ionisation Type Smoke Alarms are best at detecting fast flaming fires such
as loose burning paper; however their operation can be significantly delayed
the farther they are from the source of the fire and smoke, according to
recommendations in BS5839 pt 6.
Unless there is significant risk of fast clean burning fires in a particular
area, photoelectric alarms are recommended by that standard for living
accommodation where most fires are started by electrical equipment and
smouldering material such as soft furnishings, clothing, curtains and carpets.
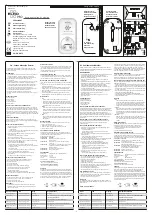
For minimum protection install at least one smoke alarm in the escape route
from each floor of your home and within 3 metres of all bedroom doors, see
diagrams below.
Recommended siting of smoke and heat alarms in:
SINGLE STOREY HOME WITH ONE
SLEEPING AREA
SINGLE STOREY HOME WITH TWO
SLEEPING AREAS
MULTIPLE STOREY HOME WITH
MULTIPLE SLEEPING AREAS
Recommended position of alarms in a room, corridor or escape route:
What to Do if the Alarms Sound
Alarms sounds are as follows:
Full alarm indicating
smoke and fire
Repeating series of 3 beeps every 4
seconds with flashing lights
Low Battery
Single beep every minute
Test button jammed
One beep every 11 seconds
Fault
Double beep every minute
WARNING:
MANY CHILDREN MAY NOT RESPOND TO THE ALARM TONES.
THEREFORE CHILDREN MUST NOT BE LEFT ON THEIR OWN BUT MUST BE
SUPERVISED AND IN THE EVENT OF A FIRE BE BROUGHT TO SAFETY BY
AN ADULT.
•
Ensure everyone leaves the building as soon as possible.
•
Do not run.
•
Do not stop to collect belongings.
•
If it is safe to do so, close all windows and doors as you escape to prevent
the spread of fire.
•
Smoke is the main cause of death from fire. If trapped inside the building,
cover your mouth, conserve breath and crawl to safety.
Do not silence a fire alarm until you know the cause of the alarm and when all
occupants are safely outside the building. The light on the test button of the
alarm that has set the system off will be flashing Red once every second. The
system can only be silenced from this alarm. The lights on the other alarms will be
flashing once every minute.
The life of the alarm can be significantly reduced by adverse environments,
incorrect location and a failure to regularly clean and maintain it according to the
following instructions. Incorrect location and a lack of reasonable care may also
cause it to malfunction and will invalidate the warranty.
•
Do not install heat alarms on walls.
•
Do not locate near fans or extractors; these can pull smoke and heat away
from the alarm.
•
Do not install in bathrooms and showers.
•
Do not install in rooms where the normal temperature may exceed 40°C or
fall below 0°C; these may cause nuisance alarms.
•
Do not install in the peak of an A frame or sloping ceiling; this may delay
heat reaching it due to still air.
•
Do not install less than 300mm from walls and beams due to still air.
•
Do not install less than 300mm from light fittings.
•
Do not install heat alarms in sleeping areas such as bedrooms, nurseries,
playrooms or areas where the elderly and disabled may spend long periods
of time.
•
Do not install on poorly insulated ceilings where cold air boundary layers
may delay heat from reaching the alarm.
•
Do not install near objects that may delay or prevent heat from reaching the
alarm.
•
Avoid installing within 1500mm of fluorescent light fittings that could cause
nuisance alarms.
•
Do not paint the alarm.
•
The location of alarms must be in accordance with the applicable Building
Regulations. Further help and guidance can also be found in BS5839 Part 6.
WARNING:
Do not store alarms in temperatures below 5 degrees and above
30 degrees, and in low humidity; this may cause beeping and nuisance alarms
when first installed. These will clear after a short time when the alarm has become
acclimatised. Extended periods under these conditions will reduce the life of the
alarms and invalidate the warranty.
Further Information on Alarm Location:
•
At least one SMOKE alarm should be installed in the escape route from all
floors of the building.
•
The detection element of the heat alarm should be between 25mm and
150mm below the ceiling.
•
Heat alarms should be mounted at least 300mm from any wall or light fitting.
•
Heat alarms should NOT be mounted on walls.
•
Do not use heat alarms in escape routes.
•
No heat alarm should be further than 5.3 metres from other heat or smoke
alarms.
•
To give the earliest warning of a developing fire all smoke and heat alarms in
your home should be interlinked. This model does not support interlinking.
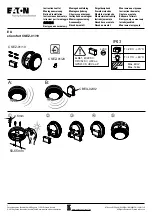
3. INSTALLATION PROCEDURE
Separate the alarm from the mounting
plate. The product is shipped with the
batteries switched off and the mounting
plate loose. (Attaching the baseplate
and rotating it turns the alarm on.) If it
has been activated prior to installation,
depress the security tag shown below
and twist the alarm anti-clockwise while
holding the mounting plate.
•
Using the previous section, select
the desired position for the alarm.
•
Screw the mounting plate to the
ceiling using the fixings provided.
•
Line up the arrow on the mounting plate with
the arrow on the back of the alarm and bring
the two together as shown on the right.
•
Twist the alarm clockwise to lock into position
and turn the alarm on.
Press and release the test button to test the alarm.
It should sound three times with a flashing red LED
then stop. After the test make sure the red LED
flashes about once every minute. Test the alarm
once a week to ensure correct operation.
WARNING:
The electronic test button provides a
full test of the alarm’s functionality. Do not try to test
it using heat or a naked flame; this will damage the
alarm and invalidate the warranty
4. USER INFORMATION
Protect your Home Against Fire
Contact your local Fire Brigade for a home safety check, this information is free
and will identify potential fire hazards in and around your home.
Make sure all occupants of the home know what a fire alarm sounds like. Prove
and practise a fire escape plan and arrange a suitable and safe assembly point.