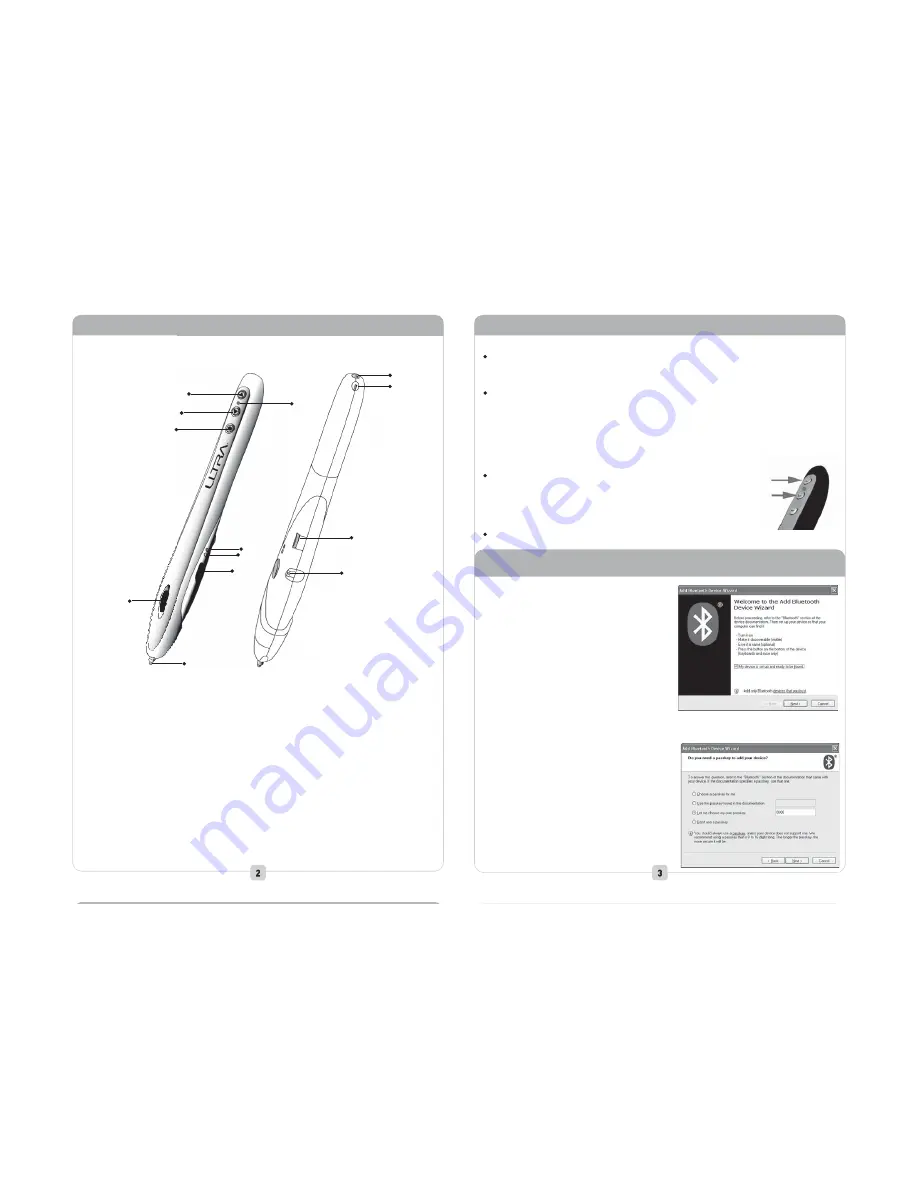
IV. Features:
①
②
③
④
⑤
⑥
⑦
⑧
⑨
⑬
⑫
⑪
⑩
①
Page Up Button
②
Charging & Laser Pointer Indicators
③
Page Down Button
④
Laser Pointer Button
⑤
Low Battery Indicator
⑥
Motion Indicator
⑦
Right Mouse Button
⑧
Scroll Wheel
⑨
Left Mouse Button (Pen Tip)
⑩
Charger Jack
⑪
Laser Pointer
⑫
DPI Switch
⑬
Power Switch
Pairing varies depending on the type of Bluetooth® connection used. Ensure
first that your Bluetooth® computer supports the HID function before paring.
For computers that are already paired with the eXo, the paring process is not
necessary after restarting your computer. Reconnection is automatically made
when the eXo is powered and the computer is ready to receive a Bluetooth®
signal. Also, when the eXo is powered off, is out of range, or has radio
interference, the device can loose its connection to the PC. Reconnection is
made by turning the eXo OFF then back ON.
In order to pair your device, turn the eXo OFF then back ON
and then press both
①
③
simultaneously for 5 seconds .
To indicate the device is in pairing mode, the green and red
LEDs will flash.
If you are not able to enter pairing mode, repeat this procedure.
VI. Paring the eXo with a PC that Already has a Bluetooth® Transmitter:
1. Click on the Bluetooth® icon in the
Control Panel window.
2. Click on the DEVICE Tab. If the eXo is
displayed, registration has already
been completed and no further steps are
necessary. If the eXo is not listed,
click on Add….
3. Ensure the eXo is in paring mode by
follow the steps under section V. Paring
4. Next, check the box for “My device is set
up and ready to be found.” and click Next.
5. If the eXo is not found, confirm if it is in the pairing mode by ensuring the device
is in paring mode and press the Search Again button.
6. You will then be asked for a passkey to
register the device.
Click on the 3rd Pass Key option
“Let me choose my own pair key:”
and input the following code: 0000.
Click on Next to continue.
V. Paring :
③
①


