
4
5
Contents of each of the kits is below:
TimeBase Only
Mounting Kit PN
Consists of:
Description
Qty.
0550-0730-1
0550-0700-1
Mounting Box
1
0550-0701-1
6 mm M3 screw, PH flat head
5 (1 extra)
Mounting Box
With Reader
Mounting Kit PN
Consists of:
Description
Qty.
0550-0731-1
0550-0700-1
Mounting Box
1
0550-0701-1
6 mm M3 screw, PH flat head
5 (1 extra)
0550-0720-1
USB Cover
1
0550-0713-1
Right angle USB extender
1
6 mm M3 screw, PH button head
5 (1 extra)
0550-0711-1
6 mm M3.5 screw, PH button head
3 (1 extra)
Phillips screwdriver
1
0550-0710-1
RFID Bracket
1
Steps for Installing the TimeBase Mounting Box
BEFORE YOU BEGIN
Step 1.
Ensure that you have the following items from the original TimeBase
kit:
• An orange T10 screwdriver
• A pair of black T10 screws (only one is needed)
• A wall mounting plate
• A wall mounting reference guide
• A set of drywall anchors and mounting screws
Step 2.
If you are mounting a TimeBase device with no peripheral readers,
skip ahead to Step 11. If you are mounting a TimeBase with a barcode reader,
skip ahead to Step 8.
PERFORM THE PROXIMITY READER INSTALLATION
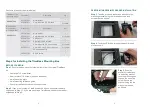
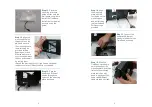
Step 3.
Take the proximity reader and attach it to the
mounting bracket using the included screws and
screwdriver, as shown.
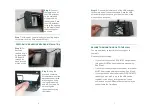
Step 4.
Feed the USB cable through the pass-through
slot, as shown.
Step 5.
Slide the
proximity reader and
its mounting bracket
onto the mounting box,
through the mounting
holes. Secure the
bracket using the two
wingnuts provided,
as shown.