background image


There  are  two  buttons  on  both  above  and  below  of  each  handpiece.  The  two 

buttons may be in the upspring or press-down state. Before connect it onto the 

machine, it must be in the press-down state. So press down the 2 buttons firstly. 


2.1.2 Connect it in the right direction.   

There are two parts of the connectors: machine part and handpiece part. Please 

look  at  the  following  pictures.  A1  connects  to  B1,  and  A2  connects  to  B2.  It 

cannot plug if connecting A1 to B2. 


4.1.3 Use some power of your hands to plug it. When you plug one well, you 


Machine part 

Handpiece part 

A1 

B1 

B2 

A2 

Summary of Contents for LS10

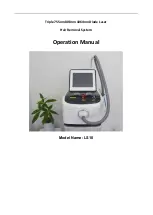
Page 1: ... Triple 755nm 808nm 1064nm Diode Laser Hair Removal System Operation Manual Model Name LS10 ...

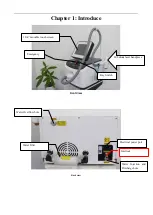
Page 2: ...r 1 Introduce Front View Back view Emergency Key Switch 10 4 movable touch screen 808 diode laser handpiece Electrical power port Water Overflow hole Water Injection and Discharge hole Interlock Water Filter ...

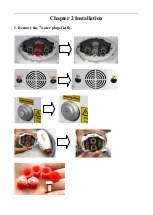
Page 3: ...Chapter 2 Installation 1 Remove the 7 water plugs firstly ...

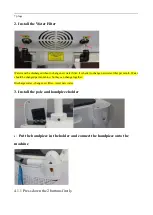
Page 4: ...o change new water filter per month Water should be changed per month too So they can change together Discharge water change new filter inject new water 3 Install the pole and handpiece holder 4 Put the handpiece in the holder and connect the handpiece onto the machine 4 1 1 Press down the 2 buttons firstly ...

Page 5: ...own state So press down the 2 buttons firstly 2 1 2 Connect it in the right direction There are two parts of the connectors machine part and handpiece part Please look at the following pictures A1 connects to B1 and A2 connects to B2 It cannot plug if connecting A1 to B2 4 1 3 Use some power of your hands to plug it When you plug one well you Machine part Handpiece part A1 B1 B2 A2 ...
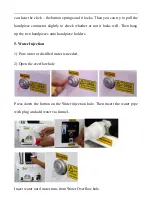
Page 6: ...or not it locks well Then hang up the two handpieces onto handpiece holders 5 Water Injection 1 Pure water or distilled water is needed 2 Open the overflow hole Press down the button on the Water injection hole Then insert the water pipe with plug and add water via funnel Inject water until water runs from Water Overflow hole ...

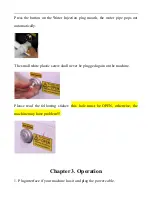
Page 7: ...out automatically The small white plastic screw shall never be plugged again on the machine Please read the following sticker this hole must be OPEN otherwise the machine may have problem Chapter 3 Operation 1 Plug interface if your machine has it and plug the power cable ...

Page 8: ...2 Turn on the air switch 3 Turn on key switch and emergency switch Turn on the screen and enter Figure one as below ...

Page 9: ...is hair removal SR is skin rejuvenation Click HR into treatment interface Energy 1 100 adjustable Pulse Width 10 400 adjustable Frequency 1 10 adjustable You can also adjust the contact cooling on handpiece ...

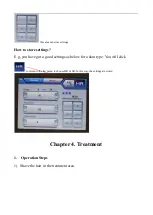
Page 10: ...e settings E g you have got a good settings as below for a skin type You will click to return to the last menu to choose HR or SR In this way the settings are stored Chapter 4 Treatment 1 Operation Steps 1 Shave the hair in the treatment area ...

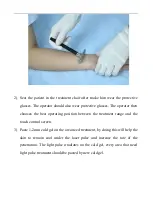
Page 11: ...he best operating position between the treatment range and the touch control screen 3 Paste 1 2mm cold gel on the area need treatment by doing this will help the skin to remain cool under the laser pulse and increase the rate of the penetration The light pulse irradiates on the cold gel every area that need light pulse treatment should be pasted by new cold gel ...

Page 12: ...t the machine and then the screen will display the main page 5 Choose treatment parameters according to the specific conditions of the patient 6 After you have adjusted all parameters press READY Then the machine is in working condition ...

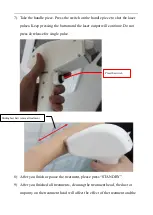
Page 13: ...utput will continue Do not press release for single pulse 8 After you finish or pause the treatment please press STANDBY 9 After you finished all treatments cleaning the treatment head the dust or impurity on the treatment head will affect the effect of the treatment and the Press the switch Sliding fast hair removal treatment ...

Page 14: ...of laser device 2 Operators and patients must wear laser goggles to protect eyes from any laser damage threat 3 Please notice that this is a high power laser device and if the patients feel very painful please stop the laser and check if there is anything happens to the patients skin Adjust it as a proper power that the patients can stand to do the treatment 4 Skin color is very important For whit...

Page 15: ...st be checked and changed every 6 months 2 The machine must be operated in a room with air conditioner The room temperature is better 28 C 3 The environment temperature can not go below ZERO or the ice may damage the water tanks and water channels inside the machine and the handle piece 4 Clear the gel on the handle piece and make sure there is no dust attached on the handle piece window 5 Do not ...

Page 16: ... can use wet soft clothes and then air it to become completely dry Instrument troubleshooting guide Following list some problem of the machine as well as the solve solution 1 The system can not function properly A Check whether the power cable is well connected B Check whether the emergency button is pressed down turn the button inverse clock can release it C If can not be solved please contact th...

Page 17: ...ings Dark hair Short pulse width light hair Long pulse width Thick hair Long interval low energy Thin hair Short interval high energy Dense hair Low energy Sparse hair High energy Dark skin Long interval low energy White skin Short interval high energy Sensitive skin Low energy Chapter 7 Clinical practice 7 1 Training 808nm laser hair removal machine should be operated by professionally trained do...

Page 18: ...cosmetics containing hormones such as some freckle products customers 11 epilepsy diabetes bleeding tendency customers 12 customers with skin infections in the irradiated sites 13 sun tan after exposure 7 2 3 Screening of patients Ask patients their expectations for improvement in the skin is very important before the treatment 808nm laser hair removal machine is quite attractive for the fast pace...

Page 19: ...8 20 minutes after the treatment finished washed cold gel do cold in the treatment region Using frozen gauze water soaked into the plastic bag to do cold After surgery blisters and ulcers generated in the skin can be cured by antibiotic ointment and burn cream such as Silverol or Biafine etc Also low concentrations of steroid cream can be used to reduce swelling If the blisters scab should use vas...

Page 20: ...ecause many patients are unable to objectively evaluate treatment progress these photos can be used as evidence Patient photography should be used in the same environment similar to the speed flash index and the focal length so the photos can do different time objective comparison 7 5 Treatment 1 allow patients to wear protective glasses sitting in the chair Operators also wear safety glasses and ...

Page 21: ...aseline to keep it moist 7 6 2 to prevent sun exposure one month after treatment patients should used high factor sunscreen to protect the treatment area from sunlight Sun exposure may increase the regeneration rate of melanin resulting in hyperpigmentation 7 6 3 make up Most doctors allow patients immediately use cosmetics after surgery but this also require the patient once found the treatment z...

Page 22: ...erative skin care Morning Use soft neutral ground cleaner and cold water to clean the skin Add synthesis of vitamin C cream on the skin Add sunscreen on the skin Night Clean the skin Apply moisturizing cream 7 7 Advantage of the treatments 1 no damage 2 the pain is not obvious 3 fast effective easy to use 4 no vacations after treatment 5 for a variety of color can improve overall skin condition Fi...

Page 23: ...d learning without any interference Specifications Parameter Value Wavelength Triple 755nm 1064nm 808nm Pulse Width 10ms 400ms Repetition Rate 1Hz 10Hz Energy Fluence 0 100J cm2 Beam Type Collimated Skin Cooling Water Air Sapphire Laser Window 15x20mm Laser Cooling Liquid Purified Water LCD Screen 10 4 Touch LCD Environment Temperature 5 28 C Environment Moisture 80 Input VAC 110V or 220V Machine ...

Reviews: