


3
Quick Install Guide
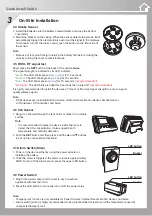
1.8~2.4m
80
80
70
70
60
60
50
50
40
40
30
30
20
20
10
10
0
A
B
0 1 2 3 4 5 6 7 8 9 10 11 12 13
(M)
0
1
2
3
4
5
6
7
8
9 10 11 12 13
(M)
A
B
1
2
2m
(M)
Distance:10m
Detection area : (Unit=Meter)
10mm
On-Site Installation
3.1 Panel Console(keypad)
1. Mount the bracket on the wall at an appropriate height.
For easy access, it is recommended to install the device near the front gate.
2. Open the battery cover and install the batteries into the battery
compartments. Then close the bottom cover firmly.
Note:
• The device supports both city power and battery (alkaline AA battery x 2,
non-rechargeable, for 2 hours emergency use).
• Once CPN-240 is unexpectedly unplugged from the bracket under system
arm mode, the tamper-proof detection will trigger the alarm.
3.2 Contact Sensor
1. Mount the bracket on the frame side of the door or
window, and then put the reed on the bracket.
2. Place the magnet on the door or window side. Align
the arrow point of the reed by less than 10mm
distance. Then stick on it.
Note:
• Due to tamper-proof design, please make sure the
installation is stable to avoid any false alarm.
3.3 Motion Sensor
1. Mount the bracket on the wall, at the height of 1.8 to
2.4 m. Do not install it upside down.
2. The scan pattern is illustrated in the figure on the
right.
• The effective distance is 8~10m, at 2m height.
• 150-degree at horizontal position.
• 25-degree at vertical position.
3. Pet immune detection could be effective if it meets
the following criteria:
• Height: less than 50cm.
• Weight: less than 6kg.
4. To avoid false alarm, do the following:
• Be sure the installation is stable.
• Do not place the device to face any light source
directly.
• Never face the sensor to the place that pests can
climb up directly.


