
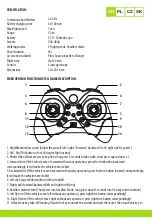
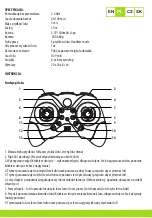

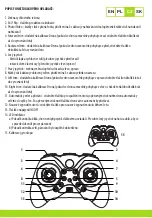
increase the height of the aircraft. Touch this key again and the aircraft will slowly land on
the ground)
12. Emergency stop (Touch this key to allow the aircraft fall down)
13. Power on/o (Power switch,push for turning on the power, long press 3 seconds for shutting off power)
14. Indicator 1) Indicating lamp intermittent flicker: it means that remote controller has not started. 2) Indicating lamp
will flashing fast: it means that remote controller in pairing mode 3) Indicator light: Paired correct
To pair remote and drone, please push
throttle up and down.
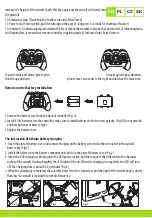
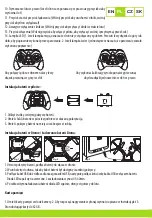
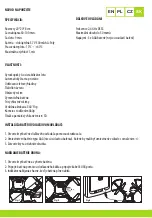
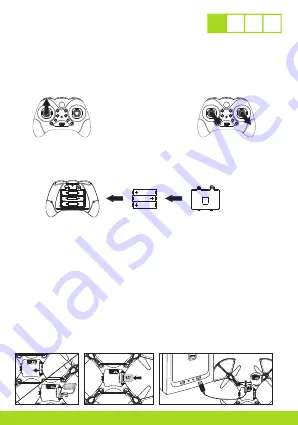
Remote control battery installation
1.Remove the battery cover from the back of controller (Fig. A)
2.Install 3 “AA” batteries into the controller, make sure to install batteries to their correct polarity. (Fig. B) Do not mix old
and new batteries or battery types.
3.Replace the battery cover
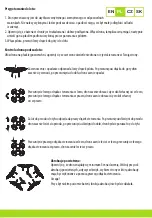
The instruction of lithium battery charging
1. Open the aircraft battery cover and connect the plug on the battery wire end to the wire outlet in the aircraft
battery bay.(Fig.1)
2. Install the battery into the battery compartment and close the aircraft battery cover.(Fig.2)
3. Insert the USB charging cable plug into the USB power socket, and then connect the other end to the charging
socket of the aircraft. During charging, the LED light will be on. When the charging is completed, the LED will turn
off. The charging time is about 45-60 minutes.(Fig.3)
4. When the charging is completed, the aircraft's power switch is turned on, and the light of the aircraft body is slowly
flashing, the aircraft is looking for a remote frequency.
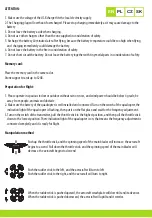
To make gyroscope calibration,
please move two sticks to the right and down at the same time.
Fig.1
Fig.2
Fig.3
CZ SK
EN
PL