background image

Mercury Light Source Range

8

DMX OPERATION

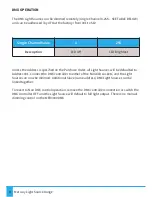
The DMX Light Sources can be dimmed remotely (single Channel 0-255 – SEE TABLE BELOW)
and can be addressed (by UFO at the factory) from 001 to 512. 

Single Channel Value

0

255

Description

LED Off

LED Brightest

Unless the address is specified on the Purchase Order, all Light Sources will be defaulted to
Address 001. Connect the DMX controller to either of the Mini XLR sockets, and the Light
Source can now be dimmed. Additional Slave (same address) DMX Light Sources can be
linked together.

To revert to Non DMX control operation, remove the DMX controller connection or switch the
DMX controller OFF and the Light Source will default to full light output. There is no manual
dimming control on the MER3000DMX

Summary of Contents for UFO MER3000M

Page 1: ...700K colour temperature variants Please read this manual fully before installing operating or performing maintenance on the light source unit Light Source User Guide Issue 2 Revised 22072013 Universal Fibre Optics Home Place Coldstream TD12 4DT United Kingdom Tel 44 0 1890 883416 Fax 44 0 1890 883062 www fibreopticlighting com ...

Page 2: ...or future reference The UFO Mercury range of light sources are suitable for use with either glass or polymer fibre optic harness The Mercury is powered by a 100 240 VAC remote desktop power supply unit IMPORTANT THIS PRODUCT MUST BE INSTALLED IN ACCORDANCE WITH THE APPLICABLE INSTALLATION CODE BY A PERSON FAMILIAR WITH THE CONSTRUCTION AND OPERATION OF THE PRODUCT AND THE HAZARDS INVOLVED 2 ...

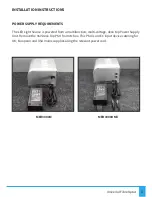
Page 3: ...EMENTS The LED Light Source is powered from a multifunction multi voltage desk top Power Supply Unit Remove the 36V Desk Top PSU from its box This PSU is an IEC input device catering for UK European and USA mains supplies using the relevant power cord MER3000M MER3000DMX ...

Page 4: ...cking screw Connect the IEC power cord into the Desk Top PSU and plug the mains plug into the electrical supply socket Switch on power the led Indicator will illuminate and the light source is ready for use If no light is produced consult the TROUBLESHOOTING section NOTE THESE LIGHT SOURCES ARE NOT MAINS DIMMABLE NORMAL OPERATION MER3000 Under normal operation the MER3000 Light Source can be dimme...

Page 5: ...t the IEC power cord into the Desk Top PSU and plug the mains plug into the electrical supply socket Switch on power the led Indicator will illuminate and the light source is ready for use If no light is produced consult the TROUBLESHOOTING section NOTE THESE LIGHT SOURCES ARE NOT MAINS DIMMABLE Connect up the DMX control cables to the Mini XLR sockets on the rear of the Light Source The recommend...

Page 6: ...nect the IEC power cord into the Desk Top PSU and plug the mains plug into the electrical supply socket Switch on power the led Indicator will illuminate and the light source is ready for use If no light is produced consult the TROUBLESHOOTING section NOTE THESE LIGHT SOURCES ARE NOT MAINS DIMMABLE Connect up the 0 10V control cable to the mini XLR sockets on the rear of the light source The recom...

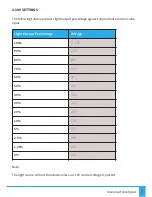
Page 7: ...ut percentage against approximate control value input Note The light source will not illuminate unless a 0 10V control voltage is present Light Output Percentage Voltage 100 7 10V 90 6 2V 80 5 8V 70 5 4V 60 5V 50 4 5V 40 3 9V 30 3 2V 20 2 3V 10 1 4V 5 1 1V 2 5 0 8V 1 25 0 4V 0 0 2V ...

Page 8: ...pecified on the Purchase Order all Light Sources will be defaulted to Address 001 Connect the DMX controller to either of the Mini XLR sockets and the Light Source can now be dimmed Additional Slave same address DMX Light Sources can be linked together To revert to Non DMX control operation remove the DMX controller connection or switch the DMX controller OFF and the Light Source will default to f...

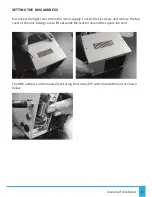
Page 9: ... the light source from the mains supply Loosen the six screws and remove the top cover of the unit taking care to lift outwards the section around the square fan vent The DMX address can be manually set using the 10 way DIP switch inside the unit as shown below ...

Page 10: ...e 10 SETTING THE DMX ADDRESS DMX B START Channel DIP Switches On DMX B START Channel DIP Switches On 1 1 11 1 2 4 2 2 12 3 4 3 1 2 13 1 3 4 4 3 14 2 3 4 5 1 3 15 1 2 3 4 6 2 3 16 5 7 1 2 3 8 4 9 1 4 10 2 4 511 1 2 3 4 5 6 7 8 9 ...

Page 11: ...Universal Fibre Optics 11 MAINTENANCE Date Maintenance Undertaken Please Note that a record of all maintenance MUST be kept in the table below indicating what maintenance was undertaken and when ...

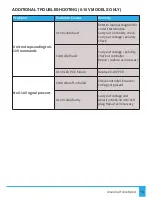
Page 12: ...eplace PSU Unit is dead no light output but LED power indicator is illuminated DMX dimming at minimum for DMX version only Adjust brightness on controller increase value up from 0 DMX fault on controller or DMX cable Remove DMX XLR plug from rear of light source Light source wil default to full bright Repair DMX controller or cabling LED Array failure Replace Light Source Unit not responding to DM...

Page 13: ...ct termination Carry out continuity check Carry out voltage polarity check Controller fault Carry out voltage polarity check at controller Repair replace as necessary 0 10V LED PCB failure Replace 0 10V PCB No 0 10V signal present Controller off or failed Check controller Ensure 0 10V signal present 0 10V cable faulty Carry out voltage and polarity check on mini XLR plug Repair as necessary ...

Page 14: ...onnection 2 1 x 5 5 x 12mm Min Ambient Temperature 10ºC Max Ambient Temperature 45ºC Fan 80mm 12V Crossflow Thermal Protection Thermal Cut Out switch 70 C LED Type Model White light DMX User Addressable 1 channel dimming 0 255 0 10V Control 0 10V DC Receiving LED Life 50 000 hours in ambient 25ºC Equivalent TH Light Output 90W CRI 90 Colour Temperature ºK 3050ºK or 2700ºK Material Aluminium Colour...

Page 15: ...Universal Fibre Optics 15 ...

Page 16: ...Universal Fibre Optics Home Place Coldstream TD12 4DT United Kingdom Tel 44 0 1890 883416 Fax 44 0 1890 883062 www fibreopticlighting com ...

Reviews: