background image

Güvenlik Talimatlar›

7

7

Vantilatör çal›flt›r›lmadan önce, vantilatör ve güç kablosu üzerinde bir hasar olup
olmad›¤› mutlaka kontrol edilmelidir. E¤er hasar varsa cihaz›n›z› çal›flt›rmayarak
teknik servise baflvurulmal›d›r.

Vantilatörü veya herhangi bir parças›n› aç›k alev, piflirme veya di¤er ›s›tma
cihazlar›n›n yan›na koymay›n›z.

Vantilatörü duvara veya tavana asmay›n›z veya monte etmeyiniz

Hareketli parçalara dokunmaktan kaç›n›n›z.

Vantilatörün montaj›n› tamamlamadan, kesinlikle fiflini prize takmay›n›z.

Vantilatörünüzü prize ba¤lamadan önce, flebeke elektri¤inin tip/barkod etiketinde
belirtilmifl olan voltaja uygun olmas›na dikkat ediniz.

Vantilatörünüzü her zaman kuru ve sabit zeminler üzerine koyunuz, banyo küveti,
yüzme havuzu ve dufl gibi sulu yerlerden uzak tutunuz.

Kullan›mda de¤ilken, vantilatörü bir yerden baflka bir yere tafl›rken, parçalar›n›
t a k a r k e n   v e y a   ç › k a r t › r k e n   v e   t e m i z l e m e d e n   ö n c e   f i fl i n i   ç e k i n i z .

Bu ürün, çocuklar›n yak›nlar›nda kullan›ld›¤›nda yetiflkinlerin gözetimi gerekir. Bu
ürün, çocuklar veya fiziksel, duyusal veya zihinsel kapasiteleri cihaz› güvenle
kullanmalar›n› engelliyorsa di¤er kifliler taraf›ndan yard›m veya gözetim olmadan
kullan›lma amaçl› de¤ildir.

Vantilatörünüzü küçük çocuklardan uzak tutunuz.

Güvenli¤iniz için güç kablosunu prizden çekiniz. Cihaz çal›fl›rken fifli çekmeyin.
Kablonun prize tamamen tak›l› oldu¤undan emin olun.

Güç kablosunu ›slak elle asla tutmay›n, aksi halde bu durum yang›na veya elektrik
çarpmas›na neden olabilir.

Cihaz›n›z› tek bafl›n›za parçalar›na ay›rmay›n, onarmay›n veya de¤ifliklik yapmay›n.
Yetkili olmayan kifli veya kurumlarca yap›lan onar›mlar garantinin hükümsüz
kalmas›na neden olabilir.

Hazne içerisindeki su tükendi¤inde su güvenlik butonu cihaz› otomatik olarak
durduracakt›r.

Kafes içerisine parmak ya da herhangi bir cisim sokmay›n›z.

Kullan›c› Korumas› Cihaz›n›z›n motoru motor s›cakl›¤› çok yüksek seviyeye ç›kt›¤›nda
plastik yan›¤› ve biçimsizli¤ini engellemek için cihaz› otomatik olarak durdurur.

>

>

>

>

>

>

>

>

>

>
>

>

>

>

>

>

>

Summary of Contents for ATSFI-02

Page 1: ...UFO 16 PORTAT F YON ZERL FERAHLATICI VANT LATÖR ATSFI 02 KULLANIM KILAVUZU UFO 16 STAND FAN WITH IONIZER ATSFI 02 USER MANUAL www ufotr com ...

Page 2: ......

Page 3: ...www ufotr com UFO 16 PORTAT F YON ZERL FERAHLATICI VANT LATÖR ATSFI 02 KULLANIM KILAVUZU ...

Page 4: ...akt r Bu do ru karar n z ve UFO ya duydu unuz güven için teflekkür ederiz Memnuniyetinizin uzun süreli olmas için lütfen bu kullan m k lavuzunu dikkatlice okuyunuz Özellikle Güvenlik Talimatlar bölümündeki kurallara harfiyen uyunuz Do ru montaj do ru çal flt rma ve bak m siz ve vantilatörden faydalanacak di er kiflilerin güvenli i için çok önemlidir Lütfen bu Kullan m K lavuzunu gerekli hallerde tekr...

Page 5: ... 3 4 Vantilatörün Montaj 4 5 Cihaz n Kullan lmas Kontrol Paneli ile Çal flt rma 5 6 Cihaz n Kullan lmas Uzaktan Kumanda ile Çal flt rma 6 7 Güvenlik Talimatlar 7 8 Temizlik ve Bak m 8 9 Ufo Yetkili Servisleri Teknik Servis 9 10 Garanti ile lgili Olarak Müflterinin Dikkat Etmesi Gereken Hususlar 10 çindekiler 1 1 ...

Page 6: ...sa l a zararl partiküllerin solunum sistemi içine çekilmesi önlenir Böylece yaflad m z ortamda ferahl k hissi sa lar Negatif yonlar n Yararlar Soludu umuz oksijenin artmas na yard mc olurlar Sigara kokusu kirli hava ve etrafta uçuflan partikülleri yok ederek havay temizler Ruh sa l n iyilefltirir sinirleri gevfletir ve enerjiyi artt r r Depresyonu azalt r uykuyu düzenler soluk almay kolaylaflt r r ve h...

Page 7: ...4 Uzaktan Kumanda 15 Güç Kablosu 16 Taban 17 Taban Tespit Somunu Cihaz n Kurulum Tablosu ve Teknik Özellikleri 3 3 Teknik Özellikleri K z lötesi uzaktan kumanda ve dokunmatik butonu LED ekran Hava temizli ini ve ferahl n sa lamak üzere negatif iyon özelli i 7 5 saatlik zaman göstergesi 3 ayr h zda çal flma seçene i slow mid fast Ayarlanabilir yükseklik ve sa a sola sal n m seçene i Afl r s nmaya kar...

Page 8: ...tak p saat yönüne çevirerek s k ca ba lay n z Pervanenin Montaj 1 Pervaneyi mile yerlefltirin ve pimin pervane kanal na oturmas n sa lay n 2 Pervane sabitleme somununu kullanarak pervaneyi sabitleyin Pervane sabitleme somununu saat yönünün tersine üzerindeki TIGHT oku yönünde s k flt rarak pervaneyi sabitleyiniz Uyar fllemin do ru yap lmas çok önemlidir Aksi takdirde çal flma esnas nda pervane bofllukt...

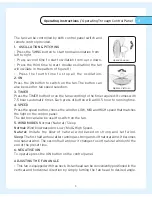
Page 9: ... zamana eklenir 4 SPEED HIZ H z butonuna bas n ve kontrol paneli üzerindeki fl k ile uyuflan DÜfiÜK ORTA YÜKSEK h z ayar için üflemeyi seçin Cihaz n z çal flt rmak için de bu butonu kullanabilirsiniz 5 WIND ÜFLEME MODLARI Normal Natural Sleep Normal Düflük orta ve yüksek ayarlar na göre üfleme Natural Güçlü ve yumuflak ayarlara göre do al üfleme Bir düflük bir yüksel ayarlara göre üfleme Sleep lk yar m s...

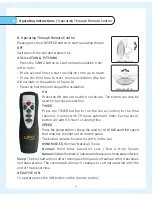
Page 10: ...ICI Vantilatörünüzü gerekli zamana göre çal flt rmak için TIMER butonuna bas n 7 5 saatlik otomatik zaman göstergesi belirir Butona her bas ld nda 0 5 saat mevcut zamana eklenir SPEED HIZ H z butonuna bas n ve kontrol paneli üzerindeki fl k ile uyuflan DÜfiÜK ORTA YÜKSEK h z ayar için üflemeyi seçin Cihaz n z çal flt rmak için de bu butonu kullanabilirsiniz WIND ÜFLEME MODLARI Normal Natural Sleep Norm...

Page 11: ...ve temizlemeden önce fiflini çekiniz Bu ürün çocuklar n yak nlar nda kullan ld nda yetiflkinlerin gözetimi gerekir Bu ürün çocuklar veya fiziksel duyusal veya zihinsel kapasiteleri cihaz güvenle kullanmalar n engelliyorsa di er kifliler taraf ndan yard m veya gözetim olmadan kullan lma amaçl de ildir Vantilatörünüzü küçük çocuklardan uzak tutunuz Güvenli iniz için güç kablosunu prizden çekiniz Cihaz ...

Page 12: ...liniz ve kullanmadan önce çok iyi kurulay n z 4 Su veya baflka herhangi bir s v içerisine sokmay n z 5 Elektrik kablosunun tamiri veya de iflmesi gerekti i takdirde bu tamirat yetkili servis taraf ndan yap lmal d r 6 Temizlik süresince pervaneyi dikkatli bir flekilde tafl y n 7 Motor ömrünü uzatmak için temizlik yapt ktan sonra motor taban na bir kaç damla ya ekleyin Not Herhangi bir onar m kablo ya d...

Page 13: ... r Afla daki önerilere uyman z rica ederiz Servis ihtiyac n z oldu unda bu kullanma k lavuzunun ekinde verilen listede belirtti imiz üzere size en yak n herhangi bir UFO Yetkili Servisine baflvurunuz Onar m ve yedek parça de iflimi yaln zca UFO Yetkili Servisler veya SUN taraf ndan yetki verilmifl di er uzman kifliler taraf ndan yap lmal d r fliniz bitti inde Yetkili Servisten Teknik Servis Ar za Formun...

Page 14: ...sas al naca ndan kullan c n n Garanti Belgesiyle birlikte faturay veya okunakl bir fotokopisini muhafaza etmesi gereklidir 9 Garanti belgesi üzerinde ve UFO markal vantilatörün orijinal seri numaras nda tahrifat yap lm fl olmas hallerinde garanti hükmünden düfler braz edilen Garanti Belgesi nin ar zal ürüne ait olmas flartt r 10 Üzerinde sat c firma kafle ve imzas ile sat fl tarihi olmayan belgeler geç...

Page 15: ...www ufotr com UFO 16 STAND FAN WITH IONIZER ATSFI 02 USER MANUAL ...

Page 16: ...ess our thanks to you for choosing UFO and reliance on UFO products For a sustainable pleasure with your appliance please read this manual thoroughly Please stick especially to the instructions in the Safety Instructions section Proper installation operating and maintenance assume great importance for the safety of you and of those who will benefit from the fan Please keep this manual in a safe pl...

Page 17: ...art and Technical Specifications 3 4 Assembly of the Fan 4 5 Operating the Fan Through Control Panel 5 6 Operating the Fan Through Remote Control 6 7 Safety Precautions 7 8 Cleaning and Maintenance 8 9 UFO Authorized Services Technical Services 9 10 Warranty Terms 10 Table of Contents 1 1 ...

Page 18: ...cle will drop out of the air keeping them out of the breathing zone and out of the respiratory system where it can trigger breathing and health problems Benefits of negative ions Negative ions increase the flow of oxygen Negative ions purify the air eradicating the smoke and particles in the air Purified air thanks to negative ions result in higher alertness decreased drowsiness and more mental en...

Page 19: ...ntrol Panel 14 Remote Control 15 Power Cord 16 Base 17 Base Nut Technical Specifications Infrared remote control and touch panel LED screen Negative Ion to purify the air Timer of 7 5h 0 5 7 5 hour 3 speed options slow mid fast Adjustable height and 4 automatic oscillation options right left up down Protection against overheating Transparent blade Voltage 220 240V Frequency 50 Hz Power 60W Install...

Page 20: ...sten the rear guard tightly by turning the guard mounting nut clockwise III Assembling the Fan Blade 1 Insert the blade to the shaft and ensure the pin enter the blade slot 2 Tighten the blade using the blade cap turning anti clockwise in the direction TIGHT arrow on it Note Proper assembly of the blade is of great importance Otherwise the blade spins in the air and damage the appliance IV Assembl...

Page 21: ...ch press of button will add 0 5 hour to running time 4 SPEED Press the speed button choose the wind for LOW MID and HIGH speed that matches the light on the control panel The button can also be used to switch on the fan 5 WIND MODES Normal Natural Sleep Normal Wind blow based on Low Mid High Speed Natural Imitate the blow of natural wind based on strong and soft wind Sleep The first half an hour a...

Page 22: ...ection TIMER Press the TIMER button to run the fan according to the time required It comes with 7 5 hours automatic timer Each press of button will add 0 5 hour to running time SPEED Press the speed button choose the wind for LOW MID and HIGH speed that matches the light on the control panel The button can also be used to switch on the fan WIND MODES Normal Natural Sleep Normal Wind blow based on ...

Page 23: ...re cleaning Supervision is needed when this product is used anywhere near children The appliance is not intended for use by children or other persons without assistance or supervision if their physical sensory or mental capabilities prevent them from using it safely For safety reasons please disconnect the plug from the electrical outlet Do not pull the plug while the power is on Always ensure tha...

Page 24: ...ents Clean your fan with a soft damp cloth Never wash it with water 4 Do not immerse in water or any other liquids 5 The power cord should only be replaced by an authorized technical service 6 Handle the fan blade with care during cleaning 7 Please add a few drops o lubricant to the motor base after cleaning to extend motor life Note In case of any repairs replacement of cord or plug or adjustment...

Page 25: ...problems will be finalized and met as soon as possible Consult to nearest UFO Authorized Service which you will find in the enclosed with this manual on your need of service The repair and replacement of the defective parts may only be carried out by UFO Authorized Services or other persons authorized by SUN Please ask for Technical Service Problem Form from your Authorized Service The Technical S...

Page 26: ... or high voltage and operating the fan with the voltage other than specified in the label of the product 4 Damages and defects due to fire earhquake and lightning 5 Defects due to infringement of the instructions in the user manual 6 Damages and defect due to transportation of the fan 7 The warranty is only limited to the defects of the model specified on the barcode within 2 years following the d...

Page 27: ...Notlar Notes ...

Page 28: ...www ufotr com info ufotr com SUN Pazarlama Elk Makina San Tic Ltd fiti Perpa Ticaret Merkezi A Blok Kat 11 No 1594 fiiflli STANBUL TÜRK YE Tel 90 212 210 07 72 ...

Reviews: