
WARRANTY
The DMG150 is warranted to be free from defects in
materials and workmanship for a period of one year from
the date of purchase. If within the warranty period your
instrument should become inoperative from such defects,
the unit will be repaired or replaced at UEi’s option. This
warranty covers normal use and does not cover damage
which occurs in shipment or failure which results from
alteration, tampering, accident, misuse, abuse, neglect or
improper maintenance. Batteries and consequential damage
resulting from failed batteries are not covered by warranty.
Any implied warranties, including but not limited to implied
warranties of merchantability and fitness for a particular
purpose, are limited to the express warranty. UEi shall not be
liable for loss of use of the instrument or other incidental or
consequential damages, expenses, or economic loss, or for
any claim or claims for such damage, expenses or economic
loss.
A purchase receipt or other proof of original purchase date
will be required before warranty repairs will be rendered.
Instruments out of warranty will be repaired (when
repairable) for a service charge.
For more information on warranty and service, contact:
This warranty gives you specific legal rights. You may also
have other rights, which vary from state to state.
DISPOSAL
CAUTION:
This symbol indicates that equipment
and its accessories shall be subject to separate collection
and correct disposal.
CLEANING
Periodically clean your meter’s case using a damp cloth. DO NOT
use abrasive, flammable liquids, cleaning solvents, or strong
detergents as they may damage the finish, impair safety, or affect
the reliability of the structural components.
STORAGE
Remove the batteries when instrument is not in use for a
prolonged period of time. Do not expose to high temperatures
or humidity. After a period of storage in extreme conditions
exceeding the limits mentioned in the General Specifications
section, allow the instrument to return to normal operating
conditions before using it.
Run Mode
1. In Run mode, the elapsed time is accumulated when
vacuum reading is less than target vacuum value.
2. User may press
Mode Button
to enter Vacuum Reading
mode without changes in Run mode.
3. In Run mode the icon “
Run
” is shown on the display.
“
Ready
” is shown on the display after entering Run
mode.
4. User powers on the vacuum source and then presses
the
Menu/Check Button
to start monitoring the
vacuum. “Run” is shown on the display for 2 seconds
when monitoring begins. When the vacuum value is less
than target value, the vacuum gauge counts elapsed time
and accumulated. During the monitoring, the vacuum
value and the time count are shown on the display in
order.
5. Press the
Mode Button
to skip monitoring before
the elapsed time expires and go back to Vacuum Reading
mode. “
Quit?
” is shown on the display for confirming
the interrupt. Press
Menu/Check Button
to confirm
quit or press
Change/X Button
to cancel quit. When
the accumulated elapsed time is greater than the set
time duration, “
End
” flashes on the display. Press the
Mode Button
to end monitoring and go back to Vacuum
Reading mode.
6. The Sleep mode is disabled in Run mode. User should
check battery life in before and during long monitoring
times.
Sleep Mode
1. The gauge will enter Sleep mode if the reading is over
limit and continues for
5 minutes
. “
Sleep
” will be
shown on the display when the gauge is in Sleep mode.
After
5 minutes
of Sleep mode, Auto power off powers
off the gauge. The down-count timer is shown on the
display to alert user of sleep mode and Auto power off
time.
Oil Detection
1. When the vacuum sensor has contamination like oil or
other material, “Oil” is shown on the display.
2. The gauge will Auto power off after
5 minutes
.
Sensor Fail
1. If the sensor wire is broken or fails, “
Fail
” will be shown
on the display.
2. The gauge will Auto power off after
5 minutes
.
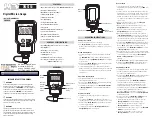
BATTERY REPLACEMENT
When the batteries are too low for safe operation, the Low
Battery indicator will display.
• Remove screw. Remove battery cover.
• Replace the old batteries with 1 new (CR123A) battery.
• Place the battery cover.
New
(CR123A)
battery
Copyright © 2017 Kane USA Inc. All Rights Reserved.
Test Equipment Depot - 800.517.8431 - 99 Washington Street Melrose, MA 02176


