background image

Checklist before Flight

Calibration Instruction

3. Put the drone on the flat surface, the drone body lights turn from flashing to
    solid bright, which indicates successful frequency pairing.

4. Push up the Left Stick slowly to fly up the drone, 

    and pull down the Left Stick slowly to the lowest

    end, then the drone will land on the ground slowly.

3. Move the Left Stick and Right Stick as Picture 16

    shown to start the motor and then release. Then

    push up the Left Stick to fly up the drone to

    certain altitude and then release.

5. It’s recommend to repeat Steps 4 above to practice.

1. The camera is the drone front. Keep the drone front away from you.
2. Power on the drone and check the direction of the rotating propellers. The left

    front and right rear A propellers rotating clockwise while the right front and left

    rear B propellers rotating counterclockwise.

6. Adjust relative transmitter Trimmer button to adjust the rudder if the drone tilts

    to one side when flying. 

Please follow below steps to calibrate the drone if the drone becomes imbalance

after crashing during the flight, and can not be adjusted by trimmer button and

cause difficult operation.

1. Power off the drone, then turn off the transmitter switch.

2. Turn on the transmitter switch, push the Left Stick all the way down to the

    lowest position (Picture 17) and then release. The Left Stick will back to the

    middle position automatically (Picture 18). The transmitter is ready for

    frequency pairing mode.

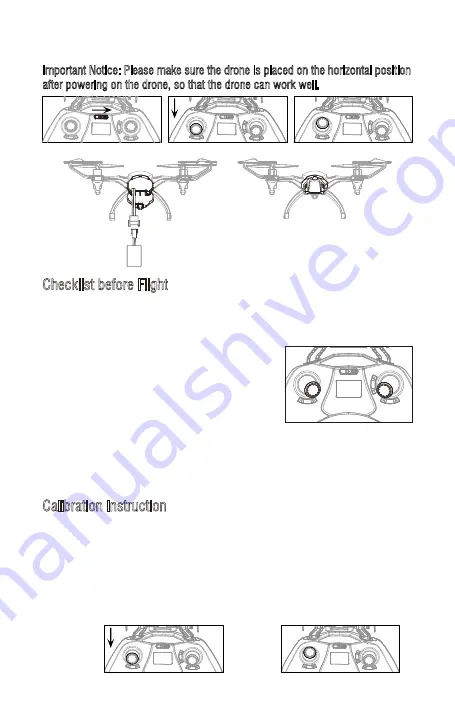
Important Notice: Please make sure the drone is placed on the horizontal position
after powering on the drone, so that the drone can work well.

Picture 12

Picture 11

Picture 14

Picture 16

Picture 15

Diagram

Picture 13

Picture 17

Picture 18

10

Summary of Contents for PEREGRINE

Page 1: ...U28W ...

Page 2: ...de 12 High Medium Low Speed Mode 13 Flip Mode 13 Heading Hold Mode 13 Low Battery Alarm 14 Out of Range Alarm 14 Propellers Stuck Protection 14 Propeller Installation Diagram 14 Download and Install the APP Flyingsee 15 Frequency Pairing between Mobile Phone and Drone WiFi 15 Introduction for APP Icons 16 Calibration Instruction 18 Flying Control 18 Media 21 To take photo and record video 21 Spare...

Page 3: ...ordinary toy but a piece of complicated equipment which is integrated with professional knowledge by mechanic electronic air mechanics high frequency emission etc so it should be installed and adjusted correctly to avoid accidents The user must always operate in a safe manner We undertake no liability for human injury or property damage caused by improper operation as we could not control the proc...

Page 4: ...Make sure the drone battery and transmitter battery are fully charged 3 Make sure the Left Stick of the transmitter in the middle position 3 Check List Before Flight 4 Please strictly obey the order of turn on and turn off before operation Turn on the transmitter power first and then turn on the drone power before flying turn off the drone power first and then turn off the transmitter power when f...

Page 5: ...t open the battery Do not leave the battery without supervision when charging Make sure that there is no short circuit of the power wire Please use the recommended charger only Check the charger s wire plug surface regularly Do not use any broken charger When the drone in low battery the transmitter will beep constantly and the drone body lights will change from flashing to solid bright to remind ...

Page 6: ...ion Drone Size Drone Weight Propeller Diameter Flying Time 156x165x65mm 68 5g 55mm 5 30 6 30mins Max Image Transmission Distance Radius 20m 30m 65 75mins Camera Resolution 1280x720P Remote Control Technology 2 4Ghz Transmitter Battery 4xAAA Alkaline Batteries Drone Battery 3 7V 500mAh Main Motor 8520x4 Charging Time for Drone Battery Max Flying Distance Radius 6 ...

Page 7: ...ns Hood High Medium Low Speed Mode Press Down 360 Flip Mode Press Down TF Card Battery Cover Left Propeller Guard Camera Antenna Right Landing Gear Camera Cover Camera Board Name Lower Cover Left Landing Gear Battery Holder Receive Board 10 9 No 1 2 3 4 5 6 7 8 Name A Propeller Clockwise Clockwise Motor Red and Blue Wire Tail Light Red B Propeller Counterclockwise Counterclockwise Motor Black and ...

Page 8: ...tick to forward backward left right to fly the drone to forward backward left right Press the button till the drone becomes balance if the drone if the drone rotates to the left or right Press the button till the drone becomes balance if the drone if the drone drifts forward or backward Press the button till the drone becomes balance if the drone if the drone tilts to the left or right Move the po...

Page 9: ...onnect the plugs to power on the drone Close the drone battery cover Picture 14 15 Picture 7 Battery Cover 4 1 5V Alkaline Batteries Picture 6 1 Make sure the electrodes are correct 2 Do not mixed use new and old batteries 3 Do not mixed use different kinds of batteries 4 Do not charge the non rechargeable battery Notice Attaching your Mobile Phone to Transmitter 1 Press the self locking switch on...

Page 10: ...propellers rotating clockwise while the right front and left rear B propellers rotating counterclockwise 6 Adjust relative transmitter Trimmer button to adjust the rudder if the drone tilts to one side when flying Please follow below steps to calibrate the drone if the drone becomes imbalance after crashing during the flight and can not be adjusted by trimmer button and cause difficult operation 1...

Page 11: ...eft and move the Right Stick to the right to fly the drone to the right 1 To fly to the left or right 2 To fly up or down 4 To fly forward or backward 3 To rotate to the left Move the Left Stick to the left to rotate the drone to the left and move the Left Stick to the right to rotate the drone to the right 5 If the drone rotates to the left or right Press the Right Rudder Trimmer till balance if ...

Page 12: ...top Button immediately and hold it for more than 1s The propellers will stop immediately Tip Do not use the emergency stop function unless in emergency situation The drone will fall down suddenly after all propellers stop 1 Method 1 Landing Push the Left Stick all the way down to the lowest position and hold it till the motors stop and the drone landing on the ground 2 Method 2 One Button Landing ...

Page 13: ...eft right accordingly Heading Hold Mode is designed for beginners and users who fly the drone in daylight or at a far distance Drones generally have a front and rear indicated by LED lights or colored propellers By default the users are required to tell the front and the rear of the drone when flying Under heading hold mode the users can operate the drone without worrying about the orientation lef...

Page 14: ...ropellers stuck protection function The drone body lights get solid bright and the drone is ready to fly Propeller Installation Diagram 1 Insert the spanner between the motor and the propeller as Picture 25 then press down the spanner as Picture 26 to remove the propeller Picture 25 Picture 26 To turn on Heading Hold Mode press Heading Hold Mode button and the drone LED lights flash which indicate...

Page 15: ...in Google Play 3 Scan the QR code on the right or the QR code in the box to download Flyingsee To know your APP 100 EMERGENCY Click on the icon Home Page 3 Click on the icon Flyingsee and click on to enter remote control interface to experience real time transmission 2 Enter set up of the mobile phone turn on WiFi WLAN and choose udirc return to desktop after successful connection 1 Install the ba...

Page 16: ...mode to experience first person view only available when using with a VR headset Click on the icon again to exit from virtual reality mode Click on this icon and it turns red Draw a flight route in the right area The drone will fly according to the flight route Click on the icon again to exit from Flight Route Setting Mode The icon turns white The icon is red by default Click this icon and the pro...

Page 17: ...er gravity induction control mode only available for flying left right and forward backward Click on the icon again to exit from gravity induction control mode SETING Trimming Save Reset Transmission quality 720P 480P To show the drone s WiFi signal strength Click on this icon to set some parameters and click again to exit Click on Save to save trimming setting Choose Reset for factory reset Click...

Page 18: ... same time to start the drone Or click One Button Take Off icon to start the drone Click on this icon and it turns red which indicates that the drone enter Heading Hold Mode Click again to exit from Heading Hold Mode The icon turns white Click on this icon to take photo Photo Heading Hold Mode Click on this icon to view or delete the aerial video and photo Click on the arrow to exit Media By defau...

Page 19: ...eft to fly the drone to the left and move the Right Ball to the right to fly the drone to the right To fly forward or backward Move the Right Ball up to fly the drone forward and move the Right Ball down to fly the drone backwards Forward Backward To fly up or down Move the Left Ball up to fly the drone up and move the Left Ball down to fly the drone back down The drone will stay flying at appoint...

Page 20: ...he to adjust the drone till balance if the drone rotates right Click the of the Left Right Trimmer till balance if the drone tilts to the left Click the to adjust the drone till balance if the drone tilts to the right If the drone tilts to the left or right Note 1 If you can not find the WiFi signal to connect turn off WiFi and turn on again to search and connect 2 The available WiFi control radiu...

Page 21: ...phone connecting with the drone WiFi and the TF card in the drone Tip Click on the video icon to save a video when ending recording or the video cannot be saved 3 Power off the drone first when finish aerial photography Take out TF card and insert the card to a card reader Connect the card reader with computer USB port After a while view the aerial photography data from my computer mobile disk Tip...

Page 22: ...8W 03 Propeller U28W 04 Propeller Guard U28W 05 Landing Gear U28W 06 Camera Cover U28W 07 Battery Cover U28W 08 Battery Holder U28W 09 USB Cable U28W 10 Drone Battery U28W 11 Clockwise Motor Parts Red and Blue Wire U28W 12 Counterclockwise Motor Parts Black and White Wire U28WH 13 Receiving Board U28W 14 Camera Board U28WH 15 Transmitter U28W 16 Spanner U28W 17 Iron Axis for Battery Cover U28W 18 ...

Page 23: ...Low battery 2 Recharge the drone battery 3 Incorrect installation of propeller 3 Install the propeller in accordance with the user manual 1 The propeller deformed seriously 1 Replace propeller 2 The motor holder deformed 2 Replace the motor holder 3 The gyro did not reset after violent crash 3 Put the drone on the flat ground for about 10s or restart the the drone to calibrate again 4 The motor is...

Page 24: ...o correct the interference by one or more of the following measures The equipment may generate or use radio frequency energy Changes or modifications to this equipment may cause harmful interference unless the modifications are expressly approved in the instruction manual Modifications not authorized by the manufacturer may void user s authority to operate this device This device complies with par...

Reviews: