

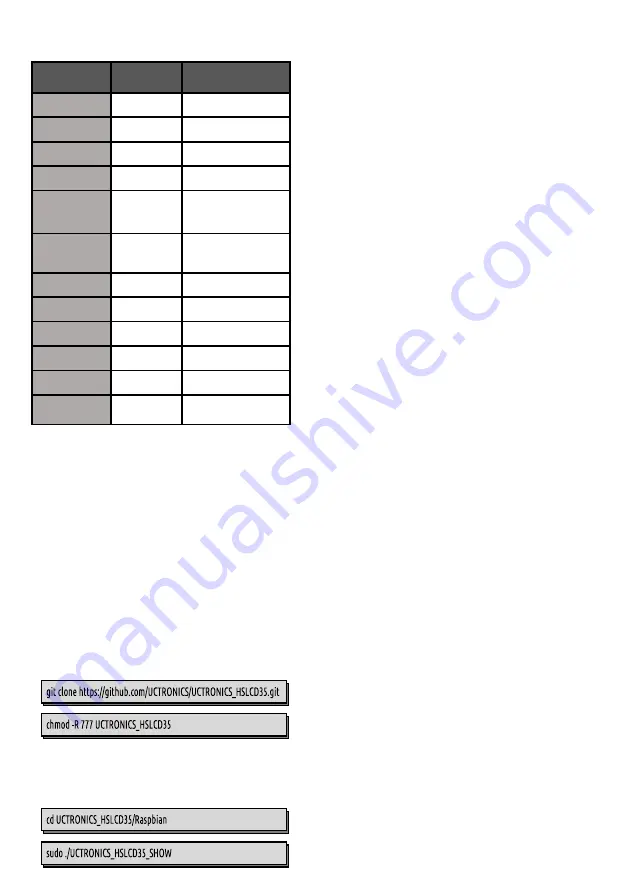
PIN DEFINITION
PIN NO.
PIN NAME
DESCRIPTION
1, 17
3.3V
3.3V power from
Raspberry Pi
2, 4
5V
5V power from Rasp-
berry Pi
3, 5, 7, 8, 10, 12,
13, 15, 16
NC
Not Connected
6,9,14,20,25
GND
Power Ground
11
TP_IRQ
Touch Panel Interrupt
request
,
LOW level for
detected panel touch
18
LCD_RS
Register Selection,
LOW level for com-
mand, HIGH level for
data
19
LCD_SI /
TP_SI
LCD/ Touch Panel SPI
input
21
TP_SO
Touch Panel SPI output
22
RST
Reset
23
LCD_SCK /
TP_SCK
LCD / Touch Panel SPI
clock
24
LCD_CS
LCD chip select, LOW
level enabled
26
TP_CS
Touch Panel chip
select, LOW level
enabled
TROUBLESHOOTING
Q1: Why am I getting a UCTRONICS logo instead
of the video feed for about a minute when boot-
ing up?
Our drivers need to be loaded on startup, which takes a
little time. It
’
s expected to see the UCTRONICS logo. The
staying logo also serves as a self
-
detecting method, and
if the driver is not correctly installed, the logo won
’
t go.
Q2: The screen stays after I shut down the system.
How do I turn that off?
Like the red indicator light on the Pi, it
’
s normal for the
screen to stay because the Pi board still feeds power to
it. Please unplug the power cable of your Pi or toggle
the backlight on/off button of the screen above the Pi
power port.
Q3: Why is my desktop monitor not responding to
the dual
-
display setup?
The native resolution of the display is 480x320, which is
not supported by all monitors. For any dual
-
display
setup, make sure you set the resolution of the system to
one that
’
s supported, like 640x480 or 1920x1080. Howev-
er, higher resolutions may leave the contents unreada-
ble on
3.5”
screens.
DRIVER INSTALLATION
The screen will not work without installing the driver.
Connect to the Pi and install the driver before using the
screen. There are 2 ways to control the Raspberry Pi.
1.
Connect the Raspberry Pi to another working
display.
2.
Connect with an SSH client like PuTTY. Make sure
your Pi is connected to the Internet before you
proceed.
Run the following commands to download and install
the LCD driver.
For different operating systems, the step 3 varies. You
need to enter the folder with the name of your specific
system. Take the Raspbian for example:
CONTACT US
If you need any further support, feel free to contact us.
●
Website: https://www.uctronics.com
●
Email: [email protected]


