background image

5

Chapter 2: Installation

airFiber X User Guide

Ubiquiti Networks, Inc.

7.  Configure the Frequency Settings. The selected 

Frequency must be the same on both airFiber X radios.

8.  Configure the Wireless Security

a.  Select the AES Key TypeHEX

 or 

ASCII.

b. 

For the 

Key field:


-

HEX 

Enter 16 bytes (eight, 16-bit HEX values: 0-9, 

A-F, or a-f). You can omit zeroes and use colons, 
similar to the IPv6 format.

Note:

 The airFiber Configuration Interface 

supports IPv6 formats excluding dotted 
quad and “::” (double-colon) notation. 


-

ASCII 

Enter a combination of alphanumeric 

characters (0-9, A-Z, or a-z).

9.  Click Change and then click Apply.
10. In-Band Management is enabled by default, so each 

airFiber X radio must have a unique IP Address. (If the 
airFiber X radios use the same IP Address, you may lose 
access to the airFiber X radios via the DATA ports.) Click 

the 

Network tab.

a. 

For the 

Management IP Address

 option: 


-

DHCP 

Keep the default, DHCP, to use DHCP 

reservation on your router to assign a unique 
IP Address.


-

Static 

Change the IP AddressNetmask, and other 

settings to make them compatible with your 
network.

b.  Click Change and then click Apply.

Repeat the instructions in the airFiber Configuration


section on your other airFiber X radio. After you have 
configured the airFiber X radios, disconnect them and 
move them to your installation site.

Hardware Installation

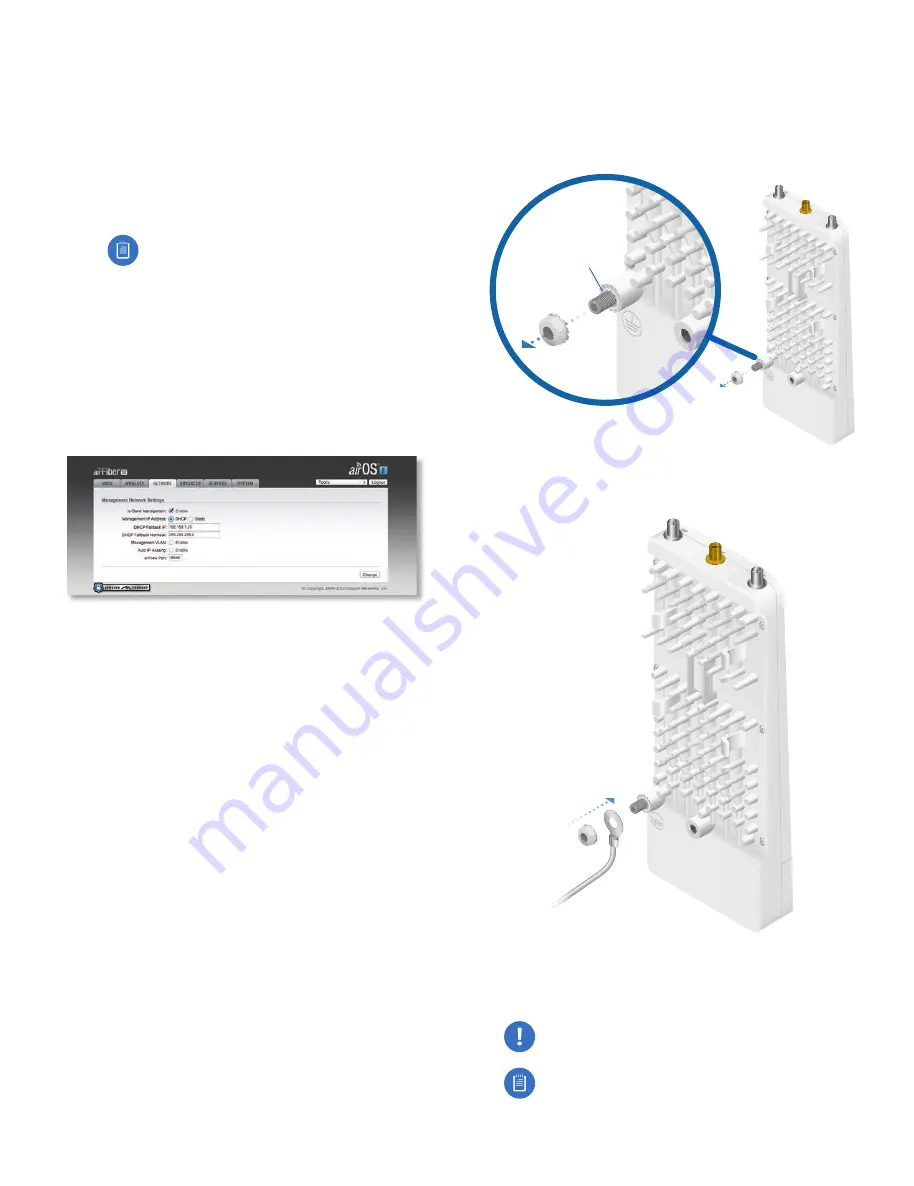
Install a Ground Wire

1.  Remove the nut from the Ground Bonding Point located 

on the back of the airFiber X radio.

Ground 

Bonding 

Point

2.  Attach a ground wire (min. 10 AWG or 5 mm

2

) to the 

lug and replace the nut to secure the wire.

3.  At the installation site, secure the other end of the 

ground wire to a grounded mast, pole, tower, or 
grounding bar.

WARNING:

 Failure to properly ground your 

airFiber X radio will void your warranty.


Note:

 The ground wire should be as short as 

possible and no longer than one meter in length. 

All manuals and user guides at all-guides.com

Summary of Contents for airFiber X

Page 1: ...2 4 GHz 3 GHz 4 GHz 5 GHz Carrier Backhaul Radio Model AF 2X AF 3X AF 4X AF 5X All manuals and user guides at all guides com...

Page 2: ...All manuals and user guides at all guides com...

Page 3: ...dware Installation 5 Alignment 9 Installer Compliance Responsibility 10 Chapter 3 Navigation 11 Accessing the airFiber Configuration Interface 11 Product Verification 12 Interface Tabs 12 Chapter 4 Ma...

Page 4: ...Chapter 10 Tools 35 Align Antenna 35 Discovery 36 Ping 36 Traceroute 36 airView 36 Appendix A Specifications 41 Appendix B AF 5X and airFiber Multiplexer 45 airFiber X Compatibility 45 Installation R...

Page 5: ...n 57 Installer Compliance Responsibility 57 FCC 57 Industry Canada 59 RF Exposure Warning 61 Australia and New Zealand 61 CE Marking 62 airFiber AF 4X Compliance 62 Frequency Ranges and Power Levels p...

Page 6: ...iv Table of Contents airFiber X User Guide Ubiquiti Networks Inc All manuals and user guides at all guides com...

Page 7: ...or more information This User Guide provides installation instructions explains how to set up an airFiber link and shows how to access and use the airFiber Configuration Interface Note Throughout this...

Page 8: ...lash This continues until the airFiber X radio is fully booted Signal Level Once fully booted the Signal 1 4 LEDs act as a bar graph showing how close the airFiber X radio is to ideal aiming This is a...

Page 9: ...tning protection follow your local electrical regulatory codes Outdoor shielded Category 6 or above cabling and shielded RJ 45 connectors are required for all wired Ethernet connections Installation O...

Page 10: ...me and Password fields Select your Country and Language You must agree to the Terms of Use to use the product Click Login Note for models AF 2X AF 3X and AF 5X only U S product versions are locked to...

Page 11: ...he Management IP Address option DHCP Keep the default DHCP to use DHCP reservation on your router to assign a unique IP Address Static Change the IP Address Netmask and other settings to make them com...

Page 12: ...ith the slots of the radio mount Then slide the radio down to lock it into place 2 Attach the RF connectors to the radio in this combination 45 to Chain 0 and 45 to Chain 1 Then slide the jackets over...

Reviews: