UBC iClicker User Manual Download Page 9


9   

Section   D:   Adding   Courses   to   iClicker   Application   


Software   update   Windows   computers:   


http://www.elearning.ubc.ca/files/2010/08/iClickerSoftwareWin.zip   

[1]   

               Unzip   the   file   and   run   the   program   anywhere   on   your   computer.   

   
I've   plugged   in   my   USB   drive   or   the   software   for   iClickers   are   somewhere   in   my   hard   drive.      
How   do   I   add   courses   to   the   iClicker   application?   
   

Skip   the   first   two   steps   if   you   do   not   have   a   USB   thumb   drive   with   the   iClicker   software   
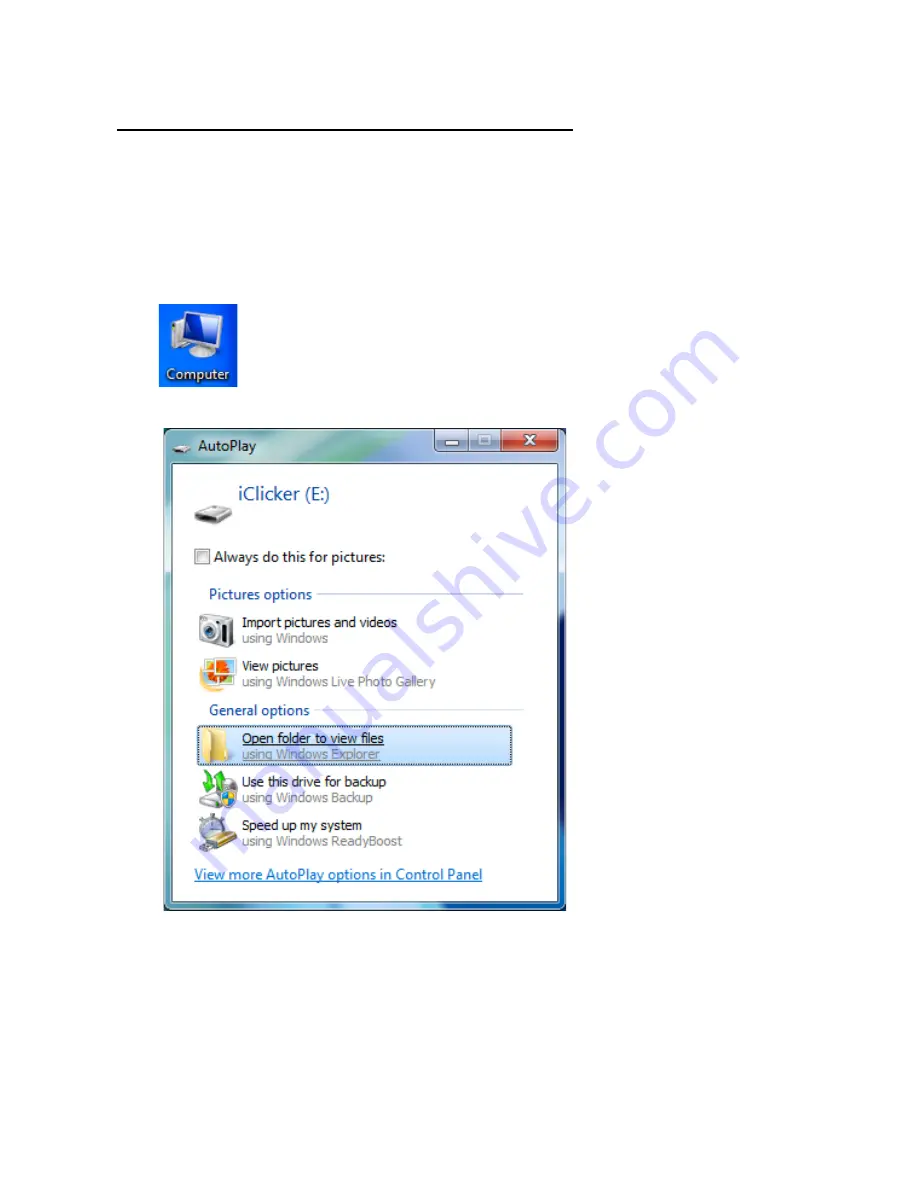
                        1.   Open   My   Computer.   


                     2.   

Open   "

iClicker

"   when   your   computer   has   recognized   the   drive.   


Summary of Contents for iClicker

Page 1: ...UBC iClicker Windows User Guide By Adrian Wong Eric Zhang Henry Chow ...

Page 2: ...Application 9 Section E iClicker Interface Settings Preferences 12 Section F CMS Integrate Wizard WebDAV 17 Section G iClicker Running Sessions 19 Section H iGrader Interfaces Session Grades and Session Reports 22 Section I iGrader Exporting Session Grades to WebCT Vista 26 Section J WebCT Vista Gradebook 28 References Article Sources and Contributors 31 Image Sources Licenses and Contributors 31 ...

Page 3: ...ebCT Vista click Add Content Link iClicker Registration Refer to Adding iClicker Registration to your Vista course Do I want to set different participation and or performance points per clicker session or do I want to set it once for the entire term To set the grading for the iClicker sessions open the iClicker application Choose the course to be changed Press Your Settings and Preferences and sel...

Page 4: ... sidebar click Adjust Font Size DPI 6 If Windows pops up a Windows needs your permission to continue box press Continue 7 Change your font size dpi to 96x96 8 Press OK and restart your computer After the class term Have I synchronized my iGrader scores into my Vista Grade Book Follow the steps in Section J WebCT Vista Gradebook References 1 http www elearning ubc ca files 2010 08 iClickerSoftwareW...

Page 5: ...fault aspx 3 or contact UBC Bookstore Textbook Requisition System text interchange ubc ca 4 How do I set up the iClicker hardware 1 To find out if the classroom you will be teaching in has a permanent affixed iClicker receiver hub go to the eLearning website http www eLearning ubc ca Clickers 5 or confirm with the Centre for Teaching Learning and Technology A The i clicker USB switcher which is us...

Page 6: ...ation files for Windows operating systems PC http www elearning ubc ca files 2010 08 iClickerSoftwareWin zip 6 2 iClicker Mac UBC Contains all the application files for Mac operating systems Mac http www elearning ubc ca files 2010 08 iClickerSoftwareWin zip 7 3 Backup Contains the zip files of all the application files for both Windows and Mac operating systems References 1 http textreq thecampus...

Page 7: ...ir clickers 1 Go to WebCT Vista http www elearning ubc ca lms login to vista 1 2 Login to your WebCT Vista course 3 Select the course from the course list that you wish to have the iClicker component 4 Click on the Build tab 5 Click on Add content Link 6 Select from the drop down list iClicker Registration ...

Page 8: ...ow should be set to False 9 Press Save and the following will appear 10 Click on the Student View and the iClicker registration icon should look like this 11 Click on the registration link and it should look something like this 12 After registering the clicker the screen will appear References 1 http www elearning ubc ca lms login to vista ...

Page 9: ...he file and run the program anywhere on your computer I ve plugged in my USB drive or the software for iClickers are somewhere in my hard drive How do I add courses to the iClicker application Skip the first two steps if you do not have a USB thumb drive with the iClicker software 1 Open My Computer 2 Open iClicker when your computer has recognized the drive ...

Page 10: ... 10 3 Open the iClicker Win UBC folder 4 Open iClicker exe to launch the iClicker application 5 The iClicker Welcome Window appears Press the Add Course button ...

Page 11: ... 11 6 Enter your course information and press the Create button 7 Select your course and press the Choose button 8 The main iClicker interface will appear ...

Page 12: ...e ID Enter the ID of your blue iClicker here to control your presentation software from anywhere in the lecture hall B Frequency Code The default frequency channel is set to AA If you are the only instructor using iClickers in the vicinity you may leave the frequency code unchanged Otherwise you or the other instructor will need to change the frequency If you are in a classroom with a permanently ...

Page 13: ...ermanently affixed iClicker receiver hub is in use it will not be displayed properly here NOTE To change frequencies on the iClickers This is also on the back of the iClickers 1 Insert the iClicker receiver hub into your computer 2 Press the On Off button until the blue Power light flashes 3 Enter the new frequency until a GREEN Vote Status light appears 4 Redo this for every session since the fre...

Page 14: ...ws Student ID Select Last Name First Initial Student ID for a more complete roster display B Web Registration You don t have to enter a security code in this section Leave this section blank C Course Management System By default the CMS option is set to General You MUST change this to Vista for ALL your classes ...

Page 15: ...ession as Question 1 2 If you prefer to name your question AND add an answer without showing your students select Show question information before each question B Polling Timer You can chose whether or not to set a limit on how long your students have in order to answer a question by selecting Count down from ___ ...

Page 16: ... These points are awarded by question for specific answer s therefore if the student gets a correct answer they would be awarded the points 5 Now press the Set For Course button An error message will appear saying that the class roster is not found Press OK and close the iClicker application 6 Please refer to the CMS Integrate Wizard WebDAV section for instructions on downloading class roster from...

Page 17: ...d This is used to connect to your courses on WebCT Vista Please note that the WebDAV password expires after 2 months Make sure you regenerate your password by following the steps above when it expires 3 In iClicker Mac UBC folder open the CMS Integrate Wizard application Note If CMS Integrate Wizard does not open you will need to install Microsoft s NET framework on your computer Click here http w...

Page 18: ...n BLUE all students who HAVE NOT registered their clicker in WebCT Vista as well as unregistered clicker ids will be in RED 6 Your class roster will be imported into the same course you chose in iClicker References 1 http www elearning ubc ca lms instructor resources utility id 2 http www microsoft com downloads details aspx familyid 0856eacb43624b0d8eddaab15c5e04f5 ...

Page 19: ...sions 1 Before starting a session in class plug in the iClicker receiver hub Ask your students to turn on their clickers and if needed change their frequencies 2 In your iClicker Win UBC folder open the iClicker application 3 Select your course and press the Choose button 4 Choose from the two session tabs ...

Page 20: ...tton when you start asking students questions Press the Stop button to stop polling your students If you selected Show question information before each question in the Polling Session tab under Settings Preferences a pop up will appear to edit question information 7 A Timer will appear and will count up down depending on your settings A counter shows the number of student votes NOTE iClicker will ...

Page 21: ...ll give you a drop down menu to A Loan Register Clickers Students MUST register their clickers in WebCT Vista See Adding iClicker Registration to Your Course Clickers SHOULD NOT be registered using this feature B Questions On The Fly Use for spontaneous questions that are not part of your planned lecture without interrupting your regular presentation C Settings and Preferences Change your settings...

Page 22: ...older open the iGrader applications 2 Select your course and press the Open iGrader button 3 The interface of iGrader has a table with your students in each row and each clicker session in the column Students with registered clickers are in blue students without registered clickers are in red Unregistered clickers that participate in sessions appear at the bottom in red ...

Page 23: ...Course 5 Each clicker session is labeled by date If you run more than one session in a day the second session will have 2 appended after the date and so on Click on the date to rename the Session Name 6 If you press Set Scores the Session Summary screen below will appear You can edit Participation Attendance Points and Points for that specific session NOTE You have set the marks distribution in th...

Page 24: ...s a picture every time you ask a question You can view the screenshot using the View Screenshot button 8 In the iGrader main interface page iGrader can create Reports and view them Press the Run Update HTML Reports button ...

Page 25: ...g Display Preferences pop up will appear Select your preference and press Submit B A Report Summary shown below will pop up with a description of each option You can click on each blue underlined link to view the report ...

Page 26: ...load and you can import your student roster Follow step 9 in CMS Integrate Wizard WebDAV 2 Restart iGrader 3 In the iGrader main interface A Select the checkbox es for session s you would like to upload to WebCT Vista and then press Export Selected Session s as CSV Excel file in the bottom left corner B Or if you want to export all the sessions press Export All Session s as CSV Excel file You do n...

Page 27: ...our CMS login information it will appear Otherwise re enter your login information and press the Login button 5 Select your course from the drop down menu 6 Press Export iclicker Scores to CMS 7 Your students marks will now be in the WebCT Vista Grade Book ...

Page 28: ...ass 2 Click the Teach tab 3 In the sidebar click Grade Book 4 Your sessions will appear exactly as they are in iGrader Note If you edit the marks in WebCT Vista and then export the same session s again the CMS Integrate wizard will omit the manually edited marks How do I upload only the total score of all the sessions into WebCT Vista ...

Page 29: ...ploadfile csv file in Microsoft Excel 5 Select your iClicker sessions columns i e column E and beyond 6 On your keyboard press the delete key to remove the contents in the selected columns 7 Column D should be your total Marks Copy column D and paste it into column E i e Right click on Column D Select Copy Right click on Column E Select Paste 8 If you want rename Total to Total iClicker Scores or ...

Page 30: ...as below Click Yes 11 Close Microsoft Excel 12 Now open the CMS Integrate Wizard and export your total grades See Exporting Session Grades to WebCT Vista 13 In the WebCT Vista Grade Book your total iClicker scores will be in the last column ...

Page 31: ... Iclicker_icon png License unknown Contributors HenryChow File welcome_screen png Source http wiki ubc ca index php title File Welcome_screen png License unknown Contributors HenryChow File add_course png Source http wiki ubc ca index php title File Add_course png License unknown Contributors HenryChow File choose_course png Source http wiki ubc ca index php title File Choose_course png License un...

Page 32: ...rs HenryChow File export_all png Source http wiki ubc ca index php title File Export_all png License unknown Contributors HenryChow File export_success png Source http wiki ubc ca index php title File Export_success png License unknown Contributors HenryChow File cms_roster png Source http wiki ubc ca index php title File Cms_roster png License unknown Contributors HenryChow Image Sources Licenses...

Reviews: