background image

Dear Customer,

Thank you for choosing our product to clean your pool. We hope that you will enjoy using your new robot to maintain your swimming pool for years to come. Before you begin to use 

your robot, please take a few minutes to carefully read Operating Instructions.

Again, thank you for choosing our product.



DO NOT ENTER THE POOL WHILE CLEANER IS IN USE
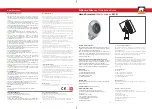
Parts List

Ref. No.

Description

Ref. No.

Description

1

Floating Power Cord

15

Anti-bumping Wheel Assembly

2

Power Cord Fixing Joint

16

Replacement Brush

3

Universal Drain Assembly

17

Main Body Base

4

Top Cover

18

Filtration Bag

5

Water-proof Joint

19

Control Box

6

Grabbing Clip

20

Power Cord Socket

7

Motor Mounting Assembly

21

ON/OFF Switch

8

Motor Filtration Cover

22

Power Cord with Plug 

9

Filtration Bag Supporting Assembly

23

PCB Board

10

Wheel Axle Assembly

24

Power Inverter

11

Wheel with Coating

25

Aluminum Plate

12

Motor

26

Screw ST4.2*8-F-H

13

Impeller

27

Driver Board

14

Screw ST3.9*11.6-C-H

IMPORTANT SAFETY INSTRUCTIONS

-   Before installing this product, read all safety instructions carefully and keep for later reference.

-  Observe all warnings and instructions marked on power supply and cleaner. Failure to follow safety warnings and instructions can result in severe injury or property damage.

-   The unit must be supplied through a residual current device (RCD) having a rated residual operating current not exceeding 30 mA. The connection to the branch circuit should be 

consistent with the local and national wiring rules and shall be made by a qualified electrician.

-   The power supply box of the cleaner must be located at minimum 3.5 meters away from the pool.

-   The power supply box of the unit must be securely fixed on the ground or at the wall. Never operate the unit without fixing the power supply box first.

-   Keep power supply away from heavy rain or placed in puddles of water

-   Do not plug the power supply into a grounded outlet or do not switch the pool cleaner “ON” if it is not fully immersed in water. Operating the cleaner out of water will cause severe 

damage and will result in loss of warranty.

-   This unit is suitable for cleaning water at temperatures between minimal 5°C and maximal 45°C. However, the recommended optimum pool water temperature is between 22°C 

and 32°C.

-   Allow the cleaner to remain in the pool for 15 to 20 minutes following the end of its cleaning cycle. This will allow the motors to cool adequately. Do not leave the cleaner in the 

pool all the time.

-  Always turn the power supply “OFF” and unplug it from the power outlet before removing the cleaner from the pool.

-   The cleaner must not be used when people are in the water. 

-   The unit is designed for use with swimming pools only.

-   Mishandling of the unit can result in leakage of lubricants.

-   The sealed motor unit and the power supply (transformer) contain no user-serviceable parts. Opening them will automatically VOID your warranty.

-  If the supply cord is damaged, it must be replaced by the manufacturer’s service agent or a qualified and trained person in order to avoid a hazard.

-  The unit is only to be used with the power supply unit provided with the cleaner.

-  This unit can be used by children aged from 8 years and above and persons with reduced physical, sensory or mental capabilities or lack of experience and knowledge if they have 

been given supervision or instruction concerning use of the appliance in a safe way and understand the hazards involved. Children shall not play with the appliance. Cleaning and 

user maintenance shall not be made by children without supervision. 

-   Keep small parts and packaging materials away from children. Hazard due to risk of suffocation!

1

   Robot Clean 2 Operating Instructions and Parts List

Summary of Contents for Robotclean 2

Page 1: ...Pool Robotclean2 cover robotclean2 indd 1 16 10 17 16 58...

Page 2: ...Pool Robotclean2 cover robotclean2 indd 1 16 10 17 16 58...

Page 3: ...1822 BN Alkmaar 0031 0 72 5671 604 0031 0 72 5671 673 Outside Living Industries Deutschland GmbH Liebauweg 32 D 46395 Bocholt 0049 0 28 71 29351 0 0049 0 28 71 29351 29 Outside Living Industries BeLux...

Page 4: ...t without fixing the power supply box first Keep power supply away from heavy rain or placed in puddles of water Do not plug the power supply into a grounded outlet or do not switch the pool cleaner O...

Page 5: ...elease the power button Light will turn OFF c The power supply has 2 settings Each setting is determined by the pool size and cleanliness as well as for how long you would like to run the cleaning cyc...

Page 6: ...elease the power button Light will turn OFF c The power supply has 2 settings Each setting is determined by the pool size and cleanliness as well as for how long you would like to run the cleaning cyc...

Page 7: ...y filter overload Assure that there is no large debris blocking any of the two inlets Large debris must be removed from the pool before using the cleaner 2 Check if drain flaps are out of place or stu...

Page 8: ...y filter overload Assure that there is no large debris blocking any of the two inlets Large debris must be removed from the pool before using the cleaner 2 Check if drain flaps are out of place or stu...

Page 9: ...n mit eingeschr nkten k rperlichen sensorischen oder geistigen F higkeiten mangelnder Erfahrung und fehlendemWissen verwendet werden wenn sie eine Beaufsichtigung oder Anweisung im sicheren Umgang mit...

Page 10: ...n mit eingeschr nkten k rperlichen sensorischen oder geistigen F higkeiten mangelnder Erfahrung und fehlendemWissen verwendet werden wenn sie eine Beaufsichtigung oder Anweisung im sicheren Umgang mit...

Page 11: ...ehe Abb 1 Sorgen Sie daf r dass der Stecker nicht nass wird b Stellen Sie den Reiniger auf eine ebene saubere Oberfl che und entfernen Sie die obere Abdeckung indem Sie dieTasten auf beiden Seiten dr...

Page 12: ...ehe Abb 1 Sorgen Sie daf r dass der Stecker nicht nass wird b Stellen Sie den Reiniger auf eine ebene saubere Oberfl che und entfernen Sie die obere Abdeckung indem Sie dieTasten auf beiden Seiten dr...

Page 13: ...ier angegebenen weder ausdr cklich oder stillschweigend und keine Person Firma oder Unternehmung ist dazu berechtigt ber das hier Angegebene hinaus eineVertretung zu bernehmen oder eineVerpflichtung i...

Page 14: ...ier angegebenen weder ausdr cklich oder stillschweigend und keine Person Firma oder Unternehmung ist dazu berechtigt ber das hier Angegebene hinaus eineVertretung zu bernehmen oder eineVerpflichtung i...

Page 15: ...knop b Om de voeding op UIT te zetten drukt u n keer op de aan uit knop Het lampje gaat dan op UIT c De voeding heeft 2 instellingen Elke instelling is afhankelijk van hoe groot en hoe schoon het zwe...

Page 16: ...knop b Om de voeding op UIT te zetten drukt u n keer op de aan uit knop Het lampje gaat dan op UIT c De voeding heeft 2 instellingen Elke instelling is afhankelijk van hoe groot en hoe schoon het zwe...

Page 17: ...r overbelast is Kijk of de uitlaten niet worden geblokkeerd door brokstukken Grotere brokstukken moeten uit het zwembad worden gehaald voordat gebruik wordt gemaakt van de cleaner 2 Controleer of de u...

Page 18: ...r overbelast is Kijk of de uitlaten niet worden geblokkeerd door brokstukken Grotere brokstukken moeten uit het zwembad worden gehaald voordat gebruik wordt gemaakt van de cleaner 2 Controleer of de u...

Page 19: ...que fournie avec le robot Cette unit peut tre utilis e par des enfants partir de 8 ans et des personnes capacit s physiques sensorielles ou mentales r duites ou manquant d exp rience et de connaissanc...

Page 20: ...que fournie avec le robot Cette unit peut tre utilis e par des enfants partir de 8 ans et des personnes capacit s physiques sensorielles ou mentales r duites ou manquant d exp rience et de connaissanc...

Page 21: ...E a D branchez l adaptateur principal de l alimentation lectrique voir ill 1 Veillez ce que la fiche ne soit pas mouill e b Placez le robot sur une surface souple et propre et retirer le couvercle en...

Page 22: ...E a D branchez l adaptateur principal de l alimentation lectrique voir ill 1 Veillez ce que la fiche ne soit pas mouill e b Placez le robot sur une surface souple et propre et retirer le couvercle en...

Page 23: ...er des obligations quelles qu elles soient au nom d Ubbink sauf indiqu dans la pr sente Pour AVOIR RECOURS AU SERVICE DE GARANTIE appelez tout d abord l agent Quand il vous aura donn son autorisation...

Page 24: ...er des obligations quelles qu elles soient au nom d Ubbink sauf indiqu dans la pr sente Pour AVOIR RECOURS AU SERVICE DE GARANTIE appelez tout d abord l agent Quand il vous aura donn son autorisation...

Page 25: ...y suelte el bot n de encendido apagado La luz se apagar c La fuente de alimentaci n tiene 2 configuraciones Cada configuraci n es determinada por el tama o y la limpieza de la piscina as como durante...

Page 26: ...y suelte el bot n de encendido apagado La luz se apagar c La fuente de alimentaci n tiene 2 configuraciones Cada configuraci n es determinada por el tama o y la limpieza de la piscina as como durante...

Page 27: ...causado por una sobrecarga del filtro Aseg rese de que no haya grandes residuos bloqueando ninguna de las dos bocas de entrada Los residuos grandes deben ser retirados de la piscina entes de usar el...

Page 28: ...causado por una sobrecarga del filtro Aseg rese de que no haya grandes residuos bloqueando ninguna de las dos bocas de entrada Los residuos grandes deben ser retirados de la piscina entes de usar el...

Page 29: ...e da persone con limitate capacit fisiche sensoriali o mentali oppure senza esperienza e conoscenza a patto che siano sorvegliati e abbiano ricevuto le necessarie istruzioni su come usare l apparecchi...

Page 30: ...e da persone con limitate capacit fisiche sensoriali o mentali oppure senza esperienza e conoscenza a patto che siano sorvegliati e abbiano ricevuto le necessarie istruzioni su come usare l apparecchi...

Page 31: ...attatore di rete dall alimentazione elettrica vedi fig 1 Assicurarsi che il connettore non si bagni b Collocare il pulitore su una superficie pulita e liscia quindi rimuovere la copertura superiore pr...

Page 32: ...attatore di rete dall alimentazione elettrica vedi fig 1 Assicurarsi che il connettore non si bagni b Collocare il pulitore su una superficie pulita e liscia quindi rimuovere la copertura superiore pr...

Page 33: ...giornati di progettazione e regolamentazione Ubbink garantisce che il robot pulitore per piscina esente da difetti nella manifattura e nei materiali in normali condizioni d uso e di manutenzione in ba...

Page 34: ...1822 BN Alkmaar 0031 0 72 5671 604 0031 0 72 5671 673 Outside Living Industries Deutschland GmbH Liebauweg 32 D 46395 Bocholt 0049 0 28 71 29351 0 0049 0 28 71 29351 29 Outside Living Industries BeLux...

Page 35: ...1822 BN Alkmaar 0031 0 72 5671 604 0031 0 72 5671 673 Outside Living Industries Deutschland GmbH Liebauweg 32 D 46395 Bocholt 0049 0 28 71 29351 0 0049 0 28 71 29351 29 Outside Living Industries BeLux...

Page 36: ...Pool Robotclean2 cover robotclean2 indd 1 16 10 17 16 58...

Reviews: