
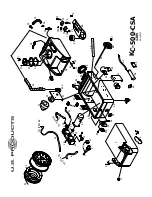
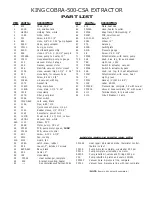

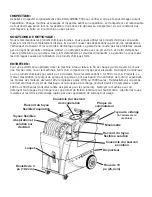

5
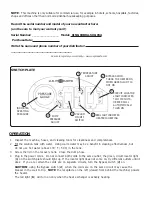
Connect the priming/siphon hose to the machine, turn the pump ON by turning the pump pressure knob
(4) up to increase pump speed, and turn the vacuum switch (3) on. Hold the rubber ‘cork’ against the
vacuum inlet hose barb on the recovery tank. The pump should prime between 20 - 60 seconds. Watch
the water flow into the recovery tank through the clear lid. When the water is clear (no air in it) and
flowing strongly, turn both the pump and the vacuum off, and remove the priming hose.
Priming may take 20 - 60 seconds, and the solution tank should be full.
6
Add liquid cleaning chemical, with a pH between 6 and 9, to the solution tank.
7
Attach the spray hose (from the reel) to the solution quick disconnect and the vacuum hose to the
hose barb on the recovery tank. Pull the hoses out from the reel. Attach the other ends of the hoses
to the cleaning tool.
8
Set the temperature knob (5) to the desired heat setting. Allow the heat exchanger two minutes to
reach operating temperature. The red light (6) will go out when the heater has reached operating
temperature. NOTE: the red light will be on nearly all the time as you clean.
9
Turn the pump on by setting the pressure adjust knob to the desired spraying pressure (0 - 500 PSI).
Read the spraying pressure at the pressure gauge (7) while spraying. NOTE: when you let off the
trigger on the wand, the pressure gauge reading will drop to 0 psi; however, the spraying pressure will
remain at the level to which you have set it. Turn the vacuum on (3). NOTE: the vacuum motor will
start up slowly to prevent a large current surge.
10 Begin cleaning.
11 Use defoamer in the recovery tank any time foaming occurs.
12 Monitor the water level in the solution tank. Do not let the pump run dry.
13 When the solution tank gets low, turn off the pump and the vacuum, fill the solution tank, empty
and clean the recovery tank.
14 When finished with the job, remove any unused solution from the solution tank, and run a few gallons of
clean water through the system. Drain the recovery tank by placing the dump hose over a drain, or a
bucket, and removing the cap. Disconnect the hoses from the cleaning tool, and reel them up onto the
hose spool.
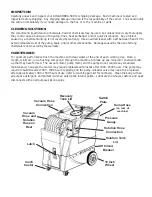
NOTE: To remove the reel, with hoses, from the machine, pull the vacuum hose loose from the hose barb
on the front of the tank. Disconnect the solution hose quick coupling. Push Vacuum hose into the center of
the hose spool. Grasp the spool from either side, and lift it off the machine. NOTE: before servicing any
component in the base cabinet, the hoses and spool must be removed from the machine before the tanks
can be lifted open.
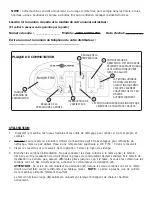
This unique, patented system is operated by a solid state circuit. It will inform the operator when the two
cords are plugged into separate circuits by turning on the green, circuit locator light. This helps to prevent
tripping circuit breakers. NOTE: if the green, circuit locator light does not illuminate when the cords are
plugged in, then both cords are on the same circuit. Try other outlets with one of the cords until you get
the locator light to come on. NOTE: if the bypass switch is turned on when both cords are on the same
circuit, the breaker in the wall may trip.
ELECTRIC CIRCUIT LOCATOR
REFER TO THE DIAGRAMS ON THE PREVIOUS PAGE
ELECTRONIC FLOAT SHUT-OFF
When the recovery tank is full, the electronic float switch will turn the vacuum motor off. This will
prevent water from entering the vacuum motor. The float may not work properly if the float filter rod
is dirty or if there is heavy foam in the tank
.
To reset, turn the Vacuum switch off, and empty the
tank.
CAUTION: to avoid vacuum motor damage, always make sure the float filter is clean and that it
can travel freely before you operate the machine. Always use a defoamer any time foam is present.


