


SKU 02575
For technical questions, please call 1-800-444-3353.
Page 9
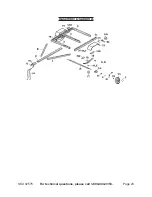
Align the
3.
two
mounting holes in a Rear Spring Hanger (15R) with the
two
mounting
holes located in the rear section of the Left Side Rail (1L). Insert
two
3/8” x 7/8”
Carriage Bolts (A)
upward from the underside
of the aligned mounting holes, and
secure the Rear Spring Hanger to the Left Side Rail with
two
Washers (C) and
two
Nuts (B).
Align the
4.
two
mounting holes in the remaining Rear Spring Hanger (15R) with the
two
mounting holes located in the rear section of the Right Side Rail (1L). Insert
two
3/8” x 7/8” Carriage Bolts (A)
upward from the underside
of the aligned mounting
holes, and secure the Rear Spring Hanger to the Right Side Rail with
two
Washers
(C) and
two
Nuts (B).
Align the mounting hole on the end of a Spring (18) with the mounting hole located
5.
on the side of one of the
pre-attached
Front Spring Hangers (15F), and secure the
Spring to the Front Spring Hanger with
one
Bolt (N) and
one
Nut (B).
Insert the second Spring Bolt (N) underneath the curved edge at the rear of the
6.
Spring (18) and through the mount hole of the Rear Spring Hanger (15R). Secure
with one Nut (E).
For the remaining Spring (18), Front Spring Hanger (15F), and Rear Spring Hanger
7.
(15R), repeat Steps #5 and #6.
Align the center mounting hole of a Spring Plate (16) with the center mounting hole
8.
of a
pre-attached
Spring (18), and secure the Spring Plate to the Spring with two U
Bolts and Nuts (U Bolts fit underneath the axles with threaded ends up). Repeat
this step on opposite side of Trailer.
Align the center mounting hole of the remaining Spring Plate (16) with the center
9.
mounting hole of the remaining
pre-attached
Spring (18), and secure the Spring
Plate to the Spring with
one
Bolt (A),
one
Washer (C), and
one
Nut (B).
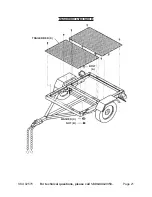
With assistance, position the
10.
pre-assembled
Tire, Wheel, and Axle Assembly under
the mid-section of the
pre-assembled
Frame of the Trailer.
On the right side of the Trailer, insert
11.
two
U-Bolts (17) upward, over the right end of
the Axle (19), and through the
four
mounting holes in the Spring Plate (16). Then,
secure the right end of the Axle to the Spring (18) by tightening
four
Washers (C)
and
four
Nuts (B) onto the two U-Bolts.
On the left side of the Trailer, insert the remaining
12.
two
U-Bolts (17) upward, over the
left end of the Axle (19), and through the
four
mounting holes in the Spring Plate
(16). Then, secure the left end of the Axle to the Spring (18) by tightening
four
Washers (C) and
four
Nuts (B) onto the
two
U-Bolts.
REV 05/03


