U-Line U-3090WCWCOL-00 Service Manual Download Page 17

14

u-line.com

General Information

Fan Delay

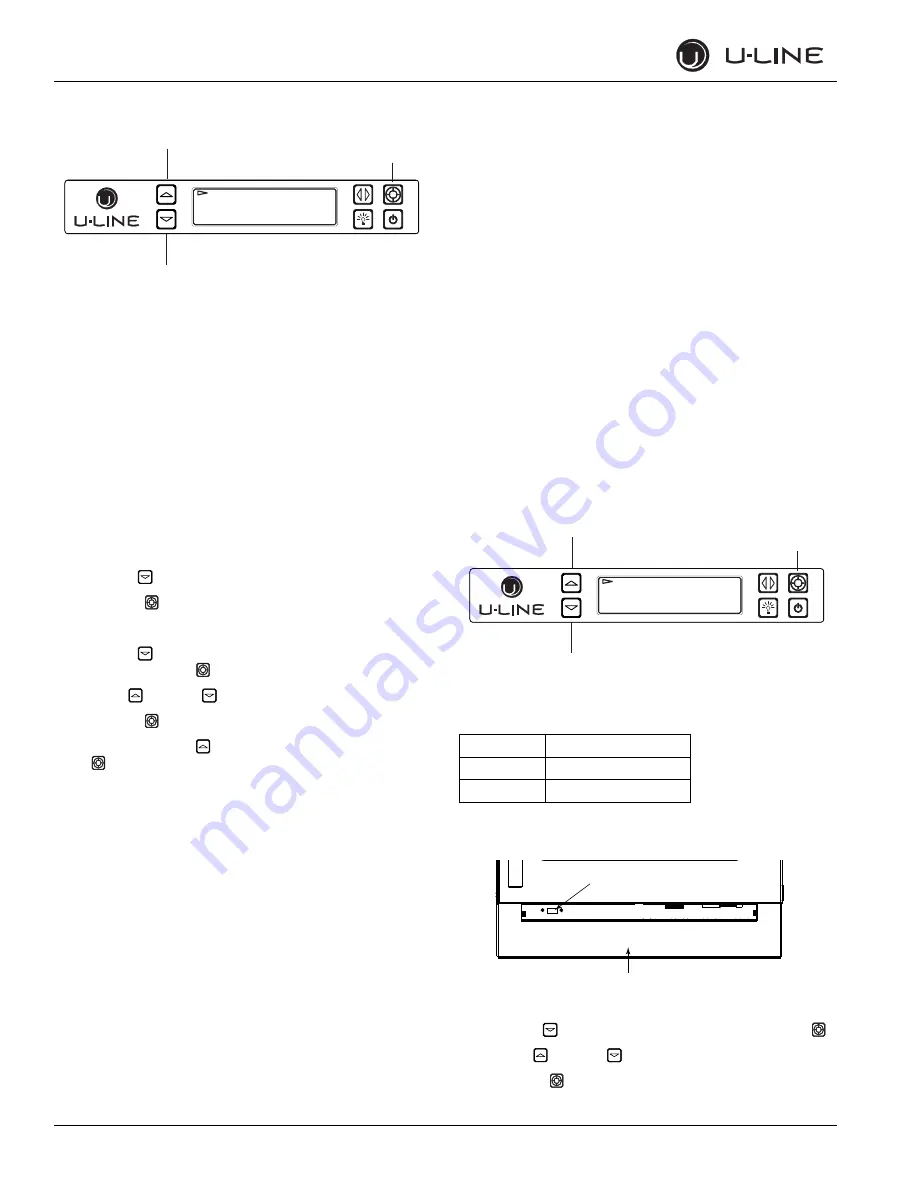
The Fan Delay menu option allows the modification of fan run times 
during and after a cooling cycle. In order to allow time for the 
evaporator to properly cool, the evaporator fan is delayed from 
starting with the cooling cycle for a given amount of time. In order to 
remove as much warmth as possible from the cabinet, the evaporator 
fan will continue to run at the end of the cooling cycle for a given 
amount of time. 

Fan Delay On=

“Fan Delay On” is the amount of time in minutes the fan will be 
delayed from starting from the beginning of a cooling cycle. 

Fan Delay Off=

“Fan Delay Off” is the amount of time in minutes the fan will 
continue to run at the end of a cooling cycle.

To access Fan Delay

1. Use Down 

 to select “Fan Delay”.

2. Press Select 

.

To alter fan settings

3. Use Down 

 to select either “Fan Delay On” or “Fan Delay 

Off” and press Select 

. The chosen option will begin to flash. 

4. Press Up 

 or Down 

 to change settings.

5. Press Select 

 to confirm.

To exit Fan Delay use Up 

 to select “Return to Menu” and press 

Select  

to 

confirm.

USB Communication

The 3000 series uses an advanced USB logging feature for system 
logging and diagnostics. The controller outputs 41 separate data 
points per second to either a USB flash disk or transmits over USB 
via TTY to a client PC. To prepare the unit for logging, first verify the 
USB port is set to the proper configuration. See “USB Port” for 
information on configuring the USB port.

Flash Mode:

Suitable for logging directly to a USB flash disk. 

PC Link Mode:

Suitable for communicating directly with another PC via USB.

USB Communication (Flash)

The main control can host a wide range of flash disks up to a max 
capacity of 8GB. After verifying the USB port is set to “Flash”, simply 
insert a flash disk in to the USB port located above the grille. The 
flash disk activity light (located on the flash disk) will begin flashing 

immediately as data is recorded to the drive. Data is recorded in one 
second increments and is only limited by the capacity of the flash disk. 

The system will create a file named “uline.csv” on the flash disk. In 
the event the file already exists, new data will automatically be 
appended to the end of the existing file. The file is output in a comma 
delineated text format and may be viewed in a wide variety of simple 
text readers or spreadsheet programs.

For information on identifying each data point, see the 
“Communication Data” table on page 

16

.

USB Communication (PC Link)

Data can be transmitted directly to a client PC via a serial 
connection. Verify the USB port is set to “PC Link”. Use a Type A to 
Type A male to male USB cable to connect the system to a 
Windows

®

 compatible PC. It is necessary to install communication 

drivers to the client PC. Drivers may be downloaded at 
u-lineservice.com. Establish a connection using a Telnet / TTY 
terminal application. U-Line recommends PuTTY. PuTTY is available 
for download at u-lineservice.com. Once the connection is 
established, the controller will output a series of 41 data points in 1 
second increments. For information on identifying each data point, 
see the “Communication Data” table on page 

16

.

USB Port

The USB Port menu option allows the selection of a communication 
mode. The 3000 Series can communicate either via TTY to a PC or 
log diagnostic information directly to a USB flash disk.

NOTE: Unit ships in PC link mode.

To alter communication settings

1. Use Down 

 to select the current setting and press Select 

2. Press Up 

 or Down 

 to change settings.

3. Press Select 

 to confirm.

Up

Select

Down

RETURN TO MENU

FAN DELAY

FAN DELAY ON = 1

FAN DELAY OFF = 2

ID

Communication

PC Link

PC TTY

Flash

USB Flash Drive

Up

Select

Down

RETURN TO MENU

USB PORT

PC Link

USB

Grille

Summary of Contents for U-3090WCWCOL-00

Page 1: ...COM SERVICE MANUAL MODULAR 3000 SERIES 230V 3090 MODELS U 3090WCWCOL 00 U 3090WCWCS 00 The American Built In Undercounter Leader Since 1962 ALL MODULAR 3000 MODELS ARE INTENDED FOR BUILT IN INSTALLATI...

Page 2: ...he product installation and any alleged property damage 2 Inquire when the problem first appeared any prior problems with the product and provide a brief description of the alleged damages 3 To expedi...

Page 3: ...Select Control 6 Adjusting Temperature Settings 6 Interior Lighting 7 Error Notification 7 Customer Menu 7 Service Menu 9 USB Communication 14 Quick Guide 18 Convection Cooling 20 3000 Series Mainten...

Page 4: ...y your old refrigerator or freezer take off the doors and leave shelves in place so children may not easily climb inside This appliance is not intended for use by persons including children with reduc...

Page 5: ...trip base fascia is free of obstruction Obstructing free airflow can cause the unit to malfunction and will void the warranty Failure to clean the condenser every six months can cause the unit to malf...

Page 6: ...ne 7 C 13 C set point 10 C Red Wine 13 C 18 C set point 13 C Cabinet Configuration Model Door Configuration Left Zone Right Zone U 3090WCWCOL 00 Overlay Glass Doors Wine Racks Wine Racks U 3090WCWCS 0...

Page 7: ...following information on the Labor Invoice Name of the selling dealer Date of purchase installation Sales order or Invoice number Description of verification document i e Store Receipt Closing Papers...

Page 8: ...formation Thermistor Calibration While thermistors generally do not require calibration over time contact corrosion and or element wear may make calibration necessary Calibration To calibrate a thermi...

Page 9: ...h Mode and temperature ranges Mode selection will vary by model The 3090 Models have two independently controlled zones Each zone may have its own Mode and set point 1 In order to adjust set points yo...

Page 10: ...Should the system detect a fault an error notification will be displayed on the user interface See below for a list of errors Customer Menu The 3000 Series of U Line undercounter refrigeration applia...

Page 11: ...Sabbath mode disables system responses to user initiated activities and all external functions including lighting display and audible alarms The unit will still maintain internal temperatures and set...

Page 12: ...toring while settings are restored When restoration is complete Restoring will return to Restore To exit Factory Default use Up to select Return to Menu and press Select to confirm Help To access the...

Page 13: ...r circuit shorted Check connection Replace if necessary R Zone T Short Right Zone thermistor circuit shorted Check display cable Replace if necessary L Evap T Short Left evaporator thermistor circuit...

Page 14: ...h available information To exit the Input Status menu use Up to select Return to Menu and press Select to confirm Outputs Outputs is used to monitor the state of DC outputs To access Outputs 1 Use Dow...

Page 15: ...ic report Any system faults will be displayed under Self test If no errors are present no errors will be displayed and the main control board is functioning properly The main control board is extremel...

Page 16: ...Restore will change to Restoring while settings are restored When restoration is complete Restoring will return to Restore To exit Factory Default use Up to select Return to Menu and press Select to c...

Page 17: ...ly insert a flash disk in to the USB port located above the grille The flash disk activity light located on the flash disk will begin flashing immediately as data is recorded to the drive Data is reco...

Page 18: ...unning the cooling system To toggle showroom mode 1 Use Down to select Showroom Mode 2 Press Select 3 Use Down to select Off and press Select Off will begin to flash 4 Press Up or Down to toggle betwe...

Page 19: ...Differential Right Zone Offset Right Evap Offset L Door Indicator R Door Indicator Relay 1 Indicator Sample Data 0 0 Beverage 34 1 0 0 Field 21 22 23 24 25 26 27 28 29 30 ID Relay 2 Indicator Relay 3...

Page 20: ...C 30 Left LED intensity provided in 10 Left Zone Differential value in F C 31 Right LED intensity provided in 11 Left Zone offset value in F C 32 Energy Saver mode indicator E active 12 Left evaporat...

Page 21: ...ADJUST MODES PRESS AND RELEASE TO SCROLL THROUGH THE MODES 4 3090 ADJUST TEMPERATURE PRESS TO SELECT ZONE PRESS TO SET THE TEMPERATURE 3045 3060 ADJUST TEMP PRESS TO SET THE TEMPERATURE 5 3090 ADJUST...

Page 22: ...H AND RELEASE TO EXIT SERVICE MODE CONFIGURES THE ON BOARD USB PORT FOR FLASH DRIVE OR PC LINK DISPLAYS THE NUMBER OF TIMES AN ERROR HAS OCCURRED SCROLL TO THE END TO ERASE THE ERROR CODES DISPLAYS TH...

Page 23: ...order to operate efficiently the evaporator fan blade and vents should be unobstructed and free of any dust buildup Evaporator Fan Replacement Should the evaporator fan need to be replaced follow the...

Page 24: ...grille lock screws See below 3 Gently pull grille away from unit until it stops 4 Push grille rails towards the center of the unit to lift rails off lock screws 5 Pull grille free from unit Installin...

Page 25: ...over extend or damage it during door alignment Overlay Models Removing Overlay 1 Open door completely 2 Remove gasket 3 Remove six screws seated in gasket pocket Stainless Models Removing Wrap 1 Open...

Page 26: ...ivate with the switching of the relay If it does not see Component Testing on page 24 Inputs The main control monitors a number of thermistor inputs and switch states during operation It would be unli...

Page 27: ...ator fan is used Condition Customer complains of the unit not cooling properly The main screen of the display lists an error L Temp Hi 12H The compressor seems to be functioning properly however the l...

Page 28: ...oblem Airflow through the grill below the door in front cannot be obstructed Also the unit cannot be installed behind a closed door or in a closet The unit is too cold or freezing product Control set...

Page 29: ...er to Quick Chill Section of this manual Control set too cold Refer to Adjusting Temperature Settings Section of this manual Review logged error codes Refer to Fault System Diagnosis Guide Section of...

Page 30: ...ine to the compressor inlet The compressor takes the low pressure vapor and compresses it increasing both pressure and temperature The hot high pressure gas is pumped out the discharge line and into t...

Page 31: ...orce pulls the reed to its contact and closes the circuit which turns the light and display off When the door is open the reed pulls away from the contact and opens the circuit If the door s are left...

Page 32: ...s or damage Repair split or pinched cabling Amb Thrm Short Inspect thermistor cable for pinch points or damage Replace if necessary Inspect wire harness from main control board for pinch points or dam...

Page 33: ...ere no clear guidelines or solutions are evident today The newest Uihlein generation continues to build upon the family s innovative legacy at the Milwaukee Wisconsin based business by providing conti...

Reviews: