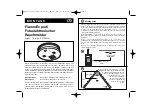
PAGE 2 OF 6
0721 IH-9465
INSTALLATION CONTINUED
6. Insert the plastic screw anchors (included) into the
holes. Tap the screw anchors gently with a hammer,
if necessary, until they are flush with the ceiling or
wall.
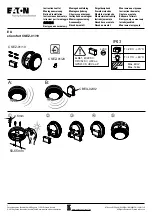
7. Tighten the screws (included) into the screw anchors,
then loosen them two turns. (See Figure 2)
8. Fit the smoke detector over the screw heads (A) as
shown. Slide cover over so screws are tight (B). Close
cover. (See Figure 2)
Screws
A
Figure 2
B
9. If the smoke detector cover does not align, rotate
the base and retighten the screws.
10. Activate the battery. With the cover open, remove
and reinstall the battery, so the terminals on the
battery match the terminals on the smoke detector.
Match "+" to "+" and "-" to "-". Push the battery in until
it snaps in securely and cannot be shaken loose. If
the battery is not snapped in completely, the unit
cannot receive battery power. The smoke detector
may beep briefly when user installs the battery – this
is normal. Once the battery is installed, the red
power indicator light (behind the test button) will
flash once per minute to show the smoke detector is
working.
11. Close the cover completely.
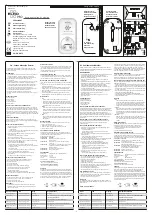
12. Test the smoke detector. Press and hold the test
button on the cover of the unit until the smoke
detector sounds (the smoke detector may continue
to sound for a few seconds after button is released).
(See Figure 3) During testing, user will hear a loud,
repeating horn pattern: three beeps, pause, three
beeps, pause. If the smoke detector does not sound
during testing, call Uline Customer Service at
1-800-295-5510.
Test Button
Figure 3
1-800-295-5510
uline.com