PAGE 2 OF 6
0823 IH-1200
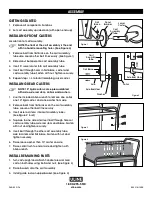
ASSEMBLY
GETTING STARTED
1. Remove all components from box.
2. Set cart assembly upside down (with open ends up).
INSTALLING FRONT CASTERS
Locate front of cart assembly.
NOTE: The front of the cart assembly is the end
with no handle mounting holes. (See Figure 3)
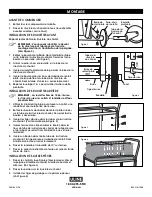
1. Remove bolt from flat brace on the cart assembly
tube side. Loosen other bolt if necessary. (See Figure 1)
2. Slide donut bumper onto cart assembly tube.
3. Insert 5" swivel caster into cart assembly tube.
4. Insert bolt through holes in flat brace, caster and
cart assembly tube. Fasten with nut. Tighten securely.
5. Repeat steps 1-3 to install remaining swivel caster.
INSTALLING REAR CASTERS
NOTE: 10" rigid casters come preassembled
with axle, axle rod stem, collars and washers.
1. Use the included Allen wrench to remove one collar,
one 10" rigid caster, and one washer from axle.
2. Remove bolts from flat braces on the cart assembly
tube. Loosen other bolt if necessary.
3. Insert axle rod stems into cart assembly tubes.
(See Figure 2 inset)
4. Tap axle to one side and insert bolt through holes of
cart assembly tube, axle rod stem and brace. Fasten
with nut and tighten securely.
5. Insert bolt through the other cart assembly tube,
axle rod stem and flat brace. Fasten with nut and
tighten securely.
6. Place loose washer then 10" caster on axle.
7. Place collar flush to end of axle and tighten with
Allen wrench.
INSTALL REMAINING PARTS
1. Turn cart upright and attach handle to rear of mail
cart on both sides using bolts and nuts. (See Figure 3)
2. Place baskets onto the cart assembly.
3. Install guide rods on upper basket. (See Figure 4)
Figure 2
Figure 3
Figure 4
Figure 1
1-800-295-5510
uline.com
Flat
Brace
Flat Brace
Donut
Bumper
Swivel
Caster
Cart
Assembly
Tube
Cart
Assembly
Tube
Collar
Axle
Axle Rod Stem
Washer
Axle Rod Stem

