background image

PAGE 3 OF 12 

0222 IH-10013

PRINTING THE FIRST LABEL

The first time user opens the application, it will ask to 

register the software. Registering the software ensures 

that user will be informed of any software updates.

During the registration process, user will be asked to 

enter the serial number for the label printer. The serial 

number is located on the bottom of the printer. 

To print the first label:

1.  Start DYMO Label software by doing one of the 

following:

•  For Windows, click Start, then 

Programs>DYMO>DYMO Label v.8.

•  For Macintosh, double-click the DYMO Label icon  

in the Applications folder.

2.  Once software is open, it will recognize the label in 

the printer and will automatically display that label 

for user to enter the text.

3.  Click Print to print label.

PRINTING

TROUBLESHOOTING

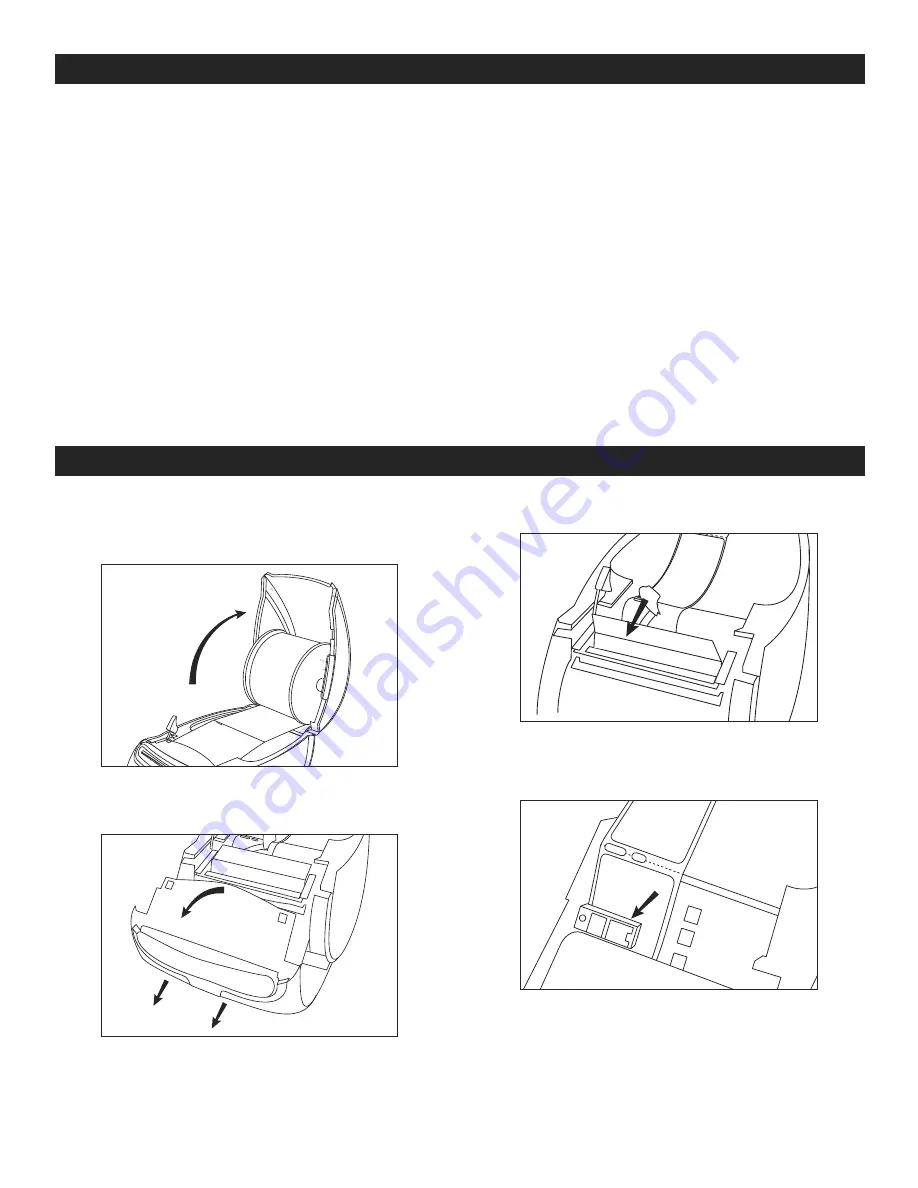
CLEANING THE SENSORS

1.  Open the top cover. (See Figure 7)

2.  Remove the front cover by pulling down then out. 

(See Figure 8)

3.  Pull forward label guide bar. (See Figure 9)

4.  The sensor will be on the left hand side of the printer. 

(See Figure 10) Use a dry cotton swab to clean off 

any debris from the sensor.

Figure 7

Figure 9

Figure 10

Figure 8

Summary of Contents for DYMO LABELWRITER 550 TURBO

Page 1: ...s the label printer power on and off The label forward feed button advances a single label The label reverse feed button reverses the label in the label exit slot out of the slot and is used to remove...

Page 2: ...ABELS NOTE For Windows do not connect the printer to your computer until instructed to do so during the software installation TO CONNECT THE POWER 1 Plug the power cord into the power adapter See Figu...

Page 3: ...For Windows click Start then Programs DYMO DYMO Label v 8 For Macintosh double click the DYMO Label icon in the Applications folder 2 Once software is open it will recognize the label in the printer...

Page 4: ...label release lever forward and pull the jammed label out of the label feed slot Labels do not feed correctly Make sure labels are loaded properly and that the left edge of the label is aligned with...

Page 5: ...e y apaga la etiquetadora El bot n de avance de etiquetas mueve hacia adelante una etiqueta individual El bot n de inserci n en reversa de etiquetas da marcha atr s a la etiqueta en la ranura de salid...

Page 6: ...ci n de software PARA CONECTARLA A LA CORRIENTE 1 Conecte el cable al adaptador Vea Diagrama 2 2 Conecte el adaptador en el puerto de alimentaci n en la parte posterior de la etiquetadora Vea Diagrama...

Page 7: ...reconocer la etiqueta en la etiquetadora y la mostrar autom ticamente para que el usuario ingrese el texto 3 Haga clic en Print Imprimir para imprimir la etiqueta IMPRIMIR SOLUCI N DE PROBLEMAS LIMPIE...

Page 8: ...hacia adelante y jale la etiqueta atascada de la ranura de alimentaci n Las etiquetas no entran correctamente Aseg rese de que las etiquetas se carguen adecuadamente y que el borde izquierdo de la et...

Page 9: ...e bouton d alimentation permet d allumer et d teindre l imprimante tiquettes Le bouton d alimentation en tiquettes permet de faire avancer les tiquettes une par une Le bouton de recul des tiquettes r...

Page 10: ...lors de l installation du logiciel CONNEXION L ALIMENTATION 1 Branchez le cordon d alimentation dans l adaptateur d alimentation Voir Figure 2 2 Branchez l adaptateur dans le connecteur d alimentatio...

Page 11: ...mesure de reconna tre l tiquette dans l imprimante et de l afficher automatiquement pour permettre d entrer le texte de l utilisateur 3 Cliquez sur Print Imprimer pour imprimer l tiquette IMPRESSION D...

Page 12: ...te coinc e hors de la fente d alimentation L imprimante ne d roule pas correctement les tiquettes Assurez vous que les tiquettes sont plac es convenablement et que le bord gauche de l tiquette est ali...

Reviews: