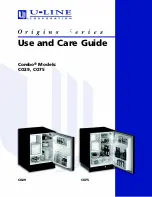
U-Line Combo CO29 Use And Care Manual Download Page 8

8

CO29, CO75

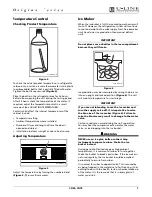
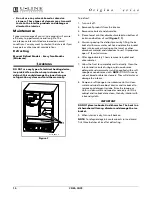
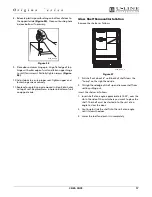
The ice bucket can be removed for emptying and 
cleaning. To remove the ice bucket, raise the bin arm and 
remove the bucket from the ice compartment. Use the ice 
bucket for ice storage only.

Normal Operating Sounds

All models incorporate rigid foam insulated cabinets to 
provide high thermal efficiency and maximum sound 
reduction for its internal working components. In spite of 
this technology, your model may make sounds that are 
unfamiliar. 

Normal operating sounds may be more noticeable 
because of the unit’s environment. Hard surfaces such as 
cabinets, wood/vinyl/tiled floors and paneled walls have a 
tendency to reflect normal appliance operating noises.

Common refrigeration components, and a brief 
description of the normal operating sounds they make, 
are listed below. 

NOTE:

 Your product may not contain all 

of the components listed.

• Compressor: The compressor makes a hum or pulsing 

sound that may be heard when it operates. 

• Evaporator: Refrigerant flowing through an evaporator 

may sound like boiling liquid. 

• Condenser Fan: Air moving through a condenser may be 

heard.

• Automatic Defrost/Drain Pan: Water may be heard 

dripping or running into the drain pan when the unit is in 
the defrost cycle.

• Automatic Ice Maker: You will hear ice as it drops from 

the mold into the ice bin/tray.

• Water Valve: After an ice maker completes a cycle, a water 

valve will make a buzzing sound and running water may 
be briefly heard.

Outdoor, Marine and RV Usage

Some U-Line models are designed to operate in outdoor, 
marine and RV environments. For best performance, keep 
the unit out of direct sunlight.

• If the unit will be shut off for five days or more, prop 

door open to allow for air circulation and prevent mold 
and mildew.

IMPORTANT

IMPORTANT

If the ambient temperature is expected to drop 
below 45°F, turn off and unplug unit, and drain all 
water from the unit to prevent freezing damage not 
covered by the warranty.

• High ambient temperatures (110°F or higher) may 

reduce the unit's ability to reach low temperatures.

Storage, Vacation, Moving

If the unit will not be used for an extended period, or 
otherwise stored, follow these steps completely:

WARNING

Electrical Shock Hazard. Disconnect power before 
servicing. Before operating, replace all panels. 
Failure to do so may result in death or electrical 
shock.

1. Remove all consumable contents from the unit.

2. Disconnect power to the unit.

3. Shut off water supply to the unit at the main water 

source.

IMPORTANT

IMPORTANT

• If the ambient temperature is expected to drop 

below 45°F, turn off and unplug unit, and drain all 
water from the unit to prevent freezing damage 
not covered by the warranty.

• The use of anti-freeze or other products of this 

nature is not necessary and is not recommended.

4. Disconnect the water valve inlet and outlet lines, and 

allow them to drain completely.

5. Reconnect power to the unit, and allow it to run for 

one hour (minimum) until any remaining ice has been 
ejected from the ice maker assembly.

6. Disconnect power to the unit, dry any remaining water 

from the ice maker assembly, and reconnect any lines 
removed from the water supply valve. 

7. Disconnect the power cord from its outlet, and leave it 

disconnected until the unit is returned to service.

8. Clean and dry the interior of the cabinet (See CLEANING 

AND MAINTENANCE: GENERAL CLEANING).

9. During periods of non-use, the cabinet must remain 

open to prevent the formation of mold and mildew. 
Open door a minimum of 2" (5 cm) to provide the 
necessary ventilation.

ULIN_016357_30089.fm  Page 8  Monday, March 27, 2006  10:25 AM

Summary of Contents for Combo CO29

Page 1: ...Use and Care Guide CO29 CO75 Combo Models CO29 CO75...

Page 2: ...cated on the inside rear cover of this guide To validate your warranty the product and its original purchase date must be registered A Warranty Registration Card has been included for this purpose in...

Page 3: ...erator Models CO29 CO75 6 Operation 6 Initial Startup 6 Temperature Control 7 Ice Maker 7 Normal Operating Sounds 8 Outdoor Marine and RV Usage 8 Storage Vacation Moving 8 Product Disposal 9 Cleaning...

Page 4: ...4 CO29 CO75 This page intentionally left blank...

Page 5: ...the doors and leave shelves in place so that children may not easily climb inside WARNING SHOCK HAZARD Electrical Grounding Required Never attempt to repair or perform maintenance on the unit until t...

Page 6: ...ovides a rich textured look and resists scratching peeling and flaking Features and specifications are subject to change without notice Figure 2 IMPORTANT IMPORTANT Proper air flow Figure 2 is require...

Page 7: ...on than manual defrost units IMPORTANT IMPORTANT Do not place cans or bottles in the ice compartment because they will freeze Figure 6 Ice production may be interrupted by raising the bin arm into an...

Page 8: ...or more prop door open to allow for air circulation and prevent mold and mildew IMPORTANT IMPORTANT If the ambient temperature is expected to drop below 45 F turn off and unplug unit and drain all wa...

Page 9: ...h a good quality all in one stainless steel cleaner polish on a monthly basis For best results use Claire Stainless Steel Polish and Cleaner which can be purchased from U Line Corporation P N 173348 C...

Page 10: ...s by filling the ice bucket with warm water not hot and place the bucket back into ice maker housing on the towel or other absorbent material and close door to unit Or prop door open 2 5 cm minimum 6...

Page 11: ...gure 8 2 and save 4 Remove grille and grille cap from unit Figure 9 5 Clean the condenser coil Figure 9 1 using a using a soft brush with a combing action or vacuum cleaner Do not touch the condenser...

Page 12: ...the water solenoid valve Figure 14 2 Tighten the connector securely 7 Open the water main supply valve and check for leakage at the water hose connection Ensure that the water supply line is not kinke...

Page 13: ...de edge as shown Figure 17 1 Figure 18 2 If the unit is not level adjust the feet on the corners of the unit as necessary Figure 18 3 Check the levelness after each adjustment and repeat the previous...

Page 14: ...le screws and remove the grille Figure 21 1 Remove top hinge from cabinet three screws Figure 21 Hold door to keep it from falling 2 Lift the door off the bottom hinge Figure 22 3 Remove bottom hinge...

Page 15: ...n upper hinge to unit three screws Figure 28 Partially tighten screws until door is aligned 12 Adjust door to assure proper seal Tighten upper hinge screws securely 13 Replace three plastic plugs remo...

Page 16: ...vert screw and reinstall pivot screw in top hinge Figure 32 Do not install hinge on cabinet at this time Figure 33 5 Remove bottom hinge from cabinet four screws and screws on opposite side of cabinet...

Page 17: ...of unit Replace screws in holes in bottom of unit on opposite side Glass Shelf Removal Installation Remove the shelves as follows Figure 37 1 Pull shelf out about 6 until back of shelf clears the hum...

Page 18: ...Corporation directly Contact information appears on the rear cover of this guide You will be asked for your product Model and Serial Numbers This information should be recorded inside the front cover...

Page 19: ...ack of the unit Water supply connection leaking Tighten fitting as required Ice cubes sticking together Door gasket not sealing properly Adjust door See MAINTENANCE DOOR ALIGN ADJUST REVERSE Infrequen...

Page 20: ...20 CO29 CO75 This page intentionally left blank...

Page 21: ...CO29 CO75 21 This page intentionally left blank...

Page 22: ...22 CO29 CO75 This page intentionally left blank...

Page 23: ...as fire floods wind and lightening damages incurred or resulting from shipping improper installation unauthorized modification or misuse abuse of the product customer education calls food loss spoila...

Page 24: ...r your unit providing complete installation information is available for download at www U Line com Information for custom panel inserts per model including panel size and instructions are available b...

Reviews: