U-Line Combo CO29 Installation Manual Download Page 8

www.U-LineService.com

8

02/2005

CO29A and CO29FF Ice Maker/Refrigerators

Checking Door Alignment

The unit’s door is aligned at the factory before shipment. 
However, its alignment could have been disturbed during 
shipment or during door panel installation.

IMPORTANT

Properly aligned, the door's gasket should be firmly in 
contact with the cabinet all the way around the door (no 
gaps).

1. Carefully examine the door's gasket to assure that it is 

firmly in contact with the cabinet.

Note: 

When inspecting door alignment, make sure the 

door gasket is not pinched on the hinge side of the door

.

2. If the door is properly aligned, go on to 

6 Prepare 

Plumbing

. If it is not, use the following procedure.

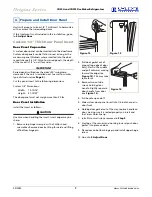
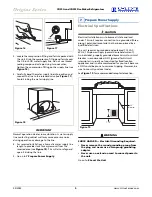
Adjusting Door Alignment

1. Loosen (do not remove) 

top and bottom hinge 
screws. See 

Figure 15

.

2. Align door squarely with 

cabinet. Make sure gasket 
is firmly in contact with 
cabinet all the way around 
the door (no gaps).

3. Tighten bottom hinge 

screws.

4. Tighten top hinge screws. 

Go on to 

6 Prepare 

Plumbing

.

CAUTION

Plumbing installation must observe all state and local 
codes. All water connections MUST BE made by a licensed/
qualified plumbing contractor. Failure to follow 
recommendations and instructions may result in damage 
and/or harm.

WARNING

To prevent accidental electrocution, make certain 
that the floor surfaces surrounding the unit are 
dry whenever power is removed from, or applied 
to, the unit.

Water Supply Connection

When connecting the water supply, follow these 
guidelines:

• Review the local plumbing codes before you install the 

unit.

• Connect to the cold water supply.

• The water pressure should be between 20 and 120 psi.

• Install a shut-off valve in the 1/4 inch OD water supply 

line.

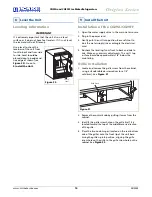
• Connect sufficient tubing to the unit so that tubing 

may be looped, allowing the unit to be removed for 
cleaning and servicing (see 

Figure 18

). However, make 

certain that the tubing is not pinched or damaged 
during installation.

• U-Line recommends the use of copper tubing for 

installation.

To connect to water supply:

1. Install the 1/4 inch OD copper water line from the 

main water source.

5 Adjust Door

Figure 15

6 Prepare Plumbing

Summary of Contents for Combo CO29

Page 1: ...com Phone 414 354 0300 FAX 414 354 7905 Service Parts Tech Lines Phone 800 779 2547 FAX 414 354 5696 OnlineService U Line com 2005 U Line Corporation 02 2005 CO29A and CO29FF Ice Maker Refrigerators I...

Page 2: ...ction to the water supply Improper hook up can result in substantial property damage If you are unsure of your ability to safely connect the water supply to the unit consult a licensed plumber for ass...

Page 3: ...d and water connection parts Complete and mail the Product Registration Card or register online at www U LineService com Once your unit is installed keep the User Manual and this Installation Guide in...

Page 4: ...t sits on a level surface as it does not have feet levelers If it is not level the ice mold will not fill evenly Product Dimensions Door Swing Clearances Information Units have a zero clearance for th...

Page 5: ...from cabinet two screws See Figure 5 Remove screws on opposite side of cabinet Figure 6 Note that there may be a nut behind one or both screws on either side 4 Install hinge on opposite side bottom of...

Page 6: ...1 Adjust door to assure proper seal Tighten upper and lower hinge screws securely 12 Replace three plastic plugs removed in Step 8 into holes on top of unit Replace screws in holes in bottom of unit o...

Page 7: ...not weigh more than 20 lbs Door Panel Installation Install the insert as follows CAUTION Use care when handling the insert Insert edges may be sharp 1 Remove top hinge screw pin with a Phillips head s...

Page 8: ...screws Go on to 6 Prepare Plumbing CAUTION Plumbing installation must observe all state and local codes All water connections MUST BE made by a licensed qualified plumbing contractor Failure to follo...

Page 9: ...5 Go on to 7 Prepare Power Supply Electrical Specifications CAUTION Electrical installation must observe all state and local codes This unit requires connection to a grounded three prong polarized rec...

Page 10: ...ntangle the electrical cord 4 Re check the leveling from front to back and side to side Make any necessary adjustments The unit s top surface should be approximately 1 8 below the countertop Grille In...

Page 11: ...etween 4 and 5 Assure that setting was not altered in shipment No other adjustments should be necessary at this time For information about Adjusting the Temperature Control see the User Manual As soon...

Page 12: ...n Problem Q Water does not appear to be flowing into unit Solution A Check that the water is connected and turned on and the line is not obstructed Water coming into the unit may take an hour or more...

Reviews: