6
75F
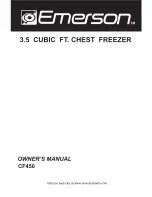
Origins Freezer Model 75F
The Model 75F Freezer provides 6.0 cu ft (170 L) of freezer
capacity and features manual temperature control.
• A generous capacity, one piece molded interior is very
durable and easy to clean.
• Four adjustable tempered glass shelves are used. These
shelves are easy to clean, contain spills, and may be
positioned evenly throughout the interior to use all
space efficiently.
• Two inner door “pick-off” storage shelves.
• Black and white models accept custom flat or raised
door panels, and can achieve a custom, built-in look by
matching surrounding cabinets.
• Doors on black and white models are field-reversible.
• All cabinets feature contoured design lines that
provide a fashionable designer appearance.
• All models feature a vinyl clad steel cabinets that
provide a rich textured look, and resist scratching,
peeling, or flaking.
Features and specifications are subject to change without
notice.
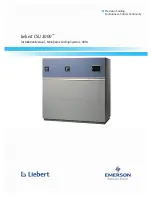
Figure 2
IMPORTANT
IMPORTANT
Proper air flow (Figure 2) is required for your unit to
operate at its highest efficiently. A grille, located in
the base of the unit, must not be blocked at any
time, or your unit will not perform as expected.
Initial Startup
All U-Line units are shipped with controls that are preset.
No initial adjustments are required.
IMPORTANT
IMPORTANT
U-Line recommends the unit be allowed to run
overnight prior to loading the refrigerator and/or
freezer with product.
To turn unit off: Turn the controller knob located in the
center of the grille counterclockwise until a “click” is
heard. It may take some force to get the control to
“click.”
To turn unit on: Turn the controller knob located in the
center of the grille clockwise to a MID setting, number 3
or 4 on the controller knob.
Temperature Control
Adjusting Temperature
Figure 3
Adjust the temperature by turning the numbered dial
(Figure 3, 1)
in small increments.
Many factors can affect the internal temperatures of the
cabinet. They include:
• Temperature setting.
• Ambient temperature where installed.
4
Product Features
5
Operation
ULIN_0228_A
ULIN_0229_A
ULIN_016357_30144.fm Page 6 Tuesday, March 14, 2006 2:34 PM