Tynetec ZXT315 User Manual Download Page 9

Doc


No.


FM0665


issue


D


Page


9


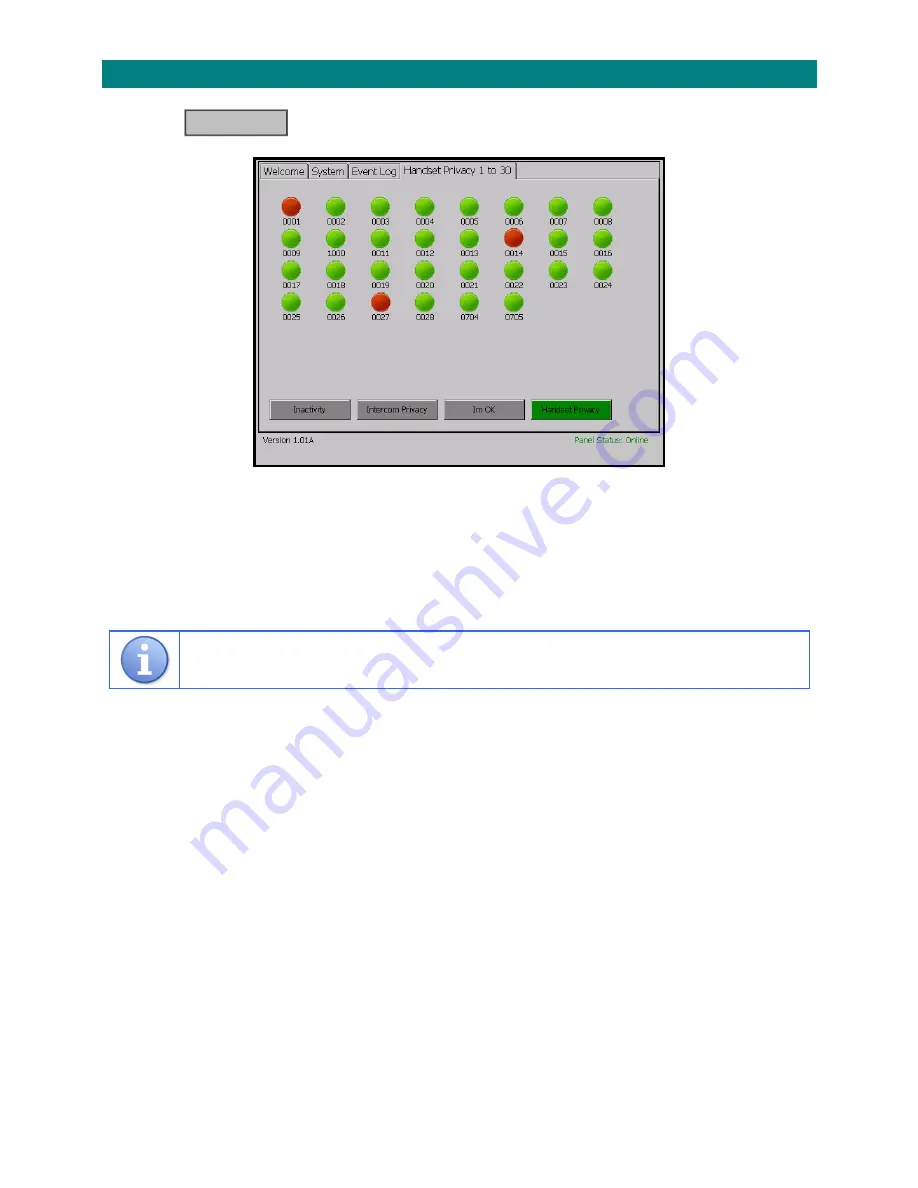
4.3


HANDSET


PRIVACY


STATUS


Touch


the


button


and


the


screen


will


display;


This


shows


which


flats


have


privacy


mode


selected


on


the


door


entry


telephone


handsets


A


red


spot


=


PRIVACY


ON


A


green


spot


=


NORMAL


(privacy


off)


If


a


flat


has


2


door


entry


handsets


both


must


be


in


privacy


to


show


on


screen


as


privacy


mode


When


handset


privacy


is


on


the


resident


will


not


get


calls


from


visitors


at


the


entrance


door


Handset Privacy 

Summary of Contents for ZXT315

Page 1: ...icy of continual product improvement and reserves the right to modify the specification of its products If any variation to the details in this document are suspected please contact Tynetec s Technica...

Page 2: ...y Status 9 5 Scheme Manager Log On 10 5 1 Add a Radio Device 11 5 2 Remove a Radio Device 12 5 3 Change Password 13 6 Engineer Log On 14 6 1 Change Flat Labels 15 6 2 Change Telephone Numbers 16 6 3 C...

Page 3: ...e screen to select System displays the current system status see section 2 Event Log displays the history of events for a chosen date see section 3 Inactivity 1 to 30 displays the activity status of a...

Page 4: ...de will be green e g Touch the or buttons to change the operating mode You will be prompted for a Password to change the operating mode Enter the password default 1234 then touch to change the passwor...

Page 5: ...the From date box and a calendar window will open Select a year month and day from the calendar window then touch the button All events for the chosen day will be listed Use the slider bar to scroll u...

Page 6: ...creen will display This shows the flats where the residents are up and about each day Up to 3 activity monitoring periods can be set to repeat each day A red spot NO ACTIVITY A green spot ACTIVITY Ref...

Page 7: ...he button and the screen will display This shows which flats have privacy mode selected on the Advent xt intercom A red spot PRIVACY ON A green spot NORMAL privacy off When intercom privacy is on the...

Page 8: ...US Touch the button and the screen will display This shows which flats have responded I m OK each day A red spot NO RESPONSE not OK A green spot I M OK Refer to the Advent xt user guide for instructio...

Page 9: ...have privacy mode selected on the door entry telephone handsets A red spot PRIVACY ON A green spot NORMAL privacy off If a flat has 2 door entry handsets both must be in privacy to show on screen as...

Page 10: ...me screen touch the button and the screen will display Enter the password default 1234 then touch and the screen will display See section 5 1 to add a Radio Device See section 5 2 to remove a Radio De...

Page 11: ...Device ID box Enter the flat number the radio device is being allocated to in the Flat Number box Select where the radio device is being located from the Location pull down list box Touch the button...

Page 12: ...display Enter the 8 digit device ID taken from the label of the radio device in the Device ID box Enter the flat number the radio device is being removed from in the Flat Number box Touch the button C...

Page 13: ...it password in the New Password box Re enter the same new 4 digit password in the Confirm New Password box Touch the button Touch the button to exit If you Log On as a Scheme Manager this function wil...

Page 14: ...and the screen will display See section 5 1 to Add a Radio Device See section 5 2 to Remove a Radio Device See section 5 3 to Change Password See section 6 1 to Change Flat Labels See section 6 2 to...

Page 15: ...the list if necessary Touch the button to clear the channel number from the Flat Label box Enter the actual flat number or channel ID you want displayed using the 0 9 buttons Touch the button and the...

Page 16: ...r in this location Status Received will be displayed and the current number will be in the Telephone Number box Touch the button to delete the current number if applicable Enter the new telephone numb...

Page 17: ...ame using the Input Panel keys Touch the button Touch the button to exit Check the new site name is displayed correctly on the Welcome screen 6 4 CLOSE THE APPLICATION From the System Utility screen t...

Page 18: ...hen the memory gets down to 20000000 20MB or less the panel will display a warning message every day at 10 00 AM Contact your Service Engineer to archive data from the SD memory card 7 1 ARCHIVING MEM...

Page 19: ...r and right click on it Select Properties the card should show File System FAT32 If the SD Card is not FAT32 Copy all of the data files to a drive on the local PC these will be copied back once the Fo...

Page 20: ...me Date settings from Advent xt system Auto BST Site Name User programmable max 32 characters Call in Progress Display shows flat number zone of current call Faults Exist Display shows if Faults Exist...

Reviews: