12/2010
KASTOR OY
TYLÖ MEGA – LINE SUPER 10
Sivu 6/22
TYLÖ MEGA-LINE SUPER 10
- Electrical Sauna Heater Manual -
1. INTRODUCTION
We thank you for your confidence in this Tylö product. Tylö heaters are known to be long lived and of high quality. We
recommend that you – and the person installing this heater – read these instructions carefully. This manual should be always
close at hand when needed. Once the installation is completed, this manual should be handed to the sauna's owner or the
person responsible for operating it. Before you do anything,
you should read this manual and pay special attention to the
“WARNINGS” part on page 3.
(mm) DI
10K
X (min)
195
Y (min)
260
Y (max)
305
a 165
b 320
2. INSTALLATION
2.1. The Heater's Installation Location
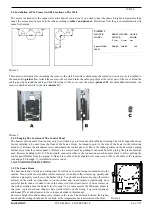
The manufacturer's safe installation distances (
table 3
,
page 5
) must be adhered to. These distances are also
given on the heater's data plate. The attachment sizes for
the wall mountings are shown in picture
1a
. The walls
next to the heater and the roof above it must not be
protected with additional paneling, as the temperature in
the wall material may rise to dangerous levels. This heater
is not designed to be embedded or installed in an alcove.
2.2. Attaching The Heater to The Wall
For easier installation the heater is equipped with a
detachable wall mounting (
picture 1b
) that can be
attached to the wall beforehand (
picture 1a
). You may use the included
attachment screws for installation in a wooden wall. A thin panel board
is not sturdy enough for the attachment. You should strengthen it from
the backside using board or plywood. Use heat resistant attachments
(wedge or hammerset anchors, no plastic plugs) for masonry,
brickwork or other stone walls. The heater is lifted into its place
according to
pictures 1c, 1d, 1e
. Do not lift the heater by its coils or
the upper plate of the back casing. Use the lower rim of the inner
casing with support from the upper part instead. A free corridor should
be left at one side of the heater for maintenance work.
2.3. Connection to The Power Grid
The heater's electrical installation must be performed by a certified electrician. Check the heater's technical data prior to
connection. The connection to the power grid may only be performed by a professional electrician who is certified according
to present regulations. The heater is connected semi-permanently to a connection box on the sauna wall. The connection cord
should be a H07RN-F (VSN, VSB) rubber cable or equivalent. Do not use cords with PVC insulation. The connection diagram
is attached to this manual (picture 7) and to the heater's connection box. Do not attach the heater's power feed to the error
current connector.
The connection is performed in the following manner before the heater is lifted into its place: 1. Remove the wall mounting in
the back of the heater, open the upper attachment screws at the sides and loosen the lower ones. 2. Attach the throughput
rubbers and cable grip. 3. Pass the cable through the throughput rubber to the connection box. 4. Attach the cable to the cable
grip and connector according to the connection diagram. 5. Provide sufficient cable length to ensure that the cable does not run
underneath the stone enclosure nor too close to the heater's base plate. The heater's connector also provides for control of the
electric heating (or the heater's signal lamp). The package holds a second throughput rubber and cable grip with screws for this
purpose. The control cable's conducting material and diameter must be equal to the connection cable. The relay used in
controlling the electric heating gets a control voltage of 230 VAC from the heater. The conductors' diameters and numbers and
fuse values are given in the technical data table. The spray water tight connection box must not be attached more than 50 cm
above the ground.


