


http://www.tyan.com
77
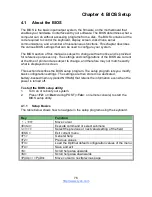
4.1.2 Getting Help
Pressing [
F1
] will display a small help window that describes the appropriate
keys to use and the possible selections for the highlighted item. To exit the Help
Window, press [
ESC
] or the [
Enter
] key again.
4.1.3 In Case of Problems
If you have trouble booting your computer after making and saving the changes with
the BIOS setup program, you can restart the computer by holding the power button
down until the computer shuts off (usually within 4 seconds); resetting by pressing
CTRL-ALT-DEL; or clearing the CMOS.
The best advice is to only alter settings that you thoroughly understand. In particular,
do not change settings in the Chipset section unless you are absolutely sure of what
you are doing. The Chipset defaults have been carefully chosen either by MiTAC or
your system manufacturer for best performance and reliability. Even a seemingly
small change to the Chipset setup options may cause the system to become
unstable or unusable.
4.1.4 Setup Variations
Not all systems have the same BIOS setup layout or options. While the basic look
and function of the BIOS setup remains more or less the same for most systems, the
appearance of your Setup screen may differ from the charts shown in this section.
Each system design and chipset combination requires a custom configuration. In
addition, the final appearance of the Setup program depends on the system
designer. Your system designer may decide that certain items should not be
available for user configuration, and remove them from the BIOS setup program.
NOTE
:
The following pages provide the details of BIOS menu. Please be aware that
the BIOS menus are continually changing due to continual BIOS updates over the
product lifespan of the motherboard. The BIOS menus provided are current as of the
date when this manual was written. Please visit TYAN
’s website at
http://www.tyan.com
for information on BIOS updates available for this specific
motherboard.
Summary of Contents for GT62F-B8026
Page 1: ...GT62F B8026 Service Engineer s Manual...
Page 31: ...2 1 2 Removing the Air Duct 1 Remove the air duct from the chassis...
Page 36: ...DIMM Location...
Page 40: ...4 Insert the PCI E card in the direction of arrows as shown...
Page 41: ...5 Screw the PCI E cards firmly to the riser card bracket...
Page 46: ...http www tyan com 46 3 Secure the mounting ears of chassis to the rack with 2 M5 15L C screws...
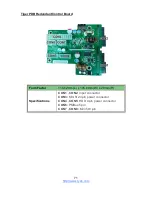
Page 50: ...http www tyan com 50 3 4 1 Riser Card Features M7106 L16 1F Riser Card M7106 R16 1F Riser Card...
Page 53: ...http www tyan com 53 7 Remove the eight screws securing the bracket to the HDD backplane...
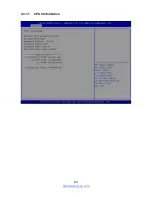
Page 83: ...http www tyan com 83 4 3 1 1 CPU0 Information...
Page 91: ...http www tyan com 91...
Page 107: ...http www tyan com 107 4 3 11 NVMe Configuration...
Page 108: ...http www tyan com 108 4 3 12 SATA Configuration...
Page 114: ...http www tyan com 114 4 4 1 2 Socket 0 Information...
Page 116: ...http www tyan com 116 4 5 AMD CBS Menu...
Page 118: ...http www tyan com 118 4 5 1 1 Core Thread Enablement Submenu...
Page 121: ...http www tyan com 121 4 5 3 UMC Common Options Submenu...
Page 122: ...http www tyan com 122 4 5 3 1 DDR4 Common Options Submenu...
Page 129: ...http www tyan com 129 4 5 4 FCH Common Options Submenu...
Page 134: ...http www tyan com 134 4 6 2 BMC Network Configuration Submenu...
Page 152: ...http www tyan com 152 7 Insert the LAN card into the OCP slot...
Page 153: ...http www tyan com 153 8 Secure the LAN card to the chassis...
Page 157: ...http www tyan com 157 NOTE...