background image


http://www.tyan.com


74

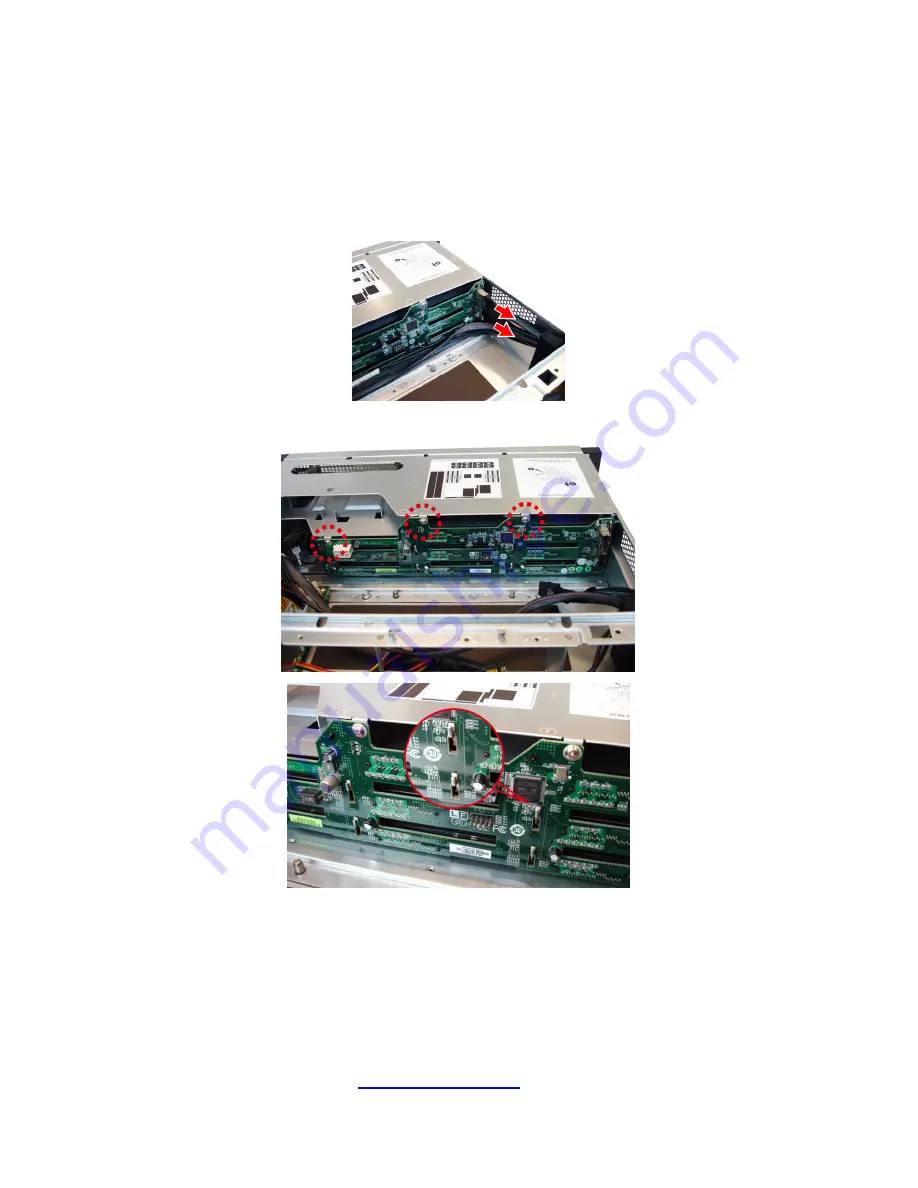
3.9      Replacing the HDD Backplane Board 

 
Follow these instructions to replace the SATA/SAS HDD Backplane Board.


Refer to Section 

3.8 Replacing the Fan Backplane Board

 for how to remove 

the Fan Module. Disconnect the power cables attached to the HDD BP Board. 


Unscrew the HDD BP Board.    Remove the HDD BP Board from the hook. 


Replace a new HDD BP Board and reinstall it into the chassis following the 

steps in reverse.

Summary of Contents for B8236G70W8HR-HE-IL

Page 1: ...Welcome to the Iceberg Altus 2850GTi Manual...

Page 2: ...1 http www tyan com GN70 B8236 IL Service Engineer s Manual...

Page 3: ...2 http www tyan com...

Page 4: ...bility or warranties relating to fitness for a particular purpose or merchantability MiTAC retains the right to make changes to produce descriptions and or specifications at any time without notice In...

Page 5: ...es and can radiate radio frequency energy and if not installed and used in accordance with the instruction manual may cause harmful interference to radio communications Operation of this equipment in...

Page 6: ...an introduction to the TYAN GN70 B8236 IL barebones standard parts list describes the external components gives a table of key components and provides block diagram of the system Chapter2 Covers proc...

Page 7: ...the purpose of this pin If your outlet does not support this kind of plug contact your electrician to replace your obsolete outlet Do not place anything on the power cord Place the power cord where i...

Page 8: ...mbols on Equipment Caution This symbol indicates a potential hazard The potential for injury exists if cautions are not observed Consult equipment documentation for specific details Warning This symbo...

Page 9: ...nees bent Equipment Racks To avoid injury or damage to the equipment Observe local occupational health and safety requirements and guidelines for manual materials handling Do not attempt to move a rac...

Page 10: ...l cause restricted airflow and might cause damage to the equipment Make sure the product is properly matted with the rails Products that are improperly matted with the rails might be unstable Verify t...

Page 11: ...signated for your product Do not attempt to recharge the battery Dispose of used batteries according to the instructions of the manufacturer Do not dispose of batteries with the general household wast...

Page 12: ...can become hot to the touch If the product sustains damage requiring service disconnect the product from the AC electrical outlet and refer servicing to an authorized service provider Examples of dam...

Page 13: ...http www tyan com 12...

Page 14: ...alling Motherboard Components 37 2 1 1 Removing the Chassis Cover 37 2 1 2 Removing the Riser Card Brackets 39 2 1 3 Installing the CPU and Heatsink 40 2 1 4 Installing the Memory 43 2 1 4 Installing...

Page 15: ...he Fan Backplane Board 70 3 8 1 Fan BP Board Specifications 73 3 8 2 Fan BP Board LED Definitions 73 3 9 Replacing the HDD Backplane Board 74 3 9 1 HDD BP Board Specifications 75 3 9 2 HDD BP Board LE...

Page 16: ...gh bandwidth memory design and lightning fast PCI E bus implementation The GN70 B8236 IL not only empowers your company in nowadays IT demand but also offers a smooth path for future application usage...

Page 17: ...cy PFC 80 plus gold Redundancy 1 1 Input Range Full range AC 100 240V Frequency 60 Hertz Power Supply Output Watts 770 Watts Supported CPU Series AMD 45nm 8 Core 12 Core Opteron 6100 Series Processors...

Page 18: ...cator System Monitoring Others Chassis intrusion detection Watchdog timer support Onboard Chipset Onboard Aspeed AST2050 AST2050 IPMI Feature IPMI 2 0 compliant baseboard management controller BMC Sup...

Page 19: ...x 3 43 700 x 450 x 87mm Motherboard S8236WGM3NR HE IL System Board Dimension EEB 12 x13 305x330mm Buttons 1 RST 1 ID 1 PWR w LED LEDs 1 PWR 1 ID 1 Warning 3 LAN Front Panel I O Ports 2 USB ports Type...

Page 20: ...1 DB 9 COM port VGA 1 D Sub 15 pin port I O Ports RJ 45 3 ports Chipset Winbond W83795G Voltage Monitors voltage for CPU memory chipset power supply Temperature Monitors temperature for CPU system en...

Page 21: ...type power cord 2 CCBL 0300 EU type power cord Optional accessories Peripheral 1 CSTK 0080 Slim type DVD kit w cables TYAN GN70B8236 IL B8236G70W8HR HE IL N2275 Form Factor 2U Rackmount Gross Weight 2...

Page 22: ...Memory Memory voltage 1 5V 1 35V 1 25V PCI E 3 PCI E Gen 2 x16 slots Max HBA Dimension H x L 6 111 15mm x 312 00mm FH FL Expansion Slots Pre install TYAN Riser Card M2201 L16 2F PCI E x16 2U riser ca...

Page 23: ...s Operating System OS supported list Please visit our Web site for the latest update FCC DoC Class A Regulation CE DoC Yes Operating Temp 10 C 35 C 50 F 95 F Non operating Temp 40 C 70 C 40 F 158 F Op...

Page 24: ...arrive packaged as illustrated below 1 4 1 Box Contents Component Description 2U chassis 8 hot swap HDD bays TYAN S8236 IL system board pre installed 1 1 ERP1U hot swap 770W RPSU Delta 8 System fan M1...

Page 25: ...or browse to TYAN s website for service http www tyan com The web site also provides information of other TYAN products as well as FAQs compatibility lists BIOS settings etc TYAN Motherboard Drive CD...

Page 26: ...http www tyan com 25 SGCC Bracket_L SGCC Bracket_R AC Power Cord 125V US AC Power Cord 250V Europe Barebone Manual Mainboard Manual Addendum for China Use Only...

Page 27: ...oduct The following views show you the product 1 5 1 System Front View 1 Ears 2 3 5 HDD bays 3 USB Ports 4 ID Button 5 NMI Button 6 RESET Button 7 NIC1 NIC2 NIC3 8 ID LED 9 Warning LED 10 BMC LED rese...

Page 28: ...ff Blinking Green LAN active On Green LAN linked NIC1 off off LAN not linked Blinking Green LAN active On Green LAN linked NIC2 off off LAN not linked Blinking Green LAN active On Green LAN linked NIC...

Page 29: ...r Amber Activity LED Color Green No Driver Present or power disconnected OFF OFF No Activity OFF Solid ON Driver Present Access Activity OFF Blinking HDD Fail Solid ON OFF Identify Locate the HDD Blin...

Page 30: ...n Green 10Mb 100Mb 1000Mb linked Blinking Green 10Mb 100Mb 1000Mb activity RJ 45 Activity left Disabled Flash Green No LAN linked On Amber 1000Mb linked On Green 100Mb linked RJ 45 Linkage Right Disab...

Page 31: ...tyan com 30 1 5 3 Motherboard S8236 IL Layout The diagram is representative of the latest board revision available at the time of publishing The board you receive may not look exactly like the above...

Page 32: ...J32 LAN3 Active LED Header J53 HDD Fault Header J59 IPMB Header JP1 JP2 COM2 Function Select Jumper JP3 Clear CMOS Jumper JP6 Front Panel ID LED Button JP7 Chassis Intrusion Header LED1 ID LED LED2 SA...

Page 33: ...http www tyan com 32 1 5 5 System Block Diagram S8236 IL...

Page 34: ...yan com 33 1 5 6 Internal View With Riser Card Brackets 1 3 5 HDD cage underneath 2 SAS SATA HDD Backplane Board 3 System Fan Unit 4 Power Distribution Board 5 PCI E Riser Card Bracket 6 Power Supply...

Page 35: ...http www tyan com 34 Without Riser Card Brackets 1 3 5 HDD cage underneath 2 SAS SATA HDD Backplane Board 3 System Fan Unit 4 Power Distribution Board 5 Power Supply underneath...

Page 36: ...d proper tools can prevent you from accidentally damaging the internal components 2 0 3 Tools The following procedures require only a few tools including the following A cross head Phillips screwdrive...

Page 37: ...id touching motherboard components IC chips connectors memory modules and leads The motherboard is pre installed in the system When removing the motherboard always place it on a grounded anti static s...

Page 38: ...nts on to the motherboard including CPUs memory modules HDD and PCI E cards 2 1 1 Removing the Chassis Cover Follow these instructions to remove the GN70 B8236 IL chassis cover 1 Unscrew the rear top...

Page 39: ...http www tyan com 38 3 Slide the rear top cover out...

Page 40: ...com 39 2 1 2 Removing the Riser Card Brackets Follow these instructions to remove the PCI E Riser Card Brackets 1 Loose four thumb screws to release the PCI E Riser Card Brackets 2 Lift up the Riser...

Page 41: ...PU and Heatsink Follow the steps below on installing CPUs and CPU heatsinks 1 Locate the CPU sockets 2 Pull the lever slightly away from the socket and then push it to a fully open position 3 Push the...

Page 42: ...an com 41 4 Take out the protection cap 5 Place the CPU into the socket and make sure that the gold arrow is located in the right direction 6 Close the CPU socket cover and press the lever down to sec...

Page 43: ...http www tyan com 42 7 Position the heatsink on top of the CPU and secure it with 2 screws 8 Repeat the procedures mentioned earlier to install the second CPU and heatsink...

Page 44: ...herboard 2 Press the memory slot locking levers in the direction of the arrows as shown in the following illustration 3 Align the memory module with the slot When inserted properly the memory slot loc...

Page 45: ...http www tyan com 44 Memory Population Option Table The following pictures show common types of DDR3 memory modules...

Page 46: ...DIMM 12 C1 CPU1_DIMM 13 B0 CPU1_DIMM 14 B1 CPU1_DIMM 15 A0 CPU1_DIMM 16 A1 NOTE 1 indicates a populated DIMM slot 2 Paired memory installation for Max performance 3 Populate the same DIMM type in each...

Page 47: ...DR n a 1333MHz n a n a SR SR n a 1333MHz 1333MHz SR and DR n a n a 1333MHz 1333MHz SR and DR SR and DR n a n a 1600MHz SR and DR n a n a n a 1600MHz SR SR NOTE U DIMM can support up to 4GB sized DIMM...

Page 48: ...n a 1333MHz SR DR and QR n a n a n a 1333MHz SR and DR SR and DR n a n a 1600MHz SR and DR n a n a n a 1600MHz SR SR NOTE RDIMM can support up to 16GB sized DIMM s SR and DR Memory has a MAX amount of...

Page 49: ...p to eight 8 3 5 or 2 5 hard drives Follow these instructions to install a hard drive Warning Always install the hard disk drive to the chassis after the chassis is secured on the rack 1 Press and hol...

Page 50: ...ttp www tyan com 49 Option A for 2 5 hard drives 3 Place a 2 5 hard drive into the HDD tray and use 4 screws to secure the HDD Option B for 3 5 hard drives 4 Unscrew the drive bracket from the HDD tra...

Page 51: ...http www tyan com 50 5 Place a 3 5 hard drive into the drive tray and use 6 screws to secure the HDD 6 Reinsert the HDD tray into the chassis and press the locking lever to secure the tray...

Page 52: ...r Card Brackets A power cable 2x3p 2x4p is required for GPU cards Follow these instructions to install PCI E cards 1 Unscrew the PCI E slots to take out the PCI brackets 2 Insert the PCI E cards and s...

Page 53: ...e TYAN GN70 B8236 IL into an industry standard 19 rack NOTE Before mounting the TYAN GN70 B8236 IL in a rack ensure that all internal components have been installed and that the unit has been fully te...

Page 54: ...53 http www tyan com 2 Repeat the same procedures for the front end of the rail Front 3 Push the locking latch to secure the rail to the rack Repeat the same procedures for the other rail Left Right...

Page 55: ...to its full length push the locking tab of the rail upward and then the rail can slide freely There are three holes on each rail which are used to hook and secure the chassis 5 Align the studs on the...

Page 56: ...http www tyan com 55 6 Push the chassis back into the rack 7 The installation is now complete...

Page 57: ...k 1 Push the ears to pull the chassis forward 2 Push forward the locking tabs on both rails to unhook the chassis from the rails 3 Follow the steps described earlier in reverse to remove the chassis f...

Page 58: ...r explains how to replace the pre installed components including the S8236 IL Motherboard M1709G70 FPB Front Panel Board PCI E Riser Card M1245G70 BP6 8 SATA SAS HDD Board System Fan and Power Supply...

Page 59: ...otherboard Components Follow these instructions to replace motherboard components including the motherboard 3 4 1 Replacing PCI E Riser Card Cards The GN70 B8236 IL has three pre installed PCI E 16 ri...

Page 60: ...http www tyan com 59 3 Repeat the same procedures for the second and third Riser Card Brackets 4 Unscrew the M2202 F16 2F riser card to replace a new one if necessary...

Page 61: ...replacing the motherboard or certain components remove cables connected to the motherboard Follow these instructions to remove all cables 1 Disconnect the power and PSMI cables 2 Disconnect the Mini S...

Page 62: ...l of the aforementioned cables follow the instructions below to remove the motherboard from the chassis 1 Remove the heatsinks and processors if installed 2 Remove the nine screws securing the motherb...

Page 63: ...yan com 62 3 5 Replacing the Power Distribution Board Follow these instructions to replace the M1601T70 D PDB power distribution board 1 Disconnect all cables 2 Unscrew to replace a new power distribu...

Page 64: ...these instructions to replace the M1709G70 FPB Front Panel Board 1 Unscrew to release the Front Panel Board Module 2 Push the Front Panel Board Module forward 3 Disconnect the Front Panel Control and...

Page 65: ...http www tyan com 64 5 Follow the steps described earlier in reverse to reinstall the Front Panel Board...

Page 66: ...Connectors One 2x15 pin header for front panel connector of motherboard and HDD backplane board LEDs Power On Off LED Color Green after power on ID LED Color Blue Warning IPMI LED Dual Color Yellow W...

Page 67: ...on the server by clicking the Chassis Locate LED key ID LED Off Off System not identified For more information on the Chassis Locate LED please visit our Web site for the latest Pilot II Software Conf...

Page 68: ...http www tyan com 67 USB Connector J1 Definition Pin Pin Definition VCC 1 2 VCC USB1 3 4 USB2 USB1 5 6 USB2 GND 7 8 GND KEY 9 10 GND...

Page 69: ...instructions to replace the system fan 1 Press the latch in the direction as shown to lift up the fan from cage 2 Take out the fan unit 3 Loose the screws on both sides 4 Push the latch in the direct...

Page 70: ...http www tyan com 69 5 Remove the iron holder to replace a new fan 6 After replacing a new one put the fan unit back into the cage...

Page 71: ...Replacing the Fan Backplane Board Follow these instructions to replace the Fan Backplane Board in your system 1 Press the latch in the direction as shown to lift up the fan from cage 2 Remove all eig...

Page 72: ...http www tyan com 71 3 Disconnect all cables attached to the Fan Backplane Board 4 Use a screw driver to unscrew the Fan Module 5 Disconnect the power and fan cables 6 Lift up the Fan Module...

Page 73: ...http www tyan com 72 7 Release the 14 screws on the Fan Backplane Board to replace a new one 8 Follow the steps described in reverse order to reinstall the fan cage...

Page 74: ...ctor 254 mm x 82 mm 4 layer PCB Integrated I O 2 1x4pin R A Power Connector 8 2x2pin Fan Connectors 1 2 x10pin Barebone Fan Connector 1 2x2pin Connector for S7015 3 8 2 Fan BP Board LED Definitions FA...

Page 75: ...plane Board 1 Refer to Section 3 8 Replacing the Fan Backplane Board for how to remove the Fan Module Disconnect the power cables attached to the HDD BP Board 2 Unscrew the HDD BP Board Remove the HDD...

Page 76: ...ar Form Factor 81 8 x 436 mm 4 layer PCB Integrated I O 8 SAS HDD Connectors 2 Mini SAS Connectors to MB and RAID Card 1 2 x 4 pin Power Connector LEDs 8 HDD active LEDs 8 HDD fault LEDs PW3 Pin defin...

Page 77: ...FF OFF No Activity OFF ON Driver Present Access Activity OFF Blinking HDD Fail On Solid OFF Identify Locate the HDD Blinking 4Hz x SAS SATA RAID Rebuilding Blinking 1Hz x NOTE If the LSI 9280 l6i4e or...

Page 78: ...tyan com 77 3 10 Replacing the Power Supply 1 Press and hold the latch to pull the power supply out 2 After replacing a new power supply press and hold the latch to push the power supply back into the...

Page 79: ...http www tyan com 78 NOTE...

Page 80: ...l Cable Front Panel Board M1709G70 FPB Connects to Motherboard J3 J23 4 USB Cable Front Panel Board M1709G70 FPB Connects to Motherboard J1 J33 5 Power Cables Power Board M1601T70 D PDB Connects to Mo...

Page 81: ...http www tyan com 80...

Page 82: ...Number Part Number Picture Quantity Description Power Supply CPSU 0470 471015200243 2 DELTA DPS 770CB 1U FAN CFAN 0330 336252012309 8 12000RPM 60 60 38MM 4PIN Cable CCBL 0300 332810000281 1 A C POWER...

Page 83: ...http www tyan com 82 NOTE...

Page 84: ...ame explanation is also included for readers reference NOTE The red dot indicates the sensor Fan and Temp Sensor Location 1 Fan Sensor It is located in the third pin of the fan connector which detects...

Page 85: ...http www tyan com 84 BIOS Temp Sensor Name Explanation...

Page 86: ...ature of the System Air Inlet Area Ambient Temperature of the sensor built in the Front Panel Connector It displays the system temp only when the FP cable is connected MB the sensor reads N A BB the s...

Page 87: ...0 DIMM D1 Temperature of CPU0 DIMM D1 Slot CPU1 DIMM A0 Temperature of CPU1 DIMM A0 Slot CPU1 DIMM A1 Temperature of CPU1 DIMM A1 Slot CPU1 DIMM B0 Temperature of CPU1 DIMM B0 Slot CPU1 DIMM B1 Temper...

Page 88: ...www tyan com provides easy to access resources such as in depth Linux Online Support sections with downloadable Linux drivers and comprehensive compatibility reports for chassis memory and much more W...

Page 89: ...per maintenance of products NOTE A receipt or copy of your invoice marked with the date of purchase is required before any warranty service can be rendered You may obtain service by calling the manufa...

Reviews: