

10.
Manual Recording
8.
Record Settings
7.
Disk Settings
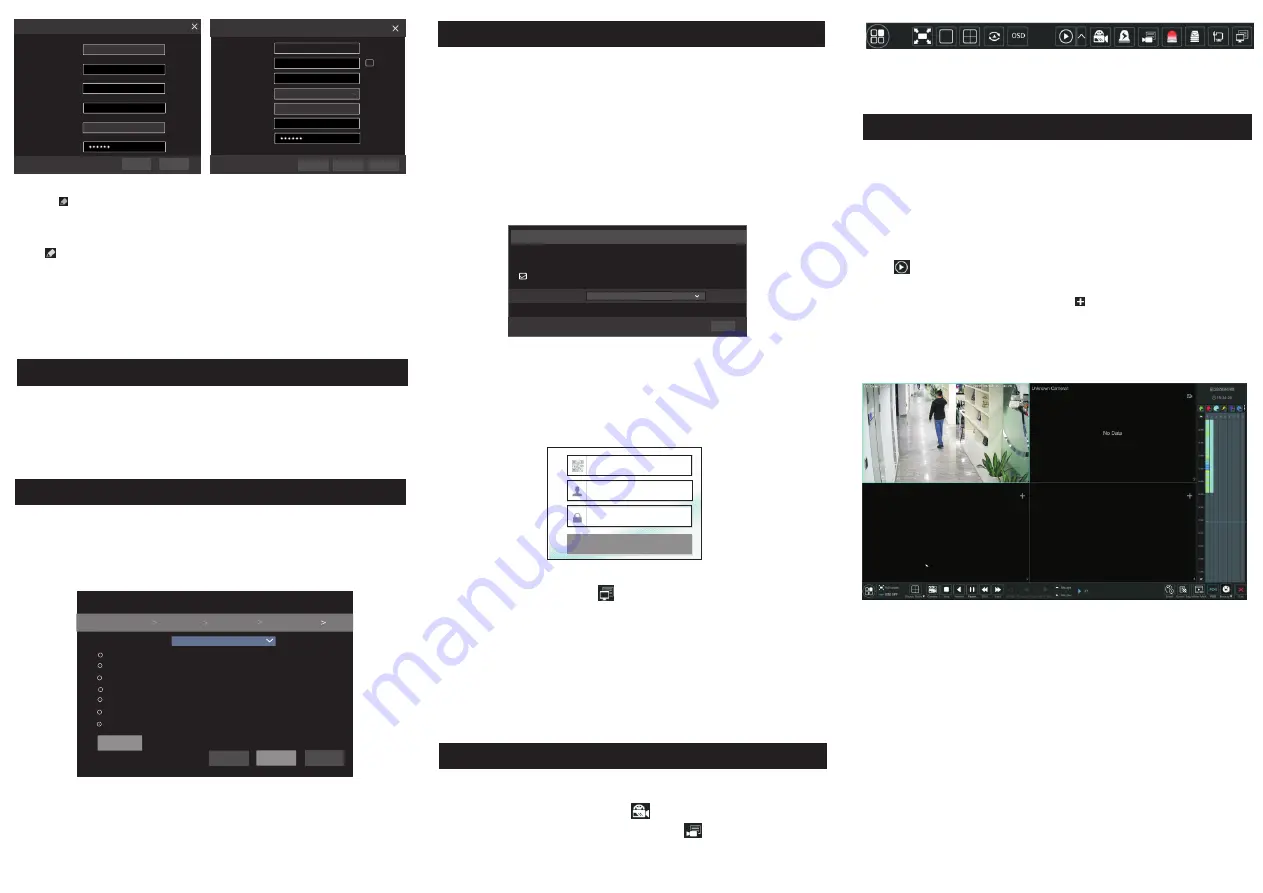
9.
NAT
11.
Playback
lick to edit an IP camera as shown on the above left. Enter the new IP
address, subnet mask, gateway, username and password of the camera. Click
“OK” to save the settings.
Click to edit the added camera as shown on the above left. Enter the new
camera name, IP address, port, username and the password of the camera.
You can click “Test” to test the effectiveness of the input information. Click
“OK” to save the settings. You can change the IP camera name only when the
added camera is online. Click “Next” to continue.
⑤
C
►
Web Browser Access Through NAT Function
Go
to Start
→
Settings
→
Network
→
NAT tab. Enable NAT and select the
NAT Server Address (The default NAT Server Address is
nat.autonat.com
).
Click “Apply” to save the parameters.
nat.autonat.com
NAT Server Address
Enable
Visit Address www.autonat.com
Apply
Enter
www.autonat.com
in the address bar of your browser and then press
enter to go to the following interface. If you are the first time to access the
NAT, you shall download and install the ActiveX according to the popup
tips. After installing ActiveX successfully, it will appear the login box.
Before recording, please install and format a HDD. In the live interface
you can see the menu toolbar. Click
button
to start
recording
.
Click
it
again
to
stop
recording
.
You
can
also click
to check the status of
the recording.
►
Click “Instant Playback” in the right-click menu of the camera’s preview
window to select or drag the playback progress bar to change the playback
time to play back the record.
Instant playback
Click
on the tool bar at the bottom of the live preview interface or click
Start
→
Playback to go to the playback interface as shown below. You can
also
add the playback cameras manually. Click
in the playback window to pop
up the “Add Camera” window. Check
the cameras in the window and then click
“Add” to add playback camera. The record files of the added playback camera
will be played in the playback interface.
►
General playback
NAT
Device Serial Number
interface to check the serial number or go to Start
Settings
Network
Network Status to check the serial number of the NVR).
Username
: The username of the NVR. The default username is admin.
Password
: The password of the NVR. The password is set by yourself when
you configure the wizard for the first time.
: Click on the menu bar at the bottom of the live
→
→
→
Enter Password
Enter Username
Enter device serial number
Login
Camera Name
Address
Model
Edit Camera
XXX
192 168 1 . 58
.
.
9008
admin
XXX
Port
Username
Protocol
Password
IP Camera 1
OK
Test
Cancel
Sync to IPC
Mac Address
Address
Edit IP
192 168 1 . 45
.
.
255 255 255 . 0
.
.
admin
192 168 1 . 1
.
.
Subnet Mask
Username
Gateway
Password
OK
Cancel
CE :98 :23 :75 :35 :22
NAT Status Success
You can view the disk number, disk capacity of the NVR and serial number,
Read/Write status of the disk. Click “Formatting” to format the disk. Click
“Next” to continue.
You can enable the NAT function in the interface or set it in the network
configuration after exiting the wizard. You can scan the QR code through the
mobile surveillance APP for iOS or Android to easily view your cameras.
Two record modes: auto and customization.
Auto Mode: Select one auto mode in the interface as shown below and then
click “Next” to save the settings. Click “Advanced” to self-define a record
mode.
Wizard
Mode
Motion Record
Sensor Record
Motion Sensor Record
Always(24x7)Motion Record
Always(24x7)Sensor Record
Always(24x7)Motion Sensor Record
Always(24x7)Motion
Sensor AI
Record
Next
Advanced
Previous
Cancel
Record Settings
Network Settings
Add Camera
Disk Settings
Auto
Customization: Set the record of each camera, such as “Sensor Record”,
“Motion Record”, “AI Record”, etc. Please enable the record as needed.
Click “Next” to continue.


