background image

5

6

Appearance and Function Introduction

Connect To Storage Accessories

Connecting With USB

1. Under power on mode, click the USB icon in the main interface, it will play the USB.
2. It will display “USB READ ”, then play the file.
3. Pull out the USB when you want to stop playing.

Connecting With SD Card

1. Under power on mode, click the 

SD

 icon in the main interface, it will play the SD card.

2. Will show can play the fi le.
3. Pull out the SD card when you want to stop playing.

If there are some file in the memory card that can’t  play, please delete it then connect to the 
unit to read the file.

Note: Please take attention for the SD card using direction, upward label side , then insert the 
card.

Remote Control Operation

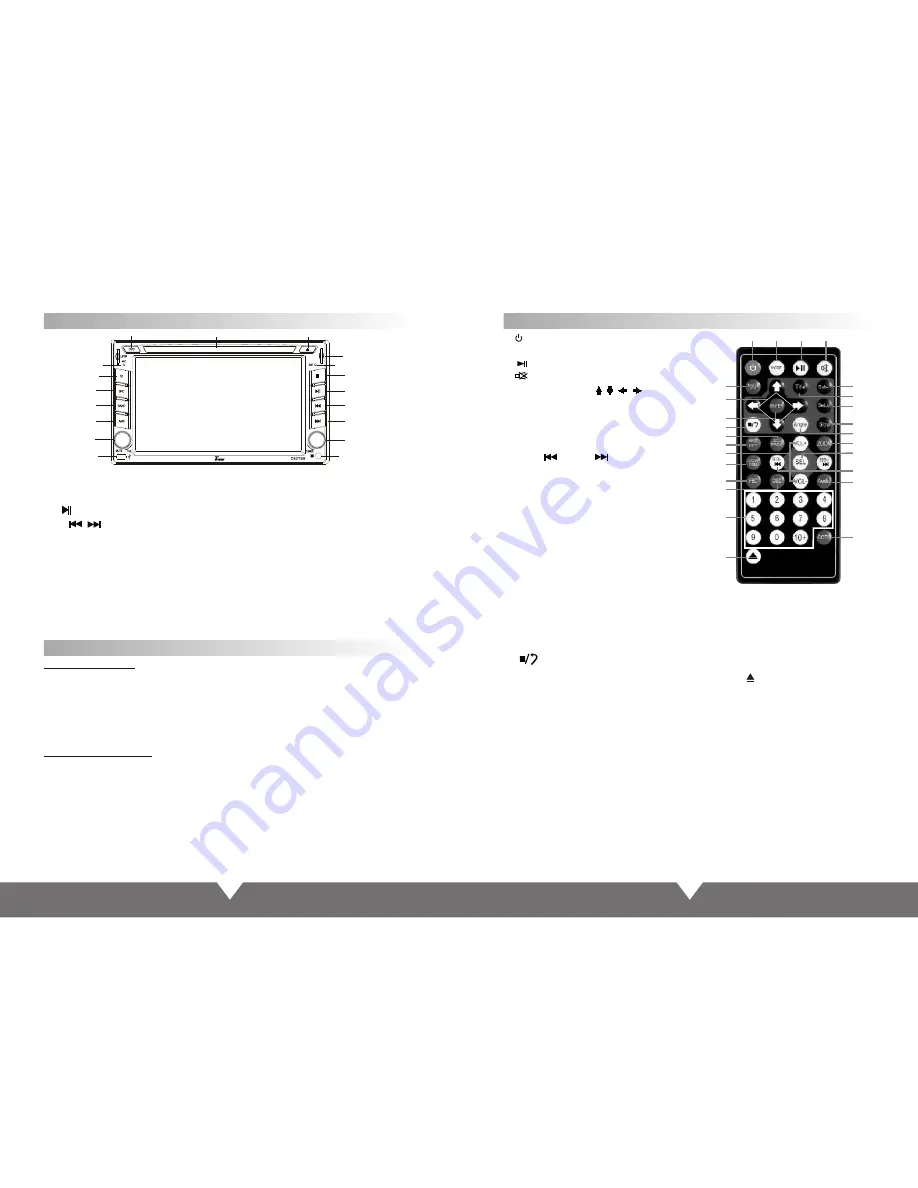
1.        : Power 
    Press this button to turn on/off the unit.
2.         : Play/Pause
3.         : MUTE
4. Cursor direction key    
    Press these to move cursor.
5. System Select: BND/TA/SYS
6. Enter 
7. Volume: VOL+/VOL-
8. SEEK-        /SEEK+        : Previous/next
9. DVD Programming
10. OSD
    Press it to display the disc information.
11. SEL: Sound adjustment function
12. AMS/RPT 
DVD mode is Loop broadcast,  radio
 mode is the search channel
13. Under DVD mode,press it for shuffle
14. Number: Pilih lagu
15. AUDIO memilih mode.
16. Switching sub menu
17. Subtitle on/off
18.Anycast title,chapter,audio,subtitle
19. MODE: Change modes
20.          : Stop playing
21. DVD display disc there are more 
angle select (need the disc support)
22. SLOW: slow forward/slow playing
23. SETUP: DVD system setup


Precautions Before Using Remote Control Unit

1. Please pull out the PVC when the remote control unit is first using.
2. Don’t drop or step in remote control unit or subject it to shocks.
3. Note that it maybe impossible to operate the main unit if there are obstacles between it 
and the remote sensor.
4. Using the remote control unit within the specified operating range.

25. ZOOM
   Press it can zoom or shrink picture
 displayed
26.         : Eject button.
   press this button to eject or slot -in 
the disc

5

4

6

20

9

12

7

13

16
10

14

26

17
24
23

22
21
25
11

8
15

18

1

3

2

19

24. TITLE 
   Return to the menu title

18

14

7

13

9

6

1

17

8

16

11

5

4

3

2

12

10

15

1. RTS: Reset butto
2. Stop playing
3

Play/Pause

Previous/next

.

.
.
.

n.


4

/

5

.     /      

6 Manual station search, t

7 Remote control window.
8 Mini USB connector.
9 Press down the mute, Rotation around the 
volume control

urning right

 is for searching stations forward, turning
 left is for searching stations backford.


10
11 BAND: 

AM

12

.

13

ower key

14
15 Shortcut key to enter the DVD
16 Disc eject
17 Eject/enter the disc
18 TF card reader slot.

.

AMS

:

Automatic income units

.

FM

/

 band shows

SRC

:

Mode conversion

.


P

.

MIC:  Microphone.

.
.


.

Summary of Contents for D62TSB

Page 1: ...Printing Color White Black Material QUALITY 100g wood free printed paper Size A6 OWNER S MANUAL ...

Page 2: ... And Operation DVD Mode Menu Interface Radio Function Interface Function Index Sign User Introduction 3 Wiring Diagram 3 Unit Rear Side Connection 4 5 5 Remote Control Operation 6 9 Bluetooth system settings 9 10 11 Audio Video Menu Setup 12 Warning 16 Trouble Shooting 16 USB SD Operation 11 SYS System Settings 13 DVD System Settings 14 15 ...

Page 3: ...tic shell debase the display quality and products quality Installation should be very tight and secured to prevent the fallen unit hurt people and damage the unit when moving on or a sudden brake Please install carefully to avoid damaging working platform Please clean the internal working platform and ensure sufficient space for installation Inner shell will be installed on the working platform Th...

Page 4: ... AMP CON Control power amplifier switch 12 13 Brown Steering wheel button 1 Brown Black Steering wheel button 2 Connected to the steering wheel button positive pole 14 Orange PWM Headlight control 15 Red ACC Trigger power 16 Yellow B 12V 12V power cable Unit Rear Side Connection TV SUB L R RR FR CAM V AUX IN RCA OUT RL FL V V WHITE AUDIO L IN WHITE RL OUT WHITE FL OUT RED AUDIO R IN RED RR OUT RED...

Page 5: ...tching sub menu 17 Subtitle on off 18 Anycast title chapter audio subtitle 19 MODE Change modes 20 Stop playing 21 DVD display disc there are more angle select need the disc support 22 SLOW slow forward slow playing 23 SETUP DVD system setup Precautions Before Using Remote Control Unit 1 Please pull out the PVC when the remote control unit is first using 2 Don t drop or step in remote control unit...

Page 6: ...mal size Note When playing MP3 USB SD this button is invalid 12 Press SLOW on the remote control to slow playing Change the playing speed to 1 2 1 4 1 8 and 1 16 through pressing SLOW button 13 During playback press the AUDIO voice key can be included on the DVD disc in a variety of audio languages to choose 14 GOTO chooses play button Press it the play information will show on screen use cursor b...

Page 7: ...000 this unit s bluetooth will be set up to the authorized equipment of the mobile phone If the match is successful the status of the bluetooth picture will show LINK OK Tips If it unable to match please starting up again After setting up the unit to authorized equipment the bluetooth will connect or enter into mobile phone bluetooth system automatically Select CAT KIT to connect it 4 After you ma...

Page 8: ... then will enter to video setting mode TRE Alt volume adjustment Touch the icon on the screen the alt volume will change BAS Bourdon volume adjust Touch the icon on the screen the bourdon volume will change FAD Front and Rear volume adjustment Touch the icon on the screen the front and Rear volume will change BAL Left and right track adjustment Touch the icon on the screen the left right track vol...

Page 9: ...oices SYS System Settings Steering operate 2 3 4 5 6 CANCEL 7 MODE When the user want to re set steering wheel keys for short cut purpose firstly press the Delete key to delete the previously set before re designate functions on steering wheel Secondly long press he buttons of the car s steering wheel and hold down the function keys on car and then click learn button on the steering wheel of the u...

Page 10: ...ch disc otherwise will damage the DVD play capability 6 Be sure to distinguish the anode and the cathode when connecting the power If connect wrong the fuse in filter box will melt immediately to protect unit Then please replace the same parameter fuse 7 DC 12V should be best to connect with the power adapter to prevent from the over voltage drop the may influence the normal work of the monitor 8 ...

Reviews: