background image

Transfer from Automobile 

1.

Park the automobile on a flat, smooth surface.  Open the car door all

the way.

2.

Set a folded sling under the patient's back until the bottom of the sling

touches the auto seat.  Lift the patient's thighs and pass the end loops
under the patient's legs.  Cross the loops.

3.

Lower the lifter's top bar so the cradle can clear the top of the door.

Move lifter closer to auto  so the loops on the sling can be attached to the
hooks on the cradle.

4.

Raise the lifter slowly and move the lifter back an inch at a time.

Repeat the process a few times until the patient's weight is rested on the
sling.

5.

Move lifter away from the car and rotate sling so that patient is facing

the attendant.

Transfer to Automobile 

1.

Push the lifter towards the car door.  Approach car with patient’s back

to car seat.

2.

Lean patient forward and adjust the sling to correct height so the head

will clear car door.  Continue to move the lifter forward until patient is
inside the car.

3.

Lift the patient's feet and legs inside the door and face the patient to the

front of the car.

4.

Slowly lower the lifter until the patient's weight is rested on the car

seat.  Remove the sling from patient’s back or leave it behind patient for
transferring out of the car when destination has been reached.  The lifter can
be disassembled and placed in a car trunk.

- 20 -

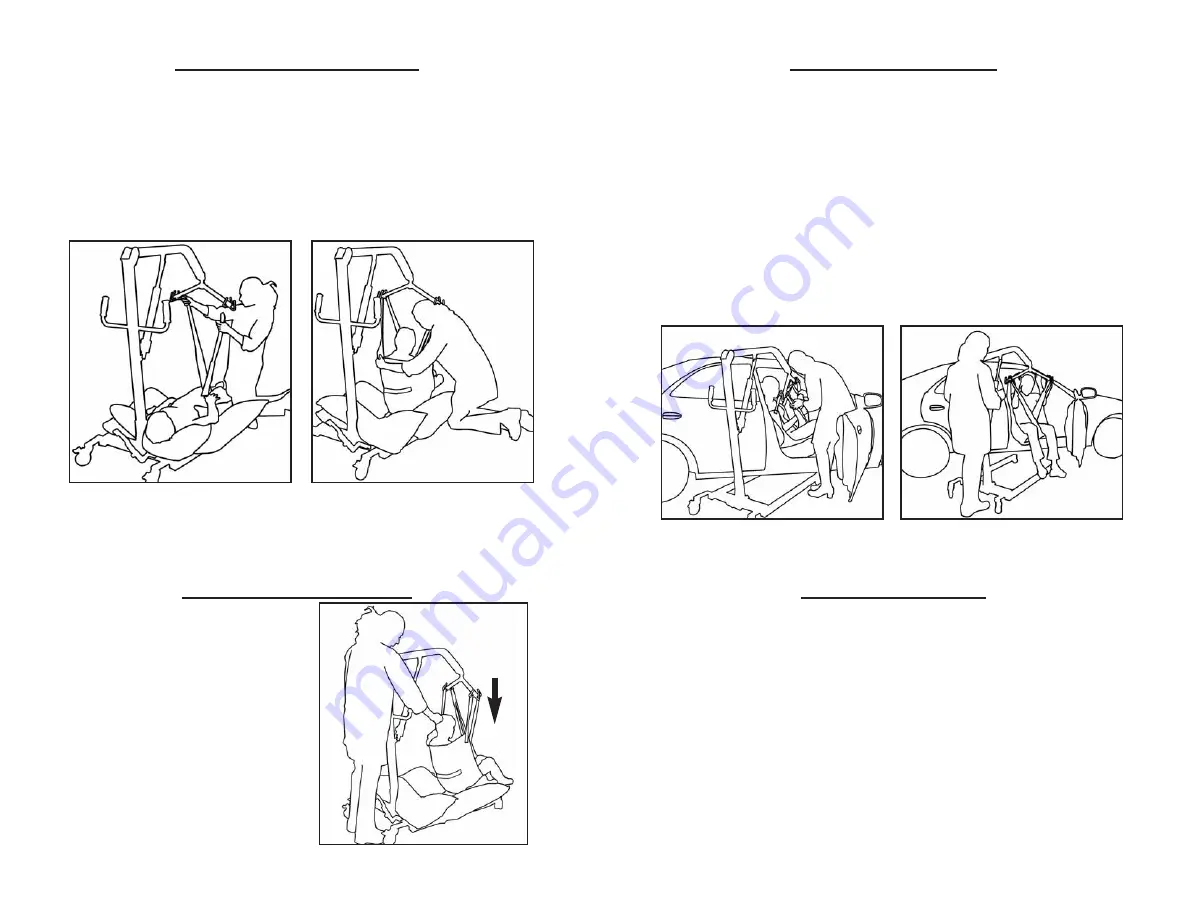
Raise the Patient from the floor

1.

Roll the patient on their side and place the sling under the patient.

2.

Move the lifter over the patient.  Next place 1 or 2 pillows beneath the

patient's head and shoulders, preventing any possible strain or injury
when lifting the patient.

3.

Lower the lifter so the loops on the sling can reach the hooks on the

lifter bar, attach the loops.

4.

Lift the patient off the floor.  Turn the cradle so the  patient is facing

towards the upright bar.  Rest the patient's legs on the base of the lifter.

Lower the Patient to the floor

1.

Before lowering patient, the patient

should be centered in the sling.

2.

Place a few pillows on the base of

the lifter, to prevent the patient from
hitting the base.  Then slowly lower
the sling to the floor.  While lowering
make sure the pillows are beneath the
patient's head.

- 19 -

Summary of Contents for Rhino P110

Page 1: ...i in no o P Pa at ti ie en nt t S Sl li in ng gs s O Op pe er ra at ti io on n M Ma an nu ua al l ATTENTION Before using this Medical Device read this manual If you are unable to understand contact yo...

Page 2: ...pended in a sling any distance Tuffcare s Rhino patient lifts or the slings are NOT transport devices They are intended to transfer an individual from one resting surface to another such as a bed to a...

Page 3: ...ath or shower Our Tuffcare Rhino slings are universal and will accommodate any 2 4 or 6 point spreader bars from other suppliers Choose Correct Type Sling 3 Model Size A B C Recommend Weight P110 S 32...

Page 4: ...ze patient movements during sling positioning Top of Sling Commode Opening Bottom of Sling Position Straps 5 Model Size A B C Recommend Weight P130 S 30 18 62 55 110 lbs P131 M 33 21 65 99 210 lbs P13...

Page 5: ...be used when you are transferring a patient that have both full head and neck control while in a seated position A B C A B C 7 Positioning the Universal Sling The inner side of the fabric is smooth w...

Page 6: ...ging and care delivery is needed Divide Leg Crossover Position the most common position great for bathing toileting transfer from lying down to seating crossover straps provide patients with more secu...

Page 7: ...the swivel bar Match the corresponding colors on each side of the sling for an even lift of the patient Black Purple Green Blue 11 Before attaching the universal divided leg sling onto the hookup poi...

Page 8: ...ng riding up to the underarm causing patient discomfort 4 When suspended the patient s weight should be carry at the legs not from the arms 13 Folding Sling in Preparation for Bed Lifting Universal ty...

Page 9: ...o that the cradle is directly over the patient Lower the top bar and attach the loops on the sling to the hooks of the cradle 16 4 Elevate the patient into a upright position by rising the head of the...

Page 10: ...ts or unpaved surfaces Do not try to go up or down a slop over 5 or one that s over the attendant s ability to handle 17 18 Transferring Patient from Wheelchair 1 Secure the wheelchair from rolling ba...

Page 11: ...atient s feet and legs inside the door and face the patient to the front of the car 4 Slowly lower the lifter until the patient s weight is rested on the car seat Remove the sling from patient s back...

Page 12: ...nches above the knee For 2nd pair of lift sling needed measure 4 inches below the knee at the top of the calf Use single hip lift sling when lifting one arm or leg Warning Always use a pair of hip lif...

Page 13: ...color coded hanger base on the surface height of the bed accordingly Black Purple Green Blue Tuffcare s Rhino Lift Swivel Bars have three hookup points per side The middle hookup is used for slings th...

Page 14: ...gether Warning Tuffcare s hip lift sling is for lifting of patient s limb for temporary of treating or cleaning them DO NOT use for transporting of patient otherwise injury or damage may occur 25 Duri...

Page 15: ...er chair or chair Model Size A B C Recommend Weight P147 L 35 71 7 5 99 450 lbs BUTTOCK STRAP is to be used in conjunction with a universal sling and not to be used by itself The buttock strap works p...

Page 16: ...the arms Buttock strap is universal one size fit all position the buttock strap under the patient s thigh in addition to the standing sling to use as a transport sling Belt Buttock Strap Belt Buttock...

Page 17: ...Place the straps of the sling over attach points of the lift arm Match the corresponding colors on each side of the sling for an even lift of the patient Use the color coded hangers to place the patie...

Page 18: ...n the user s under arms 33 Attach Standing Sling Before lifting the patient make sure that the bottom edge of the standing sling is positioned on the lower back of the patient and the patient s arms a...

Page 19: ...ush against the attachment knob 36 Attach Transport Standing Sling Make sure the color coded strap sits flush against the attachment knob Loop the hanging strap on both end of the buttock strap on to...

Page 20: ...ontrol The evaluation will be solely determined by Tuffcare The warranty shall not apply to problems arising from normal wear or failure to follow instructions or if parts are not manufactured by Tuff...

Reviews: