background image

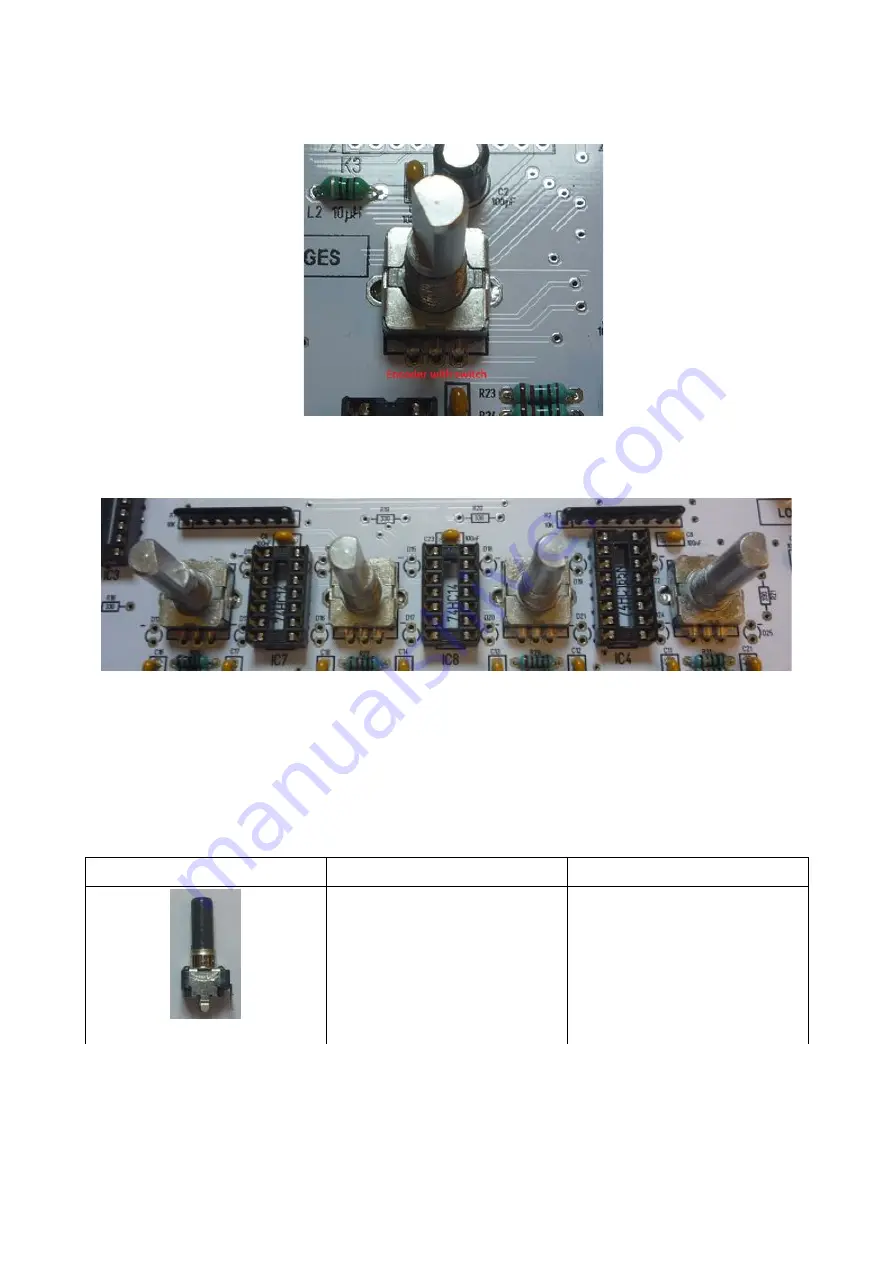
The S6 encoder with switch is the PAGE encoder and is soldered into position 'Pages'.

The encoders without pushbuttons are soldered in positions 2...4

The freely programmable potentiometers

Pot 1,2

Farbcode/colorcode/code

Value/Position


DC103B

Pot1,Pot 2

2x10Kohm lin
 

13

Summary of Contents for De-Generator

Page 1: ...De Generator DIY sample synthesizer Building instruction 1 the panelboard V1 02 english stand 08 04 2019 www tubeohm com 1...

Page 2: ...tors should also be measured through before soldering Nothing is more annoying than searching for hours because a wrong resistance has been soldered in For LEDs potentiometers buttons and encoders one...

Page 3: ...ut if you work too fast you make mistakes very quickly Please also check the connectors K3 K4 K14 and the MIC connector These are soldered in almost last and at the bottom The enclosed microphone shou...

Page 4: ...e 2 9V 4V The Formular UB operating voltage 3 3 Volt U_led voltage of the LED I_led current of the LED R_vor value of the resistor in Ohm R_vor UB U_led I_led Sample calculation for 4 LED s red U_LED...

Page 5: ...then the capacitors then the IC sockets then the LEDs then the potentiometers and encoders switches connectors and the mic and finally the LCD display First the coil is soldered in Coil Spule Farbcode...

Page 6: ...The Resistors Resistor Widerstand Farbcode colorcode Value Position Red red black black brown R4 5 6 7 8 9 220 Ohm 6 x 220 Ohm 6...

Page 7: ...n R23 24 25 26 27 28 29 30 31 32 10x10K Resistorarray Widerstands array Farbcode colorcode code Value Position A103 Attention the resistor array is polarized the white point is pin 1 and marked on the...

Page 8: ...Capacitor Farbcode colorcode Value Position marked markiert 104 C3 4 5 6 7 8 9 10 11 12 13 14 15 16 17 18 21 22 23 24 25 26 22x100nF Capacitor Farbcode colorcode Value Position marked markiert 103 C1...

Page 9: ...e code Value Position 100 uF Attention this part is polarized short pin is minus C2 100uF 1x100uF Elko Capacitor Elko Farbcode colorcode code Value Position 10 uF Attention this part is polarized shor...

Page 10: ...sockets are marked Please solder the sockets right around into the board Later it is easier to put the IC s correctly into the sockets TIP solder the IC sockets first on two legs Be sure that the soc...

Page 11: ...l Tip always solder a pin first then align the button solder and align the next button to a pin etc If all buttons are soldered to one pin each the entire buttons can now be aligned in their positions...

Page 12: ...EC11L 4120F N0020 these encoders are without pushbutton and are installed in the positions ENC 2 3 4 5 This encoder has 3 connections depending on the availability of the encoders 5 xPEC11L4120FS0020...

Page 13: ...PAGE encoder and is soldered into position Pages The encoders without pushbuttons are soldered in positions 2 4 The freely programmable potentiometers Pot 1 2 Farbcode colorcode code Value Position D...

Page 14: ...me pot Farbcode colorcode code Value Position 103A Volume 1x10Kohm log stereo The LEDs LED red LFO D1 2 3 4 and for the encoder D9 11 12 13 14 15 16 17 18 D19 20 21 22 23 24 25 Farbcode colorcode code...

Page 15: ...LEDs for the De Generator with a Plexiglas case because these are not so bright R18 19 20 21 are then changed from 330 Ohm to 220 Ohm The LEDs on the encoders can also be omitted if desired It is a CA...

Page 16: ...type 330 Ohm works in most cases 4x 220 390 Ohm R18 19 20 21 LED orange for the free pots Farbcode colorcode code Value Position Attention this part is polarized Short leg is minus D7 29 30 31 8 26 2...

Page 17: ...t cases 2 x 220 390 Ohm R 15 16 The connectors connector male Farbcode colorcode code Value Position Connector male K3 K4 2x10 pin K14 2x3pin Mic Con 1x2 pin Attention the plugs K3 4 14 and MIC con go...

Page 18: ...gh the holes from the back and soldered from above K3 K4 is the connection to the CPU board and should look like this The Micro Mic Farbcode colorcode code Value Position Attention this part is polari...

Page 19: ...should now look like this from below Tip So for example I don t feel like troubleshooting for hours so I clean up I ll take a look at all the solder joints with a magnifying glass There are still one...

Page 20: ...ecured with the nuts A plastic washer is placed on each nut The plastic washer prevents the metal nut from being damaged short circuits on the board The distance between the LCD and the board is 2 5 m...

Page 21: ...d fix it with the remaining two nuts Now the board should look like this When everything is straight and screwed on the display can now be soldered to the board It is best to solder first one row of t...

Page 22: ...The projecting pins of the plug are cut with a side cutter Power supply and test points green GND red 3 3 Volt UB blue 2 5 Volt U_ref for Pot 1 and Pot 2 22...

Page 23: ...d into the sockets Make sure the polarity is correct We use 3 x 74HC14 1 x 74HC573 3 x 74HC165 1 x 74HX595 The finished panel board should now look like this Congratulations the pannel board is now re...

Reviews: