background image

5

USER’S GUIDE

Before Initial Setup

Protect Against Power Surges

‡

Connect all components before you plug any power cords into the wall outlet or power strip.

‡ 1(9(5SOXJ\RXU79LQWRDQRXWOHWWKDWLVFRQWUROOHGE\DZDOOVZLWFK
‡ 7XUQRIIWKH79EHIRUH\RXFRQQHFWRUGLVFRQQHFWDQ\FDEOHV
‡ 0DNHVXUHDOODQWHQQDVDQGFDEOHVDUHSURSHUO\JURXQGHG5HIHUWRWKH,PSRUWDQW6DIHW\

Instructions.

Safety Information

‡ 3URWHFWFRPSRQHQWVIURPRYHUKHDWLQJ

‡ 'RQ¶WEORFNYHQWLODWLRQKROHVRQDQ\RIWKHFRPSRQHQWV$UUDQJHWKHFRPSRQHQWVVRWKDWDLUFDQ

circulate freely.

‡ 'RQ¶WVWDFNFRPSRQHQWV

‡ ,I\RXSODFHWKHFRPSRQHQWLQDVWDQGPDNHVXUH\RXDOORZDGHTXDWHYHQWLODWLRQ

‡ ,I\RXFRQQHFWDQDXGLRUHFHLYHURUDPSOL¿HUSODFHLWRQWKHWRSVKHOIVRWKHKHDWHGDLUIURPLWZRQ¶W

harm other components.

Avoid Audio Interference

‡ 3RVLWLRQFDEOHVSURSHUO\LQVHUWHDFKFDEOH¿UPO\LQWRWKHGHVLJQDWHGMDFN
‡ ,I\RXSODFHFRPSRQHQWVDERYHWKH79URXWHDOOFDEOHVGRZQRQHVLGHRIWKHEDFNRIWKH79LQVWHDG

of straight down the middle.

‡ ,I\RXUDQWHQQDXVHVRKPWZLQOHDGFDEOHVGRQRWFRLOWKHFDEOHV
‡ .HHSWZLQOHDGFDEOHVDZD\IURPDXGLRYLGHRFDEOHV

Avoid Direct Light

'RQ¶WSODFHWKH79ZKHUHVXQOLJKWRUURRPOLJKWLQJLVGLUHFWHGWRZDUGWKHVFUHHQ8VHVRIWRULQGLUHFW

lighting.

Check Supplied Parts

&KHFNWKDWWKHIROORZLQJSDUWVZHUHSDFNHGZLWK\RXUSURGXFW

Chapter 1 - Connections and Setup

Graphics contained within this publication are presentation only.

REMOTE CONTROL

PART # RC198A

2 AAA BATTERIES

MENU

CLEAR

INPUT

GO BACK

INFO

VOL

CH

MUTE

RC19 8A

FORMAT

FAV

MEDIA

GUIDE

CABLE MANAGEMENT 

STRAP

Replacing your remote

If you need to replace 

your remote, visit

www.

tclusa.com.

A shipping 

and handling fee, and 

the appropriate sales 

tax, will be charged upon 

ordering.  Have your Visa or 

MasterCard ready.

QUICK START GUIDE

4 ST-SCREWS

for model 
L32HD

M11

Summary of Contents for L32HDM11

Page 1: ...1 LCD TV User s Guide For use with models L32HDM11 Need Assistance Please visit our website at www tclusa com or call 1 877 300 8837 ...

Page 2: ...U low power standby mode but will not completely turn the power off In order to completely shut the power off you will QHHG WR GLVFRQQHFW WKH SRZHU FRUG IURP WKH RXWOHW 7KHUHIRUH RX VKRXOG HQVXUH WKDW WKH 79 LV LQVWDOOHG LQ D PDQQHU that allows you to disconnect the power cord when desired Product Information Keep your sales receipt to obtain warranty parts and service and for proof of purchase At...

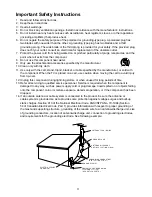
Page 3: ...LV SODFHG RQ D FDUW XVH FDXWLRQ ZKHQ PRYLQJ WKH FDUW WR DYRLG LQMXU from tip over 12 Unplug this component during lightning storms or when unused for long periods of time 5HIHU DOO VHUYLFLQJ WR TXDOL HG VHUYLFH SHUVRQQHO 6HUYLFH LV UHTXLUHG ZKHQ WKH FRPSRQHQW LV damaged in any way such as power supply cord or plug damage liquid spilled on or objects falling onto the component rain or moisture expo...

Page 4: ... 17 GMXVWLQJ 0XWLQJ WKH 9ROXPH 17 Screen Formats 18 Channel Banner 18 Chapter 3 Using the Remote Control Remote Control Buttons 19 Chapter 4 Using the TV Menu Using the Menu System 20 Picture Menu 20 Picture Settings 20 Expert Settings 20 Advanced Settings 21 PC Settings 21 Reset Picture Settings 21 Sound Menu 22 Setup Menu 23 Signal Type 23 Channel Scan 23 KDQQHO 6NLS 24 Channel Edit 24 QSXW 6NLS...

Page 5: ...LRQ FDEOHV SURSHUO LQVHUW HDFK FDEOH UPO LQWR WKH GHVLJQDWHG MDFN I RX SODFH FRPSRQHQWV DERYH WKH 79 URXWH DOO FDEOHV GRZQ RQH VLGH RI WKH EDFN RI WKH 79 LQVWHDG of straight down the middle I RXU DQWHQQD XVHV RKP WZLQ OHDG FDEOHV GR QRW FRLO WKH FDEOHV HHS WZLQ OHDG FDEOHV DZD IURP DXGLR YLGHR FDEOHV Avoid Direct Light RQ W SODFH WKH 79 ZKHUH VXQOLJKW RU URRP OLJKWLQJ LV GLUHFWHG WRZDUG WKH VFUHHQ...

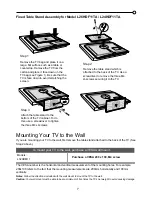
Page 6: ...move the table stand which is DWWDFKHG WR WKH EDFN RI WKH 79 8VH a screwdriver to remove the screw VHFXULQJ LW WR WKH 79 Step 1 5HPRYH WKH 79 EDJ DQG SODFH LW RQ D ODUJH ÀDW VXUIDFH VXFK DV D WDEOH RU FRXQWHUWRS 5HPRYH WKH 79 IURP WKH carton and place it face down on the 79 EDJ VHH LJXUH H VXUH WKDW WKH 79 LV IDFH GRZQ WR DYRLG VFUDWFKLQJ WKH screen Step 3 Attach the table stand to the bottom RI W...

Page 7: ...KDW WKH 79 LV IDFH GRZQ WR DYRLG VFUDWFKLQJ WKH screen Step 3 Attach the table stand to the ERWWRP RI WKH 79 FDELQHW 7R GR this use a screwdriver to tighten the three M4 st screws 0RXQWLQJ RXU 79 WR WKH DOO 7KH 9 6 QXPEHU LV WKH KRUL RQWDO DQG YHUWLFDO PHDVXUHPHQW RI WKH PRXQWLQJ KROHV RU H DPSOH 200x100 refers to the fact that the mounting measurements are 200mm horizontally and 100mm vertically ...

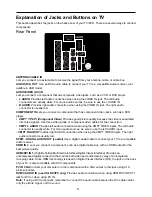
Page 8: ...LQJ WKH 037 9 2 LQSXWV 7KH ULJKW audioconnector is usually red SPDIF DIGITAL AUDIO OUT coaxial 8VH D GLJLWDO FRD LDO FDEOH WR FRQQHFW RXU 79 WR D FRPSDWLEOH audio receiver HDMI IN 3 HWV RX FRQQHFW D FRPSRQHQW VXFK DV D GLJLWDO FDEOH ER ZLWK DQ 0 RXWSXW IRU WKH best picture quality HDMI DVI IN 1 LJK H QLWLRQ 0XOWLPHGLD QWHUIDFH LJLWDO 9LVXDO QWHUIDFH 3URYLGHV DQ uncompressed digital connection that...

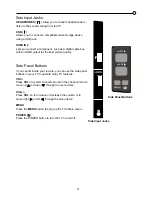
Page 9: ...LW Side Panel Buttons If you cannot locate your remote you can use the side panel buttons RQ RXU 79 WR RSHUDWH PDQ 79 IHDWXUHV CH Press CH to select channels stored in the channel list or to move up or down through the menu items VOL Press VOL to increase or decrease the volume or to move right or left through the menu items MENU Press the MENU EXWWRQ WR EULQJ XS WKH 79 V 0DLQ PHQX POWER 3UHVV WKH...

Page 10: ...h Coaxial Cable Plug the antenna or coaxial cable from the wall outlet into the ANTENNA CABLE INPUT RQ WKH EDFN of WKH 79 RX DUH UHDG WR UHFHLYH RII DLU ORFDO GLJLWDO DQG DQDORJ FKDQQHOV Cable Service Plug the coaxial cable from the wall outlet into the ANTENNA CABLE INPUT RQ WKH EDFN RI WKH 79 You are ready to receive your cable channels Set Top Box If you have a set top box you may need to call ...

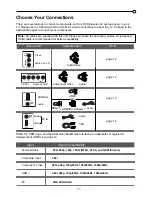
Page 11: ... 12 page 13 page 14 RPSRQHQW 9LGHR Audio Jacks Used Cable Needed Go to 0 TM 0 9 GDSWHU OR Audio Audio Audio Audio 0 9 Y Pb Pr Audio L and R Audio L and R 9LGHR 9 9 PC IN 0 TM 0 WKH 0 ORJR DQG LJK H QLWLRQ 0XOWLPHGLD QWHUIDFH DUH WUDGHPDUNV RU UHJLVWHUHG WUDGHPDUNV RI 0 LFHQVLQJ Input Signal Compatability QWHQQD DEOH 480i 480p 720p 1080i NTSC ATSC and QAM formats RPSRVLWH 9LGHR 480i RPSRQHQW 9LGHR ...

Page 12: ...QW 9LGHR HWWHU Component video connection offers better picture quality for video devices connected to the unit To FRQQHFW D FRPSRQHQW WKDW KDV 3E 3U MDFNV VXFK DV D 9 SOD HU IROORZ WKHVH VWHSV DPSOH 9 3OD HU RQQHFW RXU FDEOH DQG RU RII DLU DQWHQQD DV GHVFULEHG RQ SDJH 2 Connect three video cables or special Y Pb Pr cables to the COMPONENT IN CMPT Y Pb Pr MDFNV RQ WKH EDFN RI WKH 79 DQG WR WKH 3E ...

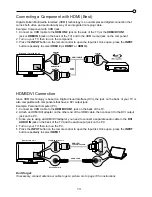
Page 13: ...HDMI 1 RQQHFWLQJ D RPSRQHQW ZLWK 0 HVW LJK H QLWLRQ 0XOWLPHGLD QWHUIDFH 0 WHFKQRORJ LV DQ XQFRPSUHVVHG GLJLWDO FRQQHFWLRQ WKDW carries both video and audio data by way of an integrated mini plug cable DPSOH RPSRQHQW ZLWK 0 MDFN RQQHFW DQ 0 FDEOH WR WKH HDMI IN 2 MDFN RQ WKH VLGH RI WKH 79 RU WKH HDMI DVI IN 1 MDFN RU HDMI IN 3 MDFN RQ WKH EDFN RI WKH 79 DQG WR WKH 0 RXWSXW MDFN RQ WKH FRPSRQHQW 7X...

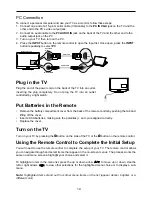
Page 14: ... ZRUNV WKH same on all menu screens highlight your choice and select it To highlight an item in the menu list press the up or down arrow to move up or down Use the left or right arrows to view other selections for the highlighted menu choice or to display a sub menu Note Highlighted items stand out from other menu items on the list appear darker brighter or a different color PC Connection 7R FRQQH...

Page 15: ...79 RFDWLRQ DVVLJQV the optimal picture settings for most home environments KRRVLQJ Retail which is not Energy Star FRPSOLDQW VHWV WKH XQLW XS ZLWK SUHGH QHG settings for retail displays In this setting the power consumption may exceed the requirements of the QHUJ 6WDU TXDOL FDWLRQ Use the up or down arrow to select the desired location setting Home Retail WKHQ SUHVV WKH OK button or right arrow to...

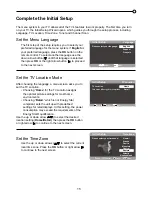
Page 16: ... Skip Scan or by pressing the CLEAR button you will need to follow this process the next time you decide to complete this procedure 1 Select the TV as input using the INPUT NH R WKURXJK WKH PHQX RSWLRQV WR VHOHFW WKH Signal Type which will display the option of scanning the channels again 3 If you are using a satellite or cable set top box you do not have to complete the Channel Search Note See th...

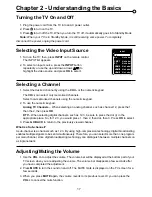
Page 17: ... IURP WKH 79 LQWR DQ SRZHU RXWOHW 2 Press WR WXUQ RQ WKH 79 3 Press WR WXUQ RII WKH 79 KHQ RX WXUQ WKH 79 RII LW DXWRPDWLFDOO JRHV LQWR 6WDQGE 0RGH Note When your TV is in Standby Mode it is still receiving some power To completely disconnect the power unplug the power cord Selecting the Video Input Source 7XUQ RQ WKH 79 WKHQ SUHVV INPUT on the remote control The INPUT list appears 2 To select an ...

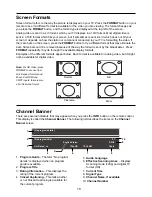
Page 18: ...ferent formats appear below Each format is available for analog video but it might not be available for digital video Channel Banner There are several indicators that may appear when you press the INFO button on the remote control This display is called the Channel Banner The following list describes the items on the Channel Banner screen 1 Program Guide The term No program details is displayed wh...

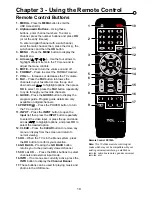
Page 19: ...ram guide details are only available on digital channels 10 POWER Press the POWER button to turn WKH 79 RQ DQG RII 11 INPUT Press the INPUT button to open the Input OLVW WKHQ SUHVV WKH INPUT button repeatedly to select the video input or press the up and down arrows to highlight options and press OK to select the desired option 12 CLEAR Press the CLEAR button to remove any menu or display from the...

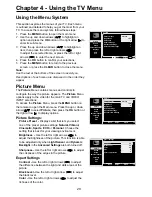
Page 20: ...Picture Settings Picture Preset LVSOD V D OLVW WKDW OHWV RX VHOHFW one of the preset picture settings Natural Vibrant Cinematic Sports ECO or Personal Choose the setting that is best for your viewing environment Brightness Use the left or right arrows to adjust the brightness of the picture This function is able to be adjusted only when Light Sensor and Dynamic Backlight in the Advanced Settings a...

Page 21: ... is especially XVHIXO IRU SURYLGLQJ D FOHDUHU SLFWXUH LQ ZHDN DQDORJ signal conditions Press the left or right arrow to choose between these options Low for a softer smoother picture that retains picture sharpness and detail Middle for a slightly softer picture than the Low setting High for an even softer smoother picture than the other settings the picture detail is somewhat decreased PC Settings...

Page 22: ... Off When you select the Off option WKH VRXQG VSHDNHU RQ WKH 79 ZLOO EH WXUQHG RII SPDIF Type Press the left or right arrow to select SPDIF Type This option controls the type of audio stream VHQW WR WKH LJLWDO XGLR 2XWSXW MDFN YDLODEOH RSWLRQV DUH Dolby Digital PCM or Off only available for analog channels Auto Volume Control Option On Off This option reduces the annoying blasts in volume that oft...

Page 23: ... the ANTENNA CABLE IN Channel Scan KHQ RX SHUIRUP D KDQQHO 6FDQ RXU 79 VHDUFKHV IRU channels with signals and stores the channel information LQ WKH KDQQHO LVW 7KHQ DV RX ZDWFK 79 DQG SUHVV CH or CH RXU 79 JRHV WR WKH QH W RU SUHYLRXV FKDQQHO LQ WKH KDQQHO LVW DQG VNLSV WKH FKDQQHOV WKDW GR QRW KDYH signals I WKH 79 VLJQDO VRXUFH FKDQJHV IRU H DPSOH LI RX FKDQJH IURP DQ RXWGRRU DQWHQQD WR FDEOH 79 ...

Page 24: ...al channels To edit an analog channel name 1 In the Setup Menu press the up or down arrow to highlight Channel Edit 2 Press the left or right arrow to open the Channel List screen 3 Press the up or down arrow to highlight the channel you wish to label or edit 4 Press the OK button to enter the Channel Edit screen 5 The Channel name will be highlighted Use the numeric NH SDG WR HQWHU WKH QDPH IRU W...

Page 25: ...urn to the previous menu or press the CLEAR button to close the menu Input Labels RX FDQ DGG D ODEHO WR D YLGHR LQSXW VRXUFH WR PDNH LW easier to identify 1 In the Setup Menu press the up or down arrow to highlight Input Labels 2 Press the left or right arrow to open the Input Labels screen 3 Press the up or down arrow to highlight the input source you wish to label 4 Press the left or right arrow...

Page 26: ... to select between Off and On options On mode allows you to set the options below Digital CC Style This option lets you customize the following display options if available Caption Style Select either As Broadcast or Custom options If you choose Custom options the setting changes according to the options you choose Digital CC Size Set the size of the digital closed caption text Small Middle or Lar...

Page 27: ...me 1 In the Time Setup Menu press the up or down arrow to highlight Time 2 Press the left or right arrow to proceed to the next screen 3 Options on this screen include a Auto Synchronization Press the left or right arrow to choose On to acquire the time automatically from digital channels b Date 8VH WKH QXPHULF NH SDG WR VHW WKH GDWH c Time If you want to set the time manually use WKH QXPHULF NH S...

Page 28: ...select WKLV RSWLRQ D FRQ UPDWLRQ ER RSHQV 1RWH I VRPH FKDQQHOV DUH EORFNHG RX PXVW HQWHU WKH 9 FKLS password then you can follow the operation below 1 Press the left or right arrows to select OK or Cancel 2 Press the OK EXWWRQ WR FRQ UP UHDWH KDQJH 9 KLS 3DVVZRUG 7KH UVW WLPH RX HQWHU WKH 3DUHQWDO RQWURO PHQX RX must set a password in order to adjust other parental control VHWWLQJV 7R HQWHU D 9 KL...

Page 29: ...nalog 5 Analog 6 Analog 7 Analog 8 Analog 9 Analog 10 Analog Setup Parental Control Language Sound Picture USB Exit Back MENU Set Select Exit CLEAR OK Parental Control Channel Block Button Block Setup Parental Control Language Sound Picture USB Exit V Chip Input Block Change Password Off Back MENU Adjust Select Exit CLEAR 1 Press the MENU button to display the Main Menu 2 Press the up or down arro...

Page 30: ...t or right arrow to enter the next screen 5 U S TV Ratings is highlighted Press the left or right arrow 6 Use the up down left and right arrows to select the desired rating 7 Press the OK EXWWRQ UHSHDWHGO WR WRJJOH EHWZHHQ 9LHZ DQG ORFN 7R YLHZ FRQWHQW WKHPHV DIWHU RX YH ORFNHG WKHP IROORZ WKH VDPH VWHSV DV DERYH WR XQORFN U S TV Ratings TV Y TV G TV PG TV 14 TV MA Setup Parental Control Language ...

Page 31: ...gram ratings follow these steps 1 Press the up or down arrow to select V Chip in the Parental Control submenu 2 Press the left or right arrow to enter the next screen 3 Press the up or down arrow to select Canada V Chip 4 Press the left or right arrow to proceed to the next screen 5 Press the up or down arrow to select Canadian English Ratings or Canadian French Ratings Rating G PG PG 13 R NC 17 X...

Page 32: ... select V Chip in the Parental Control submenu 2 Press the left or right arrow to proceed to the next screen 6HOHFW WKLV RSWLRQ WR UHVHW WKH GRZQORDGDEOH 9 KLS GDWD KHQ RX VHOHFW WKLV RSWLRQ D FRQ UPDWLRQ ER RSHQV 3UHVV WKH OHIW RU ULJKW DUURZ to select 4 Press the OK button to reset the downloadable rating data if present QSXW ORFN 1 Press MENU on the remote control the Main Menu appears 2 Select...

Page 33: ...LQJ WKH to highlight the song then press OK IRU SOD EDFN For slideshow options press MENU DJDLQ WR JR WR WKH 3OD EDFN 2SWLRQV PHQX Thumbnail Size RX FDQ VHOHFW WR GLVSOD WKH OHV RU IROGHUV RQ RXU 86 GHYLFH LQ Small Middle or Large size USB Connection RX FDQ FRQQHFW D GHYLFH ZLWK 86 WR RXU 79 RU XVH D 86 ÀDVK GULYH 7KLV FRQQHFWLRQ DOORZV RX WR LQVHUW D 86 ÀDVK GULYH GLUHFWO RU FRQQHFW D FRPSDWLEOH ...

Page 34: ... can I get rid of them 0RVW GLJLWDO YLGHR LV VHQW LQ D IRUPDW ZKLFK OOV RXU VFUHHQ EXW LV VRPHWLPHV VHQW LQ ZKLFK GRHV QRW OO RXU VFUHHQ W GHSHQGV RQ KRZ WKH VWDWLRQ RU GHYLFH FRQQHFWHG WR RXU 79 LV IRUPDWWLQJ the video If there are bars on the screen press the FORMAT button to try a different format that PD HOLPLQDWH WKH EDUV 6RPH EDUV FDQ W EH UHPRYHG EHFDXVH RI WKH ZD WKH IRUPDW LV VHQW E WKH b...

Page 35: ...IURP D FRPSRQHQW RX YH FRQQHFWHG WR RXU 79 RX PLJKW KDYH RXU YLGHR FDEOHV FRQQHFWHG WR WKH ZURQJ MDFNV HOORZ YLGHR FDEOH FRQQHFWV WR WKH HOORZ 9 2 1387 MDFN RQ WKH VLGH RU EDFN RI RXU 79 WKUHH YLGHR FDEOHV RU EXQGOHG component video cables red blue and green connect to the corresponding COMPONENT INPUT MDFNV RQ WKH EDFN RI RXU 79 KHFN WKH DQWHQQD FRQQHFWLRQV 0DNH VXUH DOO RI WKH FDEOHV DUH UPO FRQ...

Page 36: ...LRQ LQ WKH 6HWXS PHQX R WR SDJH IRU PRUH instructions You are having problems with the HDMI Connection 0DNH VXUH WKH 0 RU 9 FRPSRQHQW LV WXUQHG RQ DQG WKH FDEOHV DUH UPO FRQQHFWHG I problems still occur turn off your component and reconnect it Reset the power by unplugging the SRZHU FRUG DQG SOXJJLQJ LW EDFN LQ I RX DUH WXQHG WR WKH HDMI 1 HDMI 2 or HMDI 3 1387 DQG RX UH UHFHLYLQJ 8QXVDEOH 6LJQDO ...

Page 37: ... 15 WR 9LHZ 6HSDUDWHO LQ RUGHU WR YLHZ PRYLHV ZLWK DQ 15 UDWLQJ What else can I do I RX YH EHHQ WKURXJK WKH 7URXEOHVKRRWLQJ VHFWLRQ DQG QRWKLQJ KDV HG RXU SUREOHP WU UHERRWLQJ RXU 79 1RWH WKDW DIWHU D UHERRW RX PD QHHG WR UXQ RXU 79 WKURXJK WKH VHWXS SURFHVV DJDLQ 7R GR D UHERRW XQSOXJ WKH SRZHU FRUG IURP WKH ZDOO RXWOHW RU SRZHU VWULS HHS RXU 79 XQSOXJJHG IRU DERXW PLQXWHV 7KHQ SOXJ LQ WKH 79 DQG...

Page 38: ... frighten younger children Canadian English V Chip Rating System 18 Adult Programming intended for adults 18 and older It may contain elements of violence ODQJXDJH DQG VH XDO FRQWHQW ZKLFK FRXOG PDNH LW XQVXLWDEOH IRU YLHZHUV XQGHU 9LROHQFH XLGHOLQHV 0D FRQWDLQ YLROHQFH LQWHJUDO WR WKH GHYHORSPHQW RI WKH SORW FKDUDFWHU RU WKHPH LQWHQGHG IRU DGXOW DXGLHQFHV 2WKHU RQWHQW XLGHOLQHV 0D FRQWDLQ JUDSKLF...

Page 39: ...olent scenes 16 ans Viewer 16 and over Programming is not suitable for those under age 16 This program contains frequent scenes of violence or intensely violent scenes 13 ans Viewer 13 and over Programming may not be suitable for children under the age of 13 This program either contains several violent scenes or one or more scenes that DUH YLROHQW HQRXJK WR DIIHFW WKHP 9LHZLQJ LQ WKH FRPSDQ RI DQ ...

Page 40: ...L HV DQG VPDOOHU ZLOO HLWKHU EH UHSDLUHG DW DQ XWKRUL HG 7 6HUYLFH HQWHU RU GLUHFWO H FKDQJHG IRU D QHZ RU UHIXUELVKHG UHPDQXIDFWXUHG unit At the sole discretion of TTE television screen sizes 33 through 55 will either be repaired at an Authorized TCL Service Center or repaired in home If repaired at an Authorized TCL Service Center TTE is not responsible for transportation costs to the Authorized...

Page 41: ...E GOVERNED BY THE LAWS OF THE STATE OF INDIANA EXCEPT TO THE EXTENT PROHIBITED BY APPLICABLE LAW ANY IMPLIED WARRANTY OF MERCHANTABILITY OR FITNESS FOR A PARTICULAR PURPOSE ON THIS PRODUCT IS LIMITED TO THE APPLICABLE WARRANTY AND WARRANTY PERIOD SET FORTH ABOVE How State Law relates to this warranty 6RPH VWDWHV GR QRW DOORZ WKH H FOXVLRQ QRU OLPLWDWLRQ RI LQFLGHQWDO RU FRQVHTXHQWLDO GDPDJHV RU li...

Page 42: ...rference by one or more of the following measures 5HRULHQW RU UHORFDWH WKH UHFHLYLQJ DQWHQQD QFUHDVH WKH VHSDUDWLRQ EHWZHHQ WKH HTXLSPHQW DQG UHFHLYHU RQQHFW WKH HTXLSPHQW LQWR DQ RXWOHW RQ D FLUFXLW GLIIHUHQW IURP WKDW WR ZKLFK WKH UHFHLYHU LV connected RQVXOW WKH GHDOHU RU DQ H SHULHQFHG UDGLR 79 WHFKQLFLDQ IRU KHOS This Class B digital apparatus complies with Canadian ICES 003 Please do not sen...

Reviews: