


12
Printer Initialization
1. Turn off the power switch.
2. Hold on the button then turn on the power switch.
3. Release the button when LED turns
green
after 5 amber
blinks.
(Any green will do during the 5 blinks).
The LED color will be changed as following:
Amber
red (5 blinks)
amber (5 blinks)
green (5 blinks)
green/amber (5 blinks)
red/amber (5 blinks)
solid green
Note:
Always do gap/black mark sensor calibration
after
printer initialization.
Force Black Mark
Sensor Calibration
1. Turn off the power switch.
2. Hold on the button then turn on the power switch.
3. Release the button when LED turns
green/amber
after 5
green blinks.
(Any green/amber will do during the 5
blinks).
The LED color will be changed as following:
Amber
red (5 blinks)
amber (5 blinks)
green (5 blinks)
green/amber (5 blinks)
red/amber (5 blinks)
solid green
Force Gap Sensor
Calibration
1. Turn off the power switch.
2. Hold on the button then turn on the power switch.
3. Release the button when LED turns
red/amber
after 5
green/amber blinks.
(Any red/amber will do during the 5
blinks).
The LED color will be changed as following:
Amber
red (5 blinks)
amber (5 blinks)
green (5 blinks)
green/amber (5 blinks)
red/amber (5 blinks)
solid green
Summary of Contents for TTP-245 Plus
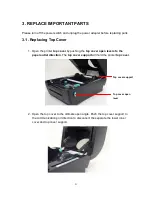
Page 27: ...24 4 Replace the top inner cover 5 Reassemble in reverse procedures ...
Page 34: ...31 9 Reassemble parts in reverse procedures Label Guide Lower inner cover ...
Page 38: ...35 4 Reassemble parts in reverse procedures Screws Head Open Micro Switch ...


