background image

20 


3.3 Communicate 

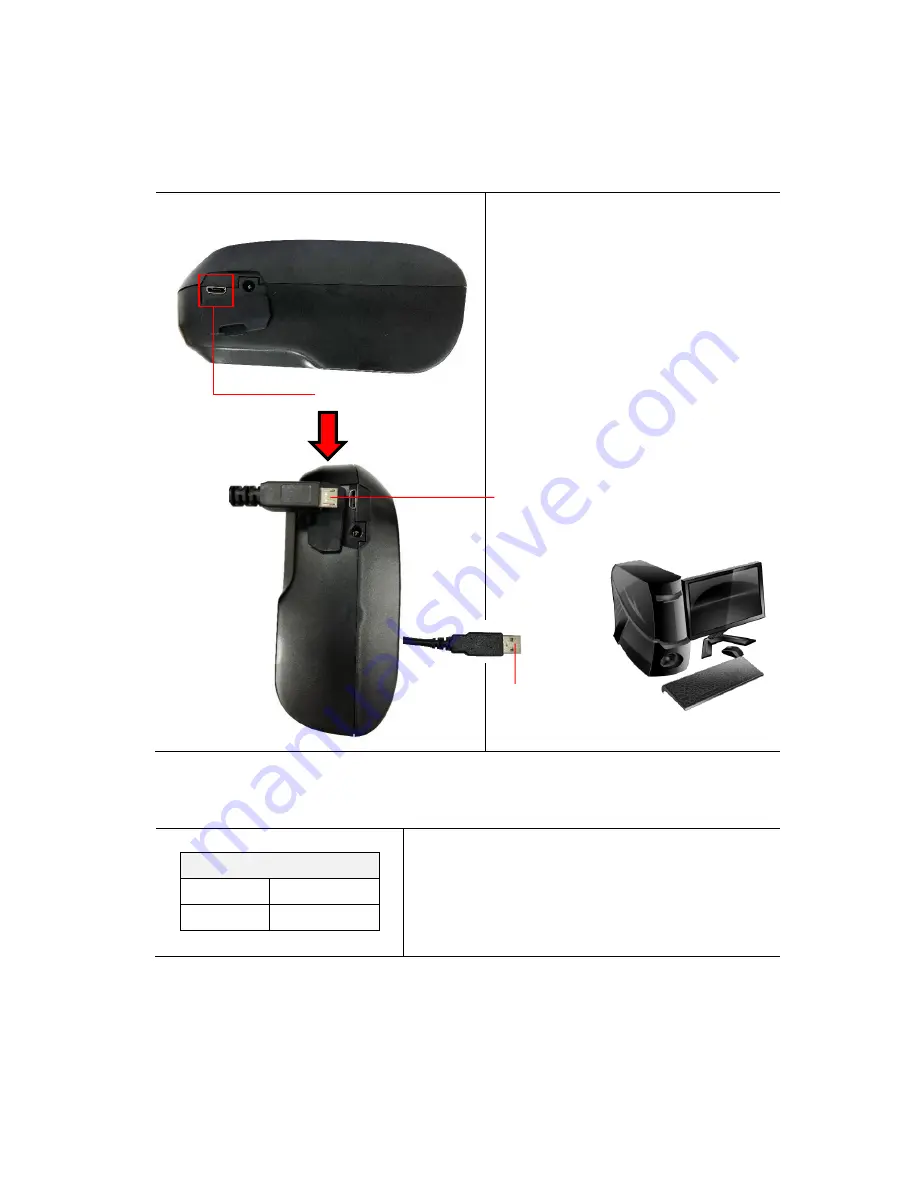
3.3.1 Connecting with the Communication Cable 


USB to USB Cable (Optional) 


1. Open the interface cover and 

connect the printer to the computer 

with USB cable. 


3.3.2 Connecting with Bluetooth (Optional) 


Default 

Name 

RF-BHS 

PIN 

0000 

Turn on the printer and make sure the Bluetooth 

of device is opened. 


Note: 
Please refer to section 6.5 to change the name of 
default and PIN.


USB interface 

USB connector 
(PC) 

USB connector 
(Printer) 

Summary of Contents for TDM-30 Series

Page 1: ...i USER S MANUAL TDM 30 Series Direct Thermal Portable Printer...

Page 2: ...e from the Monotype Corporation Windows is a registered trademark of Microsoft Corporation All other trademarks are the property of their respective owners Information in this document is subject to c...

Page 3: ...h can be determined by turning the equipment off and on the user is encouraged to try to correct the interference by one or more of the following measures Reorient or relocate the receiving antenna In...

Page 4: ...d or aerosol cleaners Using a damp cloth is suitable for cleaning 4 The mains socket shall be installed near the equipment and easily accessible 5 The unit must be protected against moisture 6 Ensure...

Page 5: ...be placed in municipal waste RTC CR2032 1 2 3 4 5 Caution The printhead may be hot and could cause severe burns Allow the printhead to cool CAUTION Any changes or modifications not expressly approved...

Page 6: ...sure limits under portable exposure conditions Antennas are less than 20 cm of a person s body For Bluetooth Canada avis de l Industry Canada IC Cet appareil num rique de classe B est conforme aux nor...

Page 7: ...vii NCC...

Page 8: ...wt Note 1 Exceeding 0 1 wt and exceeding 0 01 wt indicate that the percentage content of the restricted substance exceeds the reference percentage value of presence condition 2 Note 2 indicates that...

Page 9: ...LCD screen and Keys 12 3 Setup 15 3 1 Install the Battery 15 3 2 Charge the Battery 16 3 2 1 Charge the Battery 16 3 2 2 Charge by Charger Station Optional 18 3 3 Communicate 20 3 3 1 Connecting with...

Page 10: ...Calibrating Media Sensor by Diagnostic Tool 32 6 3 1 Auto Calibration 32 6 4 Setting Bluetooth by Diagnostic Tool Optional 33 7 Troubleshooting 34 7 1 Common Problems 34 8 Maintenance 36 Revise Histo...

Page 11: ...thout interfering with the user s tasks Use USB optional Bluetooth to connect to a mobile computer or even a smartphone and produce clear easy to read receipts hour after hour This document provides a...

Page 12: ...and error messages 1 LED for Printer Status 1 LED for RF connection 3 colors Audible alert Programmable buzzer Rechargeable Li ion battery Micro USB 2 0 High speed mode interface 32 MB DRAM 16 MB NOR...

Page 13: ...sche Post Leitcode LOGMARS CODABLOCK F mode DataMatrix Maxicode PDF 417 Aztec MicroPDF417 QR code RSS Barcode GS1 Databar 1 2 2 Printer Optional Features The printer offers the following optional feat...

Page 14: ...16 mm D Enclosure Plastic Weight w battery 385g Electrical Internal charging capability battery in Input AC 100 240V 2 5A 50 60Hz Output DC 12V 1A 12 24V DC automobile cigarette lighter plug Auto swit...

Page 15: ...head resolution 203 dots inch 8 dots mm Printing method Direct thermal Dot size width x length 0 125 x 0 125 mm 1 mm 8 dots Print speed inches per second Max 4 ips 102 mm sec Max print width 72 mm 2 8...

Page 16: ...bel min 8 mm w x 2 mm h Gap label min 8 mm w x 2 mm h Media thickness 0 06mm 0 16 mm In lowest print speed 0 06mm 0 18 mm Note Please locate the black mark on the printing side when using black mark c...

Page 17: ...ng the bar code printer Please retain the packaging materials in case you need to reship the printer Unpacking the printer the following items are included in the carton One printer unit One Li ion ba...

Page 18: ...8 2 2 Printer Overview 2 2 1 Front View For LED version 1 Power on off button 2 Feed stop button 3 LED indicators 4 Media cover 5 Media cover window 6 Media cover release button 1 5 6 2 3 4...

Page 19: ...9 For LCD version 1 Power on off button 2 Feed stop button 3 LED indicators LCD screen 4 Media cover 5 Media cover window 6 Media cover release button 6 3 5 4 1 2...

Page 20: ...10 2 2 2 Interior View 1 Tear edge 2 Print head 3 Platen roller 4 Black mark sensor 3 2 4 1...

Page 21: ...11 2 2 3 Rear View 1 Li ion Battery 2 Battery open clasp 3 Interface cover 4 Power jack 5 USB interface 1 3 2 4 5...

Page 22: ...ontrol 2 3 1 LED Indication LCD screen and Keys For LED version 1 Power on off button 2 Feed Pause button 3 Printer status LED indicator 4 Battery charge level LED indicators 5 Wireless status LED ind...

Page 23: ...D indicator 4 LCD screen indicates battery status media type firmware version error messages Keys Function 1 Press and hold for 2 3 seconds to turn on the printer 2 Press and hold for 2 3 seconds to t...

Page 24: ...ged by revising the command refer to TSPL TSPL2 programming manual on TSC website Red solid Media cover is open Red blinking Printer error Battery status LED indicator Green blinking Recharge the batt...

Page 25: ...e battery down 3 Pull the battery clasp to lock the battery Battery safety warning DO NOT throw the battery in fire DO NOT short circuit the contacts DO NOT disassemble the battery DO NOT throw the ba...

Page 26: ...e please re plug the power cord into a power outlet 2 Plug the power cord into a properly power outlet 3 When the battery installed on printer and start charging the printer will automatically open an...

Page 27: ...device or battery charger always perform battery charging in a safe and optimum manner At higher temperatures e g approximately 40 C 104 F or charging when turning on the printers the printer or batt...

Page 28: ...the battery along the slot to the right side of charger station as pictured Refer to section 3 1 for battery installation procedure 3 Push the battery clasp and properly install the battery it will s...

Page 29: ...station is also available for your reference LED Color Description Green Solid Battery is completely charged Green Blinking Battery is charging Red Blinking Battery charging error Off No battery Batte...

Page 30: ...and connect the printer to the computer with USB cable 3 3 2 Connecting with Bluetooth Optional Default Name RF BHS PIN 0000 Turn on the printer and make sure the Bluetooth of device is opened Note P...

Page 31: ...media cover by pressing the media cover release button 2 Place the media roll at the correct side and pull out enough paper over the tear edge 3 Press the media cover on both sides to close it and mak...

Page 32: ...the battery to rear side remove the battery on the rear of the printer and lock the belt clip on the hole above the battery 2 Press the ball on the belt clip to the hole as pictured 3 After reinstalle...

Page 33: ...d environmental case with shoulder strap Optional 1 Open the zip along the arrow direction indicated on case cover 2 Place the printer in the case Note The printing side must face the outside cover as...

Page 34: ...24 3 Zip up the case cover The outside cover should be opened and fixed while printing Outside cover Outside cover fixed...

Page 35: ...ifferent functions Power on utilities The positions of LED light will be changed as following pattern LED Functions solid 5 blinks 5 blinks 5 blinks Solid green 1 Media sensor calibration Release 2 Se...

Page 36: ...the FEED button when the indicator becomes and blinking Any green will do during the 5 blinks The LEDs will be changed as following order amber 5 blinks 5 blinks 5 blinks solid green 4 It calibrates t...

Page 37: ...are checksum Printer S N TSC configuration file System date System time Printed mileage meter Cutting counter Print speed inch sec Print darkness Label size inch Gap distance inch Gap black mark senso...

Page 38: ...printed in 2 columns as following The left side characters are received from your system and right side data are the corresponding hexadecimal value of the characters It allows users or engineers to v...

Page 39: ...s The LEDs will be changed as following order amber 5 blinks 5 blinks 5 blinks solid green Printer configuration will be restored to defaults as below after initialization Parameter Default setting Sp...

Page 40: ...to a printer With the aid of this powerful tool you can review printer status and settings in an instant which makes it much easier to troubleshoot problems and other issues 6 1 Start the Diagnostic...

Page 41: ...section 5 3 Reset Printer Reboot printer Print Test Page Print a test page Configuration Page Print printer configuration Please refer section 5 2 Dump Text To activate the printer dump mode Ignore A...

Page 42: ...h 3 Open Diagnostic tool and set interface The default setting is USB The default interface setting is USB interface If USB interface is connected with printer no other settings need to be changed in...

Page 43: ...interface If USB interface is connected with printer no other settings need to be changed in the interface field 4 Select Wireless tab and Built in wireless module item 5 Enter the new BT Local Name...

Page 44: ...Supply a new media roll Please refer to the steps on section 3 4 to reinstall the media roll Calibrate the black mark sensor The printer status from DiagTool shows Paper Jam Black mark sensor is not s...

Page 45: ...l size setup Set the correct label size Gray line on the blank label The print head is dirty The platen roller is dirty Clean the print head Clean the platen roller Irregular printing The printer is i...

Page 46: ...an the print head when changing a new label roll Platen Roller 1 Turn the power off 2 Rotate the platen roller and wipe it thoroughly with water Clean the platen roller when changing a new label roll...

Page 47: ...37 Revise History Date Content Editor...

Page 48: ...t Rd Wujie Township New Taipei City 23141 Taiwan R O C Yilan County 26841 Taiwan R O C TEL 886 2 2218 6789 TEL 886 3 990 6677 FAX 886 2 2218 5678 FAX 886 3 990 5577 Web site www tscprinters com E mail...

Reviews: