background image

 TRUST SOUND EXPERT DIGITAL SURROUND 5.1

5


GB 

3. 

Installing the Trust Sound Expert Digital Surround 5.1

3.1 Connecting

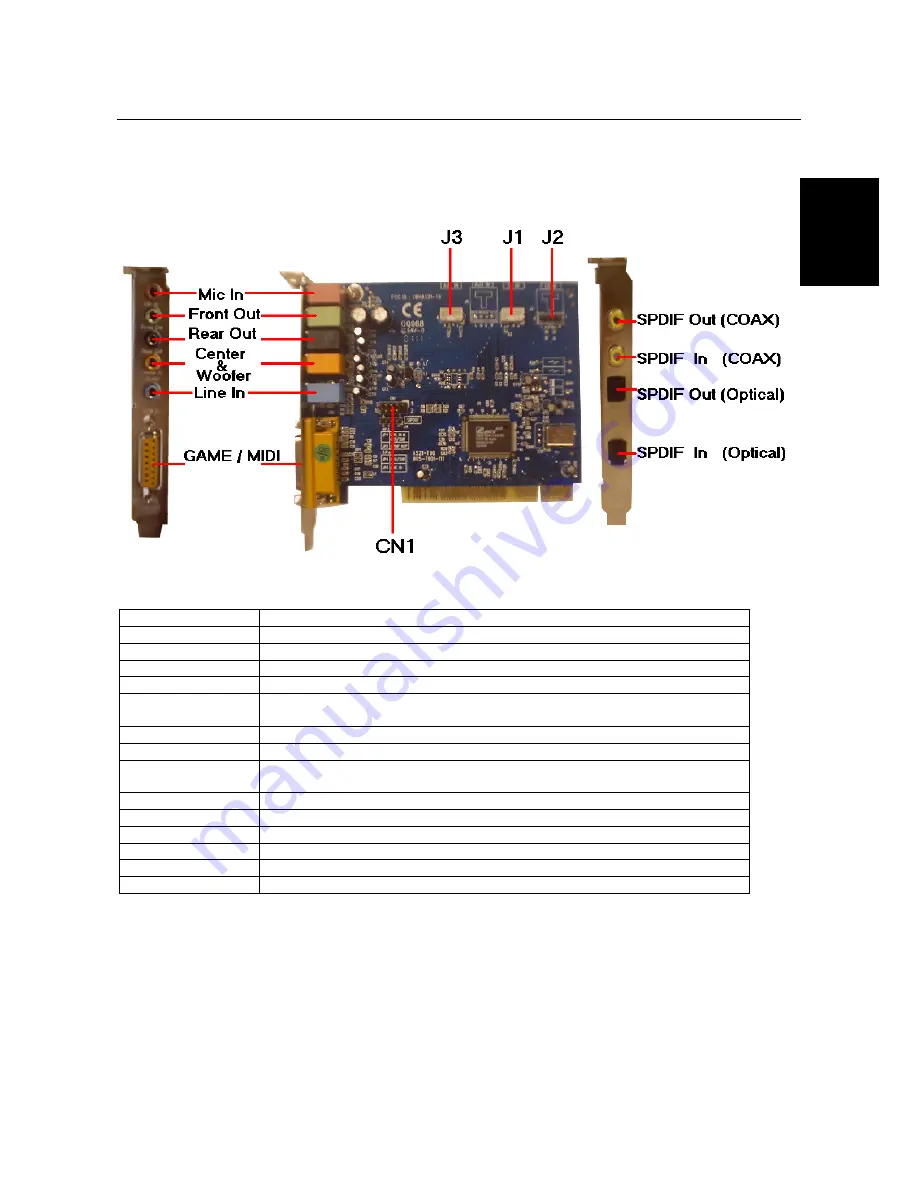
Figure 1: Connections for the Trust Soundcard

Connector

Function

J1

Analogue CD/IN Port (Signals: L-G-R-G)

J2

Analogue CD/IN Port (Signals: R-G-G-L)

J3

AUX-IN Port (Signals: L-G-G-R)

Mic-IN

Connect with the Microphone (Mono)

Front Out

Output to speakers with the amplifier or earphones or AUDIO-IN of home
stereo

Rear Out

Connect with the rear speakers while four channel speakers mode enabled

Line-IN

LINE-IN Connect with the audio output port of stereo

Center/Sub
Woofer-Speaker

Connect with the Cen/Sub speakers while 5.1 channel speakers mode
enabled

GAME/MIDI

Connect with Joystick or devices that use MIDI interface

CN1

OPTICAL SPDIF- I/O

SPDIF-Out COAX

Connect with Mini Disc, LD Player or AC3 Amplifier

SPDIF-In COAX

Connect with Mini Disc, LD Player or AC3 Amplifier

SPDIF-Out Optical

Connect with Mini Disc, LD Player or AC3 Amplifier

SPDIF- In Optical

Connect with Mini Disc, LD Player or AC3 Amplifier

3.2 

Install the soundcard in computer

1.  Turn off your PC.

2.  Remove the power plug from the wall socket.

3.  Remove the cover from the computer (if necessary, read your computer’s instruction manual).

4.  Remove the metal cover plate or your old soundcard from your PCI slot.

5.  Insert the ‘Trust Soundcard’ into your PCI slot and screw the card firmly into place.

6.  Connect the daughterboard with the flatcable to the main soundcard (Con1 to CN1).

Note:

  Be sure the flatcable is connected well. Pin1 must be connected to pin 1 (red wire)

Summary of Contents for SOUND EXPERT DIGITAL SURROUND 5.1

Page 1: ...TRUST SOUND EXPERT DIGITAL SURROUND 5 1 UK TRUST SOUND EXPERT DIGITAL SURROUND 5 1 Instruction Manual Version 1 0 ...

Page 2: ...ge and retrieval systems for any purpose other than the purchaser s own personal use without prior written permission from the manufacturer Disclaimer statement The manufacturer specifically disclaims all warranties either express or implied including but not limited to implied warranties for the marketability and suitability for a particular purpose with respect to the software the accompanying p...

Page 3: ...ing the applications 13 4 1 Trust Installer 13 4 2 Audio Rack 13 5 Using the soundcard 15 5 1 Multi Channel Audio Demo 15 5 1 1 How to test your speaker connection 15 5 2 Audio Rack 15 5 2 1 Control Center 16 5 2 2 CD Player 16 5 2 3 MIDI Player 17 5 2 4 MP3 Wave Player 19 5 2 5 Mixer 21 5 2 5 1 Volume Control 21 5 2 5 2 Recording Control 22 5 2 5 3 Advanced 22 5 3 How to adjust the volume of micr...

Page 4: ...TRUST SOUND EXPERT DIGITAL SURROUND 5 1 2 8 Specifications 29 9 Trust Customer Care Centers 30 ...

Page 5: ... D SUB multiplexed joystick MIDI connector 1 1 Conventions used in the manual The following conventions have been used in the manual to indicate instructions key here you should press a key The name of the key is given between brackets System this is a specific term used in a program These are terms used by for example Microsoft Windows 98 DIR Type the text shown between brackets term The text bet...

Page 6: ... are sensitive to static electricity By touching the computer casing you discharge your body s static electricity 2 Switch off and unplug the computer before opening the computer 3 Make sure the components you wish to add to the computer are compatible with your system 4 To prevent damage from static electricity hold sound card around the edges only ...

Page 7: ...E MIDI Connect with Joystick or devices that use MIDI interface CN1 OPTICAL SPDIF I O SPDIF Out COAX Connect with Mini Disc LD Player or AC3 Amplifier SPDIF In COAX Connect with Mini Disc LD Player or AC3 Amplifier SPDIF Out Optical Connect with Mini Disc LD Player or AC3 Amplifier SPDIF In Optical Connect with Mini Disc LD Player or AC3 Amplifier 3 2 Install the soundcard in computer 1 Turn off y...

Page 8: ... Soundcard and insert the power plug of computer in the wall socket 12 Turn on your computer and install the drivers and software of your Trust Soundcard 3 3 Installation in Windows 95 98 1 Start Windows 2 Windows will detect new hardware see Figure 2 Figure 2 New hardware detected 3 Insert the CD ROM containing the drivers into your CD ROM drive Click on Next 4 Select the option for Windows to se...

Page 9: ...undcard will be found at the location given 7 Click on Next again The driver will now be installed 8 After installation procedure Click on Finish to complete the installation 9 Restart your computer You have now completed the installation of the driver Continue to chapter 4 for instructions on how to install the necessary applications ...

Page 10: ...he option to specify a location and give the location as D DRIVERS W2K Me drv see Figure 6 Figure 6 Specifying a location for the driver 6 Click on Next The driver for the Soundcard System will be found at the location given 7 Click on Next again The driver will now be installed 8 After installation procedure Click on Finish to complete the installation 9 Restart your computer You have now complet...

Page 11: ...e 7 New hardware detected 3 Insert the CD ROM containing the drivers into your CD ROM drive Click on Next 4 Select the option for Windows to search for a suitable driver and click on Next see Figure 8 Figure 8 Searching for a suitable driver 5 Select the option to search a specific location and click on Next see Figure 9 Figure 9 Specifying a location ...

Page 12: ...n Finish to complete the installation You have now completed the installation of the driver Continue to the following chapter for instructions on how to install the necessary applications 3 6 Windows XP Note Due the final version of Windows XP was not available during development of this product the installation can vary 10 Start Windows XP and log on 11 Windows will detect new hardware see Figure...

Page 13: ...cations 15 Mark only Include this location in the search 16 Type in D Driver XP Drv 17 Click Next to continue The drivers will be copied now Figure 13 Warning 18 During installation a warning will appear Please select Continue anyway to install the driver of the soundcard Files will be copied now When installation is finished figure 14 appears ...

Page 14: ...he New Hardware Wizard 20 In the background Windows XP will install driver for the Game port and MPU401 Midi Interface This will be done automatically You have now completed the installation of the driver Continue to the following chapter for instructions on how to install the necessary applications ...

Page 15: ...D ROM drive 3 Click on Start and select Run 4 In the commend line type D Setup exe and click on OK to start the Trust Software Installer see Figure 15 Figure 15 Trust installer 5 In the left hand window select the language that you wish to use during the installation 4 2 Audio Rack By means of a user friendly interface as easy as operating your home stereo system this PCI audio rack provides you w...

Page 16: ...lick Next and the AUDIO RACK program will now be installed at the location indicated 4 After installation figure 18 will appear Figure 18 Installation AUDIO RACK 5 Click Yes if you want to use AudioRack CD Player as your default CD player Click No if you do not want to use AudioRack CD Player as your default CD player You have now completed the installation of the AUDIO RACK ...

Page 17: ... descending keys 5 1 1 How to test your speaker connection To make sure the front and the rear speakers are correctly connected you can use the following program to testify individual speaker output Move cursor to whichever speaker you want to test and left click the mouse If the set up is correct you can hear music coming from that speaker alone Each output music is different for distinction 5 2 ...

Page 18: ...rom the display click the component button s listed on the top 5 2 2 CD Player The CD player plays standard audio CDs and allows you to create your favourite song play list Current Track field shows the number of the current selection of CD tracks CD title and track name field shows CD title and track name You can modify CD title and track name in Play list function Total length field displays the...

Page 19: ...ive which analogue output is connected to the Analogue CD in of your sound card If your CD ROM does not connect the analogue CD input wire please select Using CD DA option Help Shows the help screen for detailed button function descriptions About Shows software version and copyright information Exit Stops running CD player 5 2 3 MIDI Player The MIDI Player can play MIDI files mid rmi and allow you...

Page 20: ... song Loads the next MIDI file of play list If current file is the last one the first file will become the current selection Playback Starts to playback the current MIDI file Pause Restart Pauses or restarts the current playback action Stop Stops playback Reverse 10 seconds Causes the current playback time to 10 seconds backward Forward 10 seconds Causes the current playback time to 10 seconds for...

Page 21: ...ted file in minutes and seconds Playback time field displays the current playback time File name and status field displays the file name audio format sound effect selection playback mode Karaoke mode and SPDIF status Button Function Play list Play list allow you to insert remove and record the audio files into and from the play list The audio files include wave MP3 CDDA and MPEG 1 encoding files S...

Page 22: ... Effector You can use this function to modify the special effect of the song being played Currently these effects can only be used for 44 1 kHz 16 bits format For Windows NT users we do not support the Karaoke and MCI 4 speaker functions Setting You can use this dialog to set the playback parameters and the status of SPDIF IN OUT For more information of SPDIF please refer to Chapter 6 and 6 4 Reco...

Page 23: ...oth of the volume slider and the slider for the individual output To modify all the outputs move the volume slider To change individual output s move its their slider s CD Controls the CD drive audio input level MIC Controls the input level of microphone WAVE Controls wave voice playback levels FM Controls the FM music play level AUX IN Controls the Auxiliary input play level MONO IN Controls the ...

Page 24: ...ine In level SPDIF IN Enables the recording from SPDIF in SPDIF in is mutually exclusive with other input signals Echo Enables the echo effect of microphone for karaoke Advanced Controls the advanced settings 5 2 5 3 Advanced Advanced dialog provides a fully control over SPDIF IN OUT functions You can use these settings to connect your computer to other pieces of audio device such as Mini Disc amp...

Page 25: ...s very close to the speakers it will cause feedback between the two Also unusual high frequencies or buzzing sounds might be heard from the speakers To avoid this you have to adjust the volume of microphone in both recording and playback Sometimes you might have to adjust main and Wave volume as well Please left click the mouse to adjust the microphone MIC in both Volume and Recording Control ...

Page 26: ...yer is the answer The MD player has been available at the consumer electronics market for a period of time and its popularity keeps growing in places like Japan Hong Kong and Europe Each MD player is capable of storing high quality 74 minute music and one blank MD costs less than USD2 00 4 00 More importantly the most high end 24 bit MD player costs around USD200 Since there is no expensive memory...

Page 27: ...TRUST SOUND EXPERT DIGITAL SURROUND 5 1 25 GB Situation 1 PC s CD ROM Player to MD Situation 2 Portable CD player with optical out to SPDIF IN Optical 6 1 2 From PC to AC3 Decoder or DAC ...

Page 28: ...your album into Mini Disc easily 1 Using optical fibre to connect the sound card and MD player MD player will start to do the recording and turning on the SYNC mode See 6 1 1 2 To execute MP3 Wave Player and modify the play list You should select those files whose format can be recognised by MD Player You can also change the sound effect if you like See also 5 2 4 3 In Setting dialog check Enable ...

Page 29: ...ayer can be used to do the recording of the signal from SPDIF IN The recording steps are as follows 1 Use optical fibre or coaxial to connect the sound card and SPDIF IN device See 6 1 1 2 Execute MP3 Wave Player In Setting dialog select 5 Vp p Optical or 0 5 Vp p Coaxial 3 In Wave Recording dialog you should select the recording format and SPDIF IN recording channel Then input the file name Befor...

Page 30: ...io cable between CD ROM or DVD player and soundcard Hear no sound when play Audio CD in my CD ROM or DVD Player Volume setting for Audio CD not turned on Check settings in Mixer setting Check the FAQ s on the Internet www trust com You can also register your product at www trust com so that you are able to receive optimal guarantee and service support You will be automatically informed of developm...

Page 31: ...4 bit SPDIF IN and OUT Multi channel output Headphone 2 speaker 4 speaker 5 1 speaker set Connectors Internal 4 pin AUX IN Connector 4 pin CD IN Connector 2 pin SPDIF Connectors External 3 5 mm Microphone in 3 5 mm Line in 3 5 mm Front Out 2 speakers or headphone 3 5 mm Rear Out 4 speaker 3 5 mm Sub Center Out 5 1 speaker set Sub D 15 pin for joystick and MIDI Interface Coaxial SPDIF In and SPDIF ...

Page 32: ...et www trust com Tel 33 0 803 083080 Fax 33 0 1 48630261 Inwoners van Duitsland kunnen contact opnemen met Van 9 00 17 00 uur Vestiging Duitsland Internet www trust com Tel 0800 00TRUST 0800 0087878 Fax 49 0 2821 58873 Inwoners van Spanje kunnen contact opnemen met Van 9 00 17 00 uur Vestiging Spanje Internet www trust com Tel 34 0 902 160937 Fax 31 0 78 6543299 Inwoners van Nederland kunnen conta...

Reviews: