background image

15

16

Z1 ZIGBEE CONTROL STATION

Z1 ZIGBEE CONTROL STATION

3.1

3.2

A

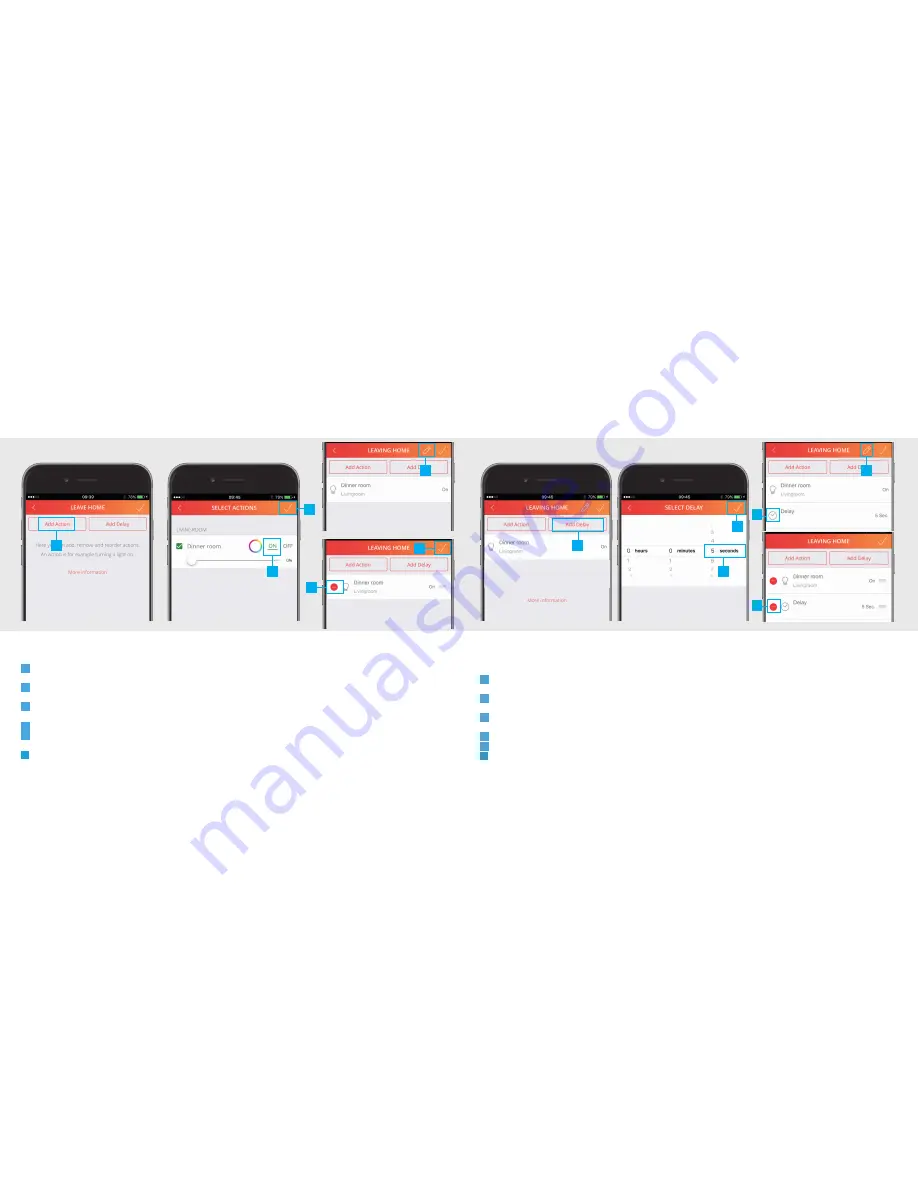
 Press the ADD ACTION button to add actions to the scene.

B

 Add the desired actions for the devices by pressing the buttons.

C

 Press CONFIRM to add the actions to the scene.

D

 By pressing the pencil button you enter edit mode. 

E

 Delete an action by pressing the DELETE button.

F

 Press CONFIRM again to save the scene.

It is possible to add a delay between actions. First add an actions like described in step 3.1

A

 Press the ADD DELAY button.

B

 Choose how long the delay must be by selecting a time period.

C

 Press the CONFIRM button to add the delay to the scene

D

 The delay is now added to your scene.

E

 By pressing the pencil button you enter edit mode. 

F

 Press the DELETE button to delete a delay.

3.1 Add/delete actions

3.2  Add/delete delays

A

A

B

C

D

E

F

B

E

F

D

C

Summary of Contents for 71168

Page 1: ...ONLINE HANDLEIDING www trust com zigbee ...

Page 2: ...ex 1 Add a room 5 1 1 Edit Delete room 6 2 Connect a ZigBee bulb 7 2 1 Connect a ZigBee Remote 11 2 2 Edit Delete a device 13 3 Add scenes 14 3 1 Add Delete action 15 3 2 Add Delete delays 16 4 Configure timers 17 4 1 Edit Delete timers 20 5 Connect manually 21 ...

Page 3: ...want to add C Press the ADD button to save the new room A To edit the name of a room press the pencil button at the top of the screen B Press on the room name to begin editing C When you are done editing the name press the CONFIRM button D To delete a room press the DELETE button in front of the room when in editing mode Press the CONFIRM button to go back to the room overview A B C A B D C ...

Page 4: ...thin 4 metres A Press on a room name to open it B Press the button at the top of the screen to add a new device C Enter a name for the device you want to add D Press ADD E Select Trust Smart Home ZigBee Line and choose for ZigBee light F Put the bulb in connect mode Check the manual of the bulb on how to put it in connect mode 2 A B C D E E ...

Page 5: ... bulb is now added to your room You can now control the bulb with the App I Use the buttons to control the device J To change the color of a ZigBee bulb press on the color circle to open the color palette Only for RGB or Cold Warm bulb K Choose the desired color L Press the BACK button to go back to the room G H I J K L ...

Page 6: ... Smart Group button on the remote and wait untill the LEDs under the channels start to blink Wait for confirmation from the App that the connection succeeded D The ZigBee Remote is now connected To control a bulb which is already connected with the Control station with the remote the bulb also needs to be connected to the ZigBee Remote Check the manual of the ZigBee remote on how to connect it wit...

Page 7: ...ame press the confirm button E To delete a device press the DELETE button in front of the device when in editing mode Press the CONFIRM button to go back to the device overview With a scene you can trigger different devices at the same time or with an delay A Press the scene button in the menu bar B Press the button at the top of the screen to add a new scene C Fill in a desired name for the scene...

Page 8: ...pressing the DELETE button F Press CONFIRM again to save the scene It is possible to add a delay between actions First add an actions like described in step 3 1 A Press the ADD DELAY button B Choose how long the delay must be by selecting a time period C Press the CONFIRM button to add the delay to the scene D The delay is now added to your scene E By pressing the pencil button you enter edit mode...

Page 9: ... the top of the screen to add a new timer C Press on Timer wizard D Fill in a name for your timer and press OK E Choose the kind of start time for the timer In this example a fixed time is used F Select the desired start time for the timer and press NEXT G Choose which days and in which months the timer should be triggered By default all days and months are selected Press NEXT 4 Configure timers B...

Page 10: ...you want the devices to be turned OFF Press NEXT K The timers have been added to the overview L Press the pencil button the enter edit mode M Press on the timer name to begin editing N When you are done editing the name press the confirm button O To delete a timer press the DELETE button in front of the timer when in editing mode Press the CONFIRM button to go back to the timers rules overview 4 1...

Page 11: ... is possible to enter the MAC address manually during the registration process Press the MANUAL button B Look at the bottom of the Z1 for the MAC address C Press the Enter manually field and enter the MAC address for your Z1 Then press NEXT 5 Connect manually MAC 00 00 A2 00 12 11 B 5 A C ...

Reviews: