background image

TEC_TM_121 | REV. A | EN

03/3/2021 

Page 1 of 22

TRADITIONAL REACH-INS

INSTALLATION MANUAL

Congratulations!

You have just purchased the finest commercial refrigerator 

available. You can expect many years of trouble-free operation.

Table of Contents

Safety Information

Safety Precautions & Proper Disposal ......................................................3

Installation

Prior to Installation, Ownership .................................................................4
Wiring Instruction Advisement & Wire Gauge Chart .........................5
Uncrating ............................................................................................................6
Locating, Leveling Legs, and Castors .......................................................7
Leveling & Sealing Cabinet to the Floor .................................................8
Electrical Installation & Safety ....................................................................9

Cabinet Setup

Standard Accessories ..................................................................................10

Cabinet Operation

Startup, Temperature Control & Light Switch Location .................11
Flex Control ....................................................................................................12
General Sequence of Operation .............................................................13

Maintenance, Care & Cleaning

Cleaning the Condenser Coil ...................................................................14
Stainless Steel Equipment Care & Cleaning .......................................16

Cabinet Adjustments, Servicing & Component Replacement

Servicing & Replacing Components......................................................17
Slide Door Operation & Adjustment .....................................................17

Warranty

Warranty (US & Canada Only) ..................................................................21
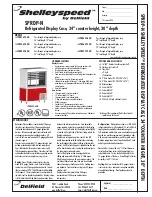
 TRUE 

MANUFACTURING CO., INC.

T-49-HC

TSD-69

North America – Canada  

and Caribbean

Warranty Phone: +1 855 878 9277

Warranty Fax: +1 636 980 8510

Technical Phone: +1 855 372 1368

Warranty Email: 

 [email protected]

Technical Email:

 [email protected]

7:00 – 7:00 CST Monday – Thursday.

7:00 – 6:00 Friday. 8:00 – 12:00 Saturday.

Mexico

Phone: +52 555 804 6343/44

Toll Free in Mexico: 01 800 202 0687

[email protected]

9:00 am – 5:30 pm M–F

Latin America

Phone: +56 232 13 3600

[email protected]

9:00 am – 5:30 pm M–F

UK, Ireland, Middle East, 

Africa and India

Phone: +44 (0) 800 783 2049

[email protected]

8:30 am – 5:00 pm M–F

European Union and 

Commonwealth of 

Independent States

Phone: +49 (0) 7622 6883 0

[email protected]

8:00 am – 5:00 pm M–F

Australia

Phone: +61 2 9618 9999

[email protected]

8:30 am – 5:00 pm M–F

*975523*

INSTALLATION MANUAL

TRADITIONAL REACH-INS

Original Instructions

TRUE MANUFACTURING CO., INC.

2001 East Terra Lane • O’Fallon, Missouri 63366-4434
(636)-240-2400 • FAX (636)-272-2408 • International FAX (636)272-7546 • (800)-325-6152
Parts Department (800)-424- TRUE • Parts Department FAX# (636)-272-9471

T-23-HC

Summary of Contents for TCGG Series

Page 1: ...Only 21 TRUE MANUFACTURING CO INC T 49 HC TSD 69 North America Canada and Caribbean Warranty Phone 1 855 878 9277 Warranty Fax 1 636 980 8510 Technical Phone 1 855 372 1368 Warranty Email warrantyinq...

Page 2: ...TRADITIONAL REACH INS truemfg com TEC_TM_121 REV A EN 03 3 2021 Page 2 of 22 Notes...

Page 3: ...as aerosol cans with a flammable propellant in this appliance Keep fingers out of the pinch point areas clearances between the doors and cabinet are necessarily small be careful closing doors when chi...

Page 4: ...n food storage Cabinet Location Appliance tested to IEC EN 60335 2 89 Climate Class 5 109 F 43 C temperature 40 relative humidity for safety Appliance tested to EN 23953 2 2015 Climate Class 3 77 F 25...

Page 5: ...10 8 8 8 25 14 14 12 12 10 10 10 10 8 8 6 6 30 14 12 12 10 10 10 8 8 8 6 6 6 35 14 12 10 10 10 8 8 8 8 6 6 5 40 14 12 10 10 8 8 8 6 6 6 5 5 50 12 10 10 8 6 6 6 6 6 5 4 4 60 12 10 8 6 6 6 6 6 5 4 4 3...

Page 6: ...final location Do not discard use the bracket blocks when next moving the cabinet 2 With an adjustable wrench remove all shipping bolts securing the wood skid to the bottom of the cabinet See fig 4 NO...

Page 7: ...lots do not align See figs 7 and 8 3 Tighten and secure the shims and castors with the optional castor wrench Lower the cabinet and verify that it is level If the cabinet is not level repeat the proce...

Page 8: ...Level the cabinet The cabinet should be level side to side and front to back To check that the cabinet is level place a carpenter s level on the interior cabinet floor in four places a Position the l...

Page 9: ...en moving the refrigerator freezer for any reason be careful not to roll over or damage the power cord Repair or replace immediately all power cords that have become frayed or otherwise damaged DO NOT...

Page 10: ...t of the shelf standard See figs 3 and 4 4 Place the shelves on the shelf clips with the cross support bars facing down NOTE Be sure all shelf corners are properly seated Installation Tips Install all...

Page 11: ...sconnected or shut off wait 5 minutes before restarting RECOMMENDATION Before loading product run your TRUE unit empty for 24 hours to verify proper operation Remember our factory warranty DOES NOT co...

Page 12: ...021 Page 12 of 22 Cabinet Operation cont Flex Control The Flex Control shifts the cabinet temperature control settings between that of a cooler and freezer Flip the switch behind the front louver gril...

Page 13: ...y may reflect the refrigeration cycle swings of up and down temperatures NOT product temperature The most accurate method to determine a cabinet s operation is to verify the product temperature Refrig...

Page 14: ...Vacuum cleaner Flashlight Eye protection Gloves 1 Disconnect power to unit 2 Remove the front louvered grill from the cabinet See fig 1 3 3 With a stiff bristle brush carefully clean accumulated dirt...

Page 15: ...n warranteed repairs and or cabinet failure Proper cleaning involves removing dust from the condenser by using a soft brush vacuuming the condenser with a shop vac or using CO nitrogen or pressurized...

Page 16: ...ement Omission of proprietary cleansers from this list does not imply inadequacy 8 Tips to Help Prevent Rust on Stainless Steel Maintain the Cleanliness of Your Equipment Avoid build up of hard stains...

Page 17: ...the cabinet See figs 1 and 2 Three Door Units Center the middle door on the left edge of the right door See fig 3 2 After centering lift the door and tilt the top of the door back until the rollers ar...

Page 18: ...olding the door cord out the back Fig 9 Be sure the door cord is in the roller slot closest to the pulley Cabinet Adjustments Servicing Component Replacement cont Fig 4 Carefully remove the door Fig 5...

Page 19: ...8 Allen wrench loosen the roller and move it along the slotted hole After the adjustment has been made tighten the roller into place See fig 1 Slide Door Operation Hold Open Feature The hold open fea...

Page 20: ...TRADITIONAL REACH INS truemfg com TEC_TM_121 REV A EN 03 3 2021 Page 20 of 22 Notes...

Page 21: ...nsure low moisture levels in the system 500 microns or lower must be obtained All claims for labor or parts must be made directly through TRUE All claims should include model number of the unit the se...

Page 22: ...TEC_TM_121 REV A EN 03 3 2021 Page 22 of 22 www truemfg com EA DF_164999_02 2021...

Reviews: