2
TRUCKFORCE
®
Connect the fill hose to the quick disconnect located on the
side of the machine. Attach the water supply hose to any
available faucet. A faucet-to-hose adapter is provided to prop-
erly attach your water supply hose to the most commonly
found faucets. It may require adapters to fit the various faucet
combinations you will encounter. Never force a threaded fit-
ting. Place a towel over the faucet connection so that any
spray will be controlled. Turn on the water and check the
hose connections for leaks.
The solution tank will fill approximately 14 gallons, which
can be increased by shortening the chain. As the tank is filling,
cleaning concentrate is being drawn into the solution tank.
Shutdown:
Before the end of each job, turn off the water
supply, to prevent the solution tank from being completely full.
With the cleaning completed and the solution pump turned off,
disconnect the fill hose from the faucet, drain the water in the
fill hose back into the solution tank, and remove the fill hose.
Remove the chemical feed supply tube from the chemical solu-
tion jug and clean the filter. Vacuum out the solution tank.
MODEL SPECIFICATIONS
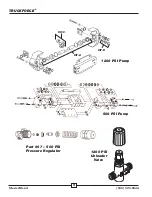
The TruckForce utilizes either a PumpTec™ twin piston
500 PSI or 1200 PSI pump. Both pumps are adjustable from
either 50–500 PSI for the TruckForce 3500 or 100–1200 PSI
for the TruckForce 1200. Do not exceed the pressure limita-
tions of 500 PSI for the TruckForce 3500 or 1200 PSI for the
TruckForce 1200. The TruckForce 3500 pump is adjustable
with a pressure relief valve shown on page 14. The pressure
regulator is located by the pressure gauge on the front of the
machine and is easily adjusted by turning the regulator clock-
wise to increase the pressure and counterclockwise to
decrease the pressure. The TruckForce 1200 pump is
adjustable with an unloader valve which is also located by the
pressure gauge on the front of the machine. The pressure
gauge on the TruckForce 1200 will register pressure when
your wand or other tool is hooked up to your high pressure
solution line and the valve is depressed, allowing solution to
go through the wand or tool. The pressure on the TruckForce
1200 is adjusted by turning the unloader valve clockwise to
increase pressure and counter-clockwise to lower the pres-
sure. Do not exceed 1200 PSI on the TruckForce 1200.
Priming the Solution Pump:
If you are experiencing
pressure fluctuations, pulsation in the solution hose, or not
maintaining pressure, you will need to prime the solution
pump by engaging the Power Prime Valve located next to the
pressure regulator on the front of the machine. Making sure
there is sufficient water in the solution tank, depress the
Power Prime Valve and any air will be immediately purged
out of the pump system and pressure should immediately be
restored.
Caution: Please be aware that depressing the Power
Prime Valve will also spray both air and water out the bot-
tom of the valve. If you wish to avoid having water on the
floor, you should have your vacuum hose hooked up to the
machine, have the vacuum motors on and have the vacuum
cuff on the end of the vacuum hose held under the Power
Prime Valve to catch any water coming out of the valve.
VACUUM SYSTEM
Vacuum Motors:
The TruckForce utilizes a unique two-
or three-vacuum system which produces both outstanding
vacuum lift and air flow for superior extraction and drying
times. The vacuum system can be used with one or two vac-
uum motors for cleaning delicate fabrics, or all three vacuum
motors for carpet cleaning and water extraction.
Waste Tank:
The vacuum system requires proper mainte-
nance of the waste tank filter bag. Refer to the
MAINTENANCE section for removal and proper cleaning of
the filter.
It is also necessary to use a defoamer to eliminate foam
build-up in the waste tank which could lead to foam/moisture
entering the vacuums and contributing to early failure of the
vacuum motors. Failure to properly maintain the filtration
system and utilize defoamer, will void the warranty on the
vacuum motors.
If moisture does enter the vacuum motors, refer to “WD-40
Vac Motors” under MAINTENANCE. To prevent moisture
from damaging the vacuum motors during storage, empty the
waste tank and store with the lid open.
AUTOMATIC WASTE PUMP-OUT
Connect the black 1-1/4˝ x 50´ drain hose to the automatic
pump-out port located in the upper left corner on the front of
the machine. Secure the other end of hose where you wish to
direct the discharge of waste water, such as a toilet or sink.
Fasten the discharge end of hose tightly. Turn on the Auto-
matic Pump-Out switch. The pump will turn on
automatically when water in the waste tank is approximately
2/3 full. The pump will discharge the waste water down to a
level of about 2 inches in the waste tank. DO NOT TURN
ON THE AUTOMATIC PUMP-OUT SWITCH WITHOUT
THE DRAIN HOSE IN PLACE. This pump-out system has
been designed to stay up with flood restoration work and is
capable of pumping 20 gallons per minute.
Electrical
115 Volt, 60 hz (230 Volt, 50 hz)
Vacuum
Dual 2-stage; Three 2-stage
Solution Pump
500 PSI
1200 PSI
Solution Tank
22 Gallons (83 liter)
Waste Tank
15 Gallons (56 liter)
Height
45
1
/
2
inches (116cm)
Length
32 inches (81cm)
Width
24
1
/
2
inches (62cm)
Power Cords
50 feet (15m)
MasterBlend
(800) 525-9644


