Troy-Bilt TB272 BC, Operator'S Manual
The Troy-Bilt TB272 BC is a versatile brushcutter that is perfect for tackling tough weeds and grass in your yard. Make sure to refer to the Operator's Manual for proper usage and maintenance instructions. You can download the manual for free from our website.
Share
Download


Reviews:
No comments
Related manuals for TB272 BC
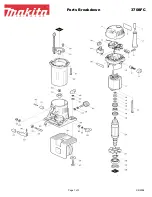
3708FC
Brand: Makita Pages: 3

DUR187U
Brand: Makita Pages: 100

769-12285
Brand: Cub Cadet Pages: 126

BG-PH2250
Brand: Gardenline Pages: 4

80775
Brand: Shindaiwa Pages: 16

210126
Brand: Ribimex Pages: 91

Y2500
Brand: Yard Machines Pages: 12

E837E
Brand: BaByliss for MEN Pages: 2

N1F-GT-250/18-D
Brand: ALDI Pages: 37

RLT26CDS
Brand: Ryobi Pages: 225

Norelco T-7500
Brand: Philips Pages: 2

Norelco MG3760
Brand: Philips Pages: 2

Norelco BodyGroom BG2030
Brand: Philips Pages: 2

Norelco Bodygroom 1100 BG1026
Brand: Philips Pages: 4

BT5200/16
Brand: Philips Pages: 4

BT5203/15
Brand: Philips Pages: 4

Norelco QT4021
Brand: Philips Pages: 8

NORELCO NT1605
Brand: Philips Pages: 9


