background image

10

EN

submerged waste water pump TWP 4036 E / TWP 7536 E / TWP 9000 ES / TWP 11000 ES

Positioning the device

Please observe the following information regarding the device
set-up and before switching the device on:

The float switch must be able to move freely. The shaft
into which the device is lowered must not restrict the
mobility of the float switch in any way.

Do not leave the device running unattended.

Make sure that the device is firmly placed on the ground or
safely suspended.

When using the device in bodies of water with natural,
muddy ground, hook or set the device up at a slightly
elevation position, e.g. on bricks.

Check whether the hose or pipe was attached properly.

Make sure that the power cable (

5

) is not under tensile

load and has enough clearance.

Make sure that the mains connection corresponds to the
specifications provided in the technical data.

Check the mains socket for its proper condition. The mains
socket's fusing must be sufficient.

Make it impossible for moisture to reach mains plug or
socket. 

There is a risk of electric shock!

Warning of electrical voltage

Electric shock from damaged power supply cable.
Make sure not to hold or suspend the device by the
power supply cable under any circumstances.

Note

At the bottom of ponds and other waterbodies deposits
may have accumulated over time. To prevent the
device from being damaged, do not lower it all the way
to the ground unless you are certain that the water is
clean, in other words that the size of the dirt particles
in the water does not exceed 25 mm.

1. Fasten the supplied nylon cord to the transport handle (

1

)

at the top of the device.

7 m

1

2. Lower the device into the water at a slight angle to allow

any remaining air to escape.

3. If you want the device to be positioned on the ground,

ensure that the latter is even.

4. Attach the end of the nylon cord to an easily accessible

position, so you can pull the device back out after pumping
has been completed.

Summary of Contents for TWP 11000 ES

Page 1: ...TRT BA TWP4036E TWP7536E TWP9000ES TWP11000ES TC2020 50 001 EN TWP 4036 E TWP 7536 E TWP 9000 ES TWP 11000 ES EN OPERATING MANUAL SUBMERGED WASTE WATER PUMP ...

Page 2: ...al word indicates important information e g material damage but does not indicate hazards Info Information marked with this symbol helps you to carry out your tasks quickly and safely Follow the manual Information marked with this symbol indicates that the operating manual must be observed You can download the current version of the operating manual and the EU declaration of conformity via the fol...

Page 3: ...mages on the mains plug or power cable If the connection line of this device is damaged the device must be sent for recycling in accordance with the specifications provided in the Disposal chapter Defective power cables pose a serious health risk Should there be a risk of flooding install the plug connections in a flood proof area There is a risk of electric shock Make sure that the mains voltage ...

Page 4: ...ted The device is not suitable as permanent automatic overflow protection of e g wells or fountains or for the regulation of the groundwater level Use a stationary waste water pumping system for building and property drainage for these purposes The device is not suitable for increasing the pressure of existing water supply networks The device is not suitable for pumping potable water The device mu...

Page 5: ...he device may be damaged Note the information regarding transport and storage of the device Behaviour in the event of an emergency 1 In an emergency disconnect the device from the mains feed in Hold onto the mains plug while pulling the power cable out of the mains socket 2 Do not reconnect a defective device to the mains Overheating protection The device is provided with a thermal protection circ...

Page 6: ...chment for nylon cord 2 Connection for connection system 3 Float switch locking device 4 Float switch 5 Power cable 6 Air intake opening with cover panel 7 Reducer 8 Elbow Connection options No Designation a Hose connection for an inner diameter of 25 mm with hose clamp b Hose connection for a G1 DN25 internal thread c Hose connection for an inner diameter of 38 mm with hose clamp d Hose connectio...

Page 7: ...er Assembly and installation Scope of delivery 1 x Submerged clear water pump 1 x Reducer for hoses with inner diameters of 25 mm or 38 mm as well as hose connections with G1 DN25 internal thread 1 x elbow for hose connections with G1 DN40 internal thread 1 x Nylon cord 10 m 1 x Manual Unpacking the device 1 Open the cardboard box and take the device out 2 Completely remove the packaging 3 Fully u...

Page 8: ... connection or hose connection with internal thread 1 Screw the pipe connection or hose connection internal thread G1 DN25 onto the reducer 7 7 8 Alternatively you can also screw the pipe connection or hose connection with the internal thread G1 DN40 directly onto the elbow 8 Installing the connection system 1 Press the red button on the elbow 8 2 Push the elbow 8 onto the pump connection 2 2 8 In...

Page 9: ...ce to run dry This would damage the pump Make sure that the float switch 4 is able to move freely and does not suffer from a limited mobility caused by obstacles Observe a sufficient distance between float switch 4 and float switch locking device 3 for this could prevent the automatic switch off causing the device to run dry Make sure that the position of float switch 4 is adjusted in a way that i...

Page 10: ...the mains socket for its proper condition The mains socket s fusing must be sufficient Make it impossible for moisture to reach mains plug or socket There is a risk of electric shock Warning of electrical voltage Electric shock from damaged power supply cable Make sure not to hold or suspend the device by the power supply cable under any circumstances Note At the bottom of ponds and other waterbod...

Page 11: ...the maximum switch on height ð The device will be switched off as soon as the float switch reaches the set or the minimum switch off height Info Once the device has been switched off any water still remaining in the line can flow back through the device Manual operation You can also use the device in manual operation In manual operation it is possible to siphon off the media to a residual height o...

Page 12: ...ns plug into a sufficiently fused mains socket ð The device switches on 7 Oversee the pumping process 8 When the device starts to suck in air disconnect the power cable from the mains socket by holding onto the mains plug Info If the device switches off again after only a brief period of operation the float switch might have come loose Fix the float switch again as depicted Shutdown Warning of ele...

Page 13: ...inimum water level Check whether the hoses are blocked and whether the water contains any suspended matter with a particle size of more than 25 mm which could clog up the device Check whether the used hose diameter is too small Check whether the hose line is kinked or blocked Remove kinks and or blockages Check whether the reducer 7 and or elbow 8 are clogged The device is not switching off automa...

Page 14: ... on the device Check the safety signs and labels attached to the device at regular intervals Replace illegible safety signs Cleaning Clean the device with a soft damp and lint free cloth Protect electrical components from moisture Do not use any aggressive cleaning agents such as cleaning sprays solvents alcohol based or abrasive cleaners to dampen the cloth Disconnect the connection line Rinse th...

Page 15: ...50 W 900 W 1100 W Type of protection IPX8 IPX8 IPX8 IPX8 Minimum operating depth 85 mm 85 mm 50 mm 50 mm Max water level after suction 40 mm 40 mm 40 mm 40 mm Connection type CEE 7 4 CEE 7 4 CEE 7 4 CEE 7 4 Cable length 10 m 10 m 10 m 10 m Protection class I I I I Weight 4 kg 5 kg 5 5 kg 6 kg Dimensions length x width x height 220 x 160 x 340 mm 220 x 160 x 370 mm 225 x 225x 370 mm 225 x 225x 370 ...

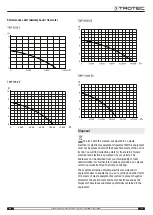
Page 16: ...1000 ES Schematic representation TWP 4036 E max 35 C 55 cm 12 cm max 5 m max 7 m TWP 4036 E TWP 7536 E max 35 C 60 cm 15 cm max 8 m max 7 m TWP 7536 E TWP 9000 ES max 35 C 60 cm 15 cm max 8 m max 7 m TWP 9000 ES TWP 11000 ES max 35 C 60 cm 15 cm max 9 m max 7 m TWP 11000 ES ...

Page 17: ...l find collection points for free return of waste electrical and electronic equipment in your vicinity The addresses can be obtained from your municipality or local administration For further return options provided by us please refer to our website https de trotec com shop The separate collection of waste electrical and electronic equipment aims to enable the re use recycling and other forms of r...

Page 18: ...Trotec GmbH Grebbener Str 7 D 52525 Heinsberg 49 2452 962 400 49 2452 962 200 info trotec com www trotec com ...

Reviews: