


10167-8
4. ASSEMBLY STEPS
Instructions for assembly
•
Unpack the carton and using the parts list check that all parts are accounted for.
•
Do not dispose of the packaging material until assembly is completed.
•
An Allen Wrench is provided for use in assembly.
STEP 1
• Attach the Rear Stabilizer (35), which includes
2 End Caps (23), to rear curve bracket of
Main Frame (19), using 2 Carriage Bolts (21), 2
Curved Washers (28), 2 Spring Washers (27)
and 2 Cap Nuts (42).
• Attach the Front Stabilizer (22), which includes
2 Transportation Wheel Caps (24), to front
curve bracket of Main Frame (19), using 2
Carriage Bolts (21), 2 Curved Washers (28), 2
Spring Washers (27) and 2 Cap Nuts (42).
Note: You can use the End Caps (23) to level
the bike.
STEP 2
• Remove the 3 pre-assembled Washers (40)
and 3 Nylon Locknuts (41) from Seat (29).
• Attach Seat (29) to the mounting plate on top
of Seat Post (32) using 3 Washers (40) and
3 Nylon Locknuts (41).
• Attach Seat Post Decoration Cover (31) to
seat post mounting tube of Main Frame (19).
• Slide the Bellows (70) onto Seat Post (32).
• Insert Seat Post (32) to seat post mounting
tube of Main Frame (19) and secure in
position with the Seat Post Adjustment
Knob (34).
• After assembling the Seat Post you can adjust
the seat to the desired position.
Summary of Contents for ENDURO 320
Page 6: ...10167 6 3 HARDWARE LIST ...
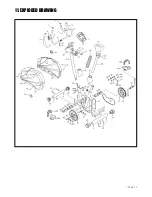
Page 17: ...10167 17 11 EXPLODED DRAWING ...


