background image

10204M-25

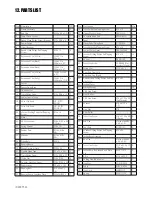
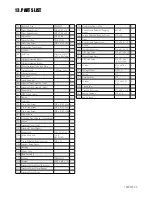
13. PARTS LIST

72

Inner End Cap

PAZ3020

1

73

Truss Philips Screw

M4 x P0.7 x 12

1

74

Truss Philips Screw

M5 x P0.8 x 30

1

75

Nylon Nut

M5 x P0.8

1

76

Plastic Post Pad

PCAP1721

4

77

Truss Hex Screw

M8 x P1.25 x 50 2

78

Folding Flex Tube-Upper

1

79

Cylinder

1

80

End Cap

Match with Ø25

x 25 x 0.9t Tube

1

81

Upright Assembly (Left)

1

82

Upright Assembly (Right)

1

83

Shock Absorber Tube Iron Plate

2

84

Guide Thread

1200mm Long

1

85

Computer Consol

1

86

Cup Shelf

2

87

Hand Pulse Set

2

88

Handrail Tube Assembly (Left)

1

89

Handrail Tube Assembly (Right)

1

90

Foam Grip

2

91

MP3 Sound Cable

1

92

Bottle

1

93

Safety Key

1

94

Truss Hex Screw

M8 x P1.25 x 15 6

95

Truss Hex Screw

M8 x P1.25 x 45 1

96

Truss Hex Screw

M8 x P1.25 x 100 6

97

Hex Wrench

1

98

L-shaped Hex  Screwdriver

1

99

Silicon

1

100 Handrail Cover (Left)

1

101 Handrail Cover (Right)

1

102 Rubber Pad

20 x 50 x 1.0t

4

103 Wire Clip Knob

UC-2 

(PCZUC2)

1

104 Truss Philips Self Tapping Screw

Ø5 x 15

5

105 Upright Fixing Plastic

2

106 Bushing

6

107 Power Cord

1

108 Base Assembly

1

109 Wheel

PBK495215

2

110 Washer

Ø19 x Ø6 x 1.5 4

111 Handrail Switch Decal (Elevation)

1

112 Handrail Switch Decal (Speed)

1

113 Handrail Switch Plastic

2

114 Handrail  Wire

2

115 Round Head Philips Self Tapping 

Screw

Ø3 x 8

2

116 Socket Philips Self Tapping Screw

Ø3 x 20

4

117 Filter

1

118 Round Head Philips Screw

M5 x P0.8 x 10

4

119 Choke

1

120 Truss Philips Screw 

M6 x P1.0 x 15

2

121 CKS Hex Screw

M8 x P1.25 x 15 2

129 Transformer 

1

130 Truss Philips Screw    


M3 x P0.6  x  10

2

131 Spring  Washer 

6

132 Lug  Wrench    


M8 x 2.0


1

122 Motor Fixing Plate

1

123 CKS Hex Screw

M8 x P1.25 x 

105 (15mm)

1

124 Washer

Ø16 x Ø8 x 

2.0t

8

126 Spring Washer

M8x1.5t

1

125 Spring

M8

1

127 Retainer Nut

M8

1

128 Washer

Ø12 x Ø4.5 x 

1.0t

8

Summary of Contents for CARDIO COACH 460

Page 1: ...981 0861 876526 0861 TROJAN WARRANTY TROJAN MY SPACE MY TIME CAUTION READ ALL PRECAUTIONS AND INSTRUCTIONS IN THIS MANUAL BEFORE USING THIS EQUIPMENT KEEP THIS MANUAL FOR FUTURE REFERENCE TREADMILL ASSEMBLY CARE AND INSTRUCTION MANUAL CARDIO COACH 460 TREADMILL ...

Page 2: ...FOLDING TRANSPORT 9 6 MAINTENANCE 10 7 GROUNDING INSTRUCTIONS 11 8 COMPUTER FUNCTIONS 12 9 FITNESSTIPS TECHNIQUES 20 10 CONDITIONING GUIDELINES 21 11 WARM UP AND COOL DOWN 22 12 FREQUENTLY ASKED QUESTIONS 23 13 PARTS LIST 24 14 EXPLODED DRAWING 26 15 TROJAN 1YEAR LIMITED WARRANTY 27 16 TROJAN REPAIRS PROCEDURE 28 ...

Page 3: ...nt be located in an access controlled area Control is the responsibility of the owner Keep children away from all equipment Parents or other supervising adults must provide close supervision of children if the equipment is used in the presence of children INSTALLATION TROJAN recommends that all equipment Be secured to or set up on a solid level surface to stabilise and eliminate rocking or tipping...

Page 4: ...m all moving parts and away from all strength equipment Parents must provide close supervision of children if the equipment is used in the presence of children Do not wear loose fitting clothing or jewellery when using the equipment It is also recommended that users tie up long hair to avoid contact with moving parts Ensure that anyone not using the equipment stays clear of the user accessories an...

Page 5: ... life to its fullest Yes it is a proven fact that a regular exercise program can improve your physical and mental health Too often our busy lifestyles limit our time and opportunity to exercise TheTROJAN CARDIO COACH 460 treadmill provides a convenient and simple method to begin your assault on getting your body in shape and achieving a healthier lifestyle Before reading further please familiarise...

Page 6: ...1 0 x 15 2 82 Right Upright 1 97 Hex Wrench 6mm 80mm x 80mm 1 88 Left HandrailTube 1 98 Hex Wrench Screwdriver 5mm 1 105 Upright Fixing Plastic 2 99 Silicon 1 100 Left Handrail Cover 1 93 Safety Key Clip 1 101 Right Handrail Cover 1 107 Power Cord 1 92 Bottle 1 41 Truss Philips SelfTapping Screw Ø4 x 16 4 89 Right HandrailTube 1 91 131 MP3 Sound Cable Spring Washer Washer Lug Wrench 1 86 Cup Shelf...

Page 7: ...6 three Spring Washer 131 and three Washer 124 on each side Note While assembling the uprights one person should hold the uprights to prevent them falling over STEP 3 Handrail Assembly Place the Left and Right HandrailTubes 88 89 above the uprights and connect the Control Wires in Uprights with the corresponding wire in HandrailTube 89 Secure the HandrailTubes 88 89 and the Uprights with three Hex...

Page 8: ...ter Consol 85 above the Handrail Tubes then connect the Control Wires in the Handrail to the corresponding wires in the Computer Consol 85 Secure the Computer Consol 85 onto the HandrailTubes with 1Truss Philips Screw 120 and 2 Truss Philips Self Tapping Screws 41 on each side STEP 5 Cover Assembly Clip Covers 100 101 onto the Handrails Place the Cup Shelves 86 into the Computer Consol Untie the L...

Page 9: ...the drawing When the running deck disengages from the locking mechanism pull down gently on the running deck Release the running deck and the treadmill will slowly fall to the ground automatically TRANSPORTING Place your right foot onto the right base foot tube With two hands holding the left and right handgrip tubes pull the treadmill toward you You can now easily move the treadmill to the desire...

Page 10: ...LUBRICATION Lift one side of the treadbelt and feel the top surface of the treadboard If the surface is slick to the touch then no further lubrication is required If the surface is dry to the touch apply one packet of lubricant or half of the bottle of lubricant BELTTRACKING ADJUSTMENT If during use you notice that the running belt either shifts to the right or the left of centre switch off the tr...

Page 11: ...rdinances DANGER improper connection of the equiment grounding conductor can result in a risk of electric shock Check with a qualified electrician or serviceman if you are in doubt as to whether the product is properly grounded Do not modify the plug provided with the product if it will not fit the outlet have a proper outlet installed by a qualified electrician This product is for use on a nomina...

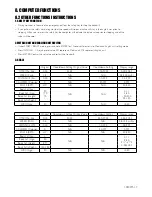
Page 12: ... displays age value Start Ready Mode Under START READY mode the display alternates between the Profile of Program1 Program10 Press Program Fast Key Switch between Program1 Program10 Time Countdown Distance Countdown Calories Countdown HRC 65 HRC 85 HRCTarget USER 1 USER 2 BODYFAT Press START Computer counts down for 3 seconds and enters into Manual mode Window Display Displays Speed and Incline Pr...

Page 13: ... Press SPEED Adjust target distance 1 Km 99 0 Km Press START Computer counts down for 3 seconds and enters into sport mode all the values count up Press STOP RESET Return to START READY mode Calories Mode Preset value is 200 Calories Press SPEED Adjust target calories 40 Calories 999 Calories Press START Computer counts down for 3 seconds and enters into sport mode all the values count up Press ST...

Page 14: ... and if you push it a second time it will enter into pulse setting Press START Computer counts down for 3 seconds and enters into countdown mode Press STOP RESET Return to START READY mode Under the different HEART RATE modes the Dot Matrix window will display the corresponding heart rate value Setting Mode Press SPEED Non Target mode can adjust age 13 80 Target mode can adjust target pulse value ...

Page 15: ... 00 99 00 After entering into Profile setting mode set SPEED or INCLINE value Press START Computer counts down for 3 seconds and enters into sport mode Press STOP RESET Return to START READY mode Press Enter Switch betweenTIME setting SPEED setting INCLINE setting Sport Mode Press SPEED Set speed Press INCLINE Set incline Press STOP RESET Stop running Press START Computer counts down for 3 seconds...

Page 16: ...de Press COOL DOWN Enter into COOL DOWN mode Cool Down Mode Press STOP RESET Stop running The computer counts down for 4 minutes The speed value will halve before entering into COOL DOWN mode and the speed will halve every minute thereafter until the time is up then it will return to START READY mode 9 RECOVERY MODE General Mode Press RECOVERY During workout press STOP to stop running Press RECOVE...

Page 17: ...irm the set value and restart the treadmill 3 SCALE Original Countdown Setting OriginalValue Countdown Setting Display range TIME Min Sec 0 00 20 00 5 00 99 00 0 00 99 59 SPEED Km h 0 8 N A N A 0 8 20 0km hr DISTANCE Km 0 00 N A 1 0 99 0 0 0 99 9 CALORIES Calories 0 N A 40 999 0 999 PULSE BPM HP N A N A 40 220 Body Fat Sex 30 170 70 1 N A N A 0 11 3 80 120 200 23 130 Body Fat Age Body Fat Height B...

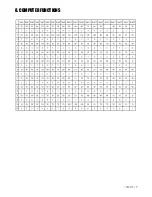
Page 18: ...10204M 18 8 3 PROGRAMS 8 COMPUTER FUNCTIONS ...

Page 19: ...10204M 19 8 COMPUTER FUNCTIONS ...

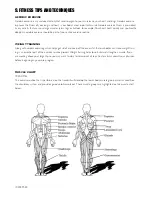
Page 20: ... with aerobic exercising which helps get rid of and keep off the excess fat that our bodies can store weight train ing is an essential part of the exercise routine process Weight training helps tone build and strengthen muscle If you are working above your target zone you may want to do a lesser amount of reps And as always consult your physician before beginning any exercise program MUSCLE CHART ...

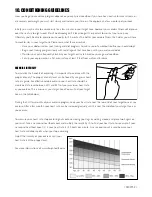
Page 21: ... at least 3 feet from walls and furniture EXERCISE INTENSITY To maximize the benefits of exercising it is important to exercise with the proper intensity The proper intensity level can be found by using your heart rate as a guide For effective aerobic exercise your heart rate should be maintained at a level between 65 and 85 of your maximum heart rate as you exercise This is known as your target z...

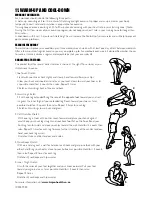
Page 22: ... Allow your back and shoulders to relax as you reach down toward your toes as far as possible Hold for 15 counts then relax Repeat 3 times Stretches Hamstrings back of knees and back 2 Hamstring Stretch Sit with one leg extended Bring the sole of the opposite foot toward you and rest it against the inner thigh of your extended leg Reach toward your toes as far as possible Hold for 15 counts then r...

Page 23: ... 2 Check that you have a power supply to your home 3 Ensure that the consol computer cables have been connected properly in the neckpiece when assembling the unit Q4 The consol cannot read the hand pulse signal 1 The hand pulse sensors will not operate correctly if your skin is extremely dry Moisten your hands and try again 2 Avoid moving your hands while exercising and hold the hands pulse sensor...

Page 24: ... Foam Sticker 30 x 40 x 1 5t 2 34 Running Belt 515 x 2865 x 1 6t 1 35 Running Board Lengthen Plate NALNO3206 2 No Description Qty 36 Truss Philips SelfTapping Screw Ø4 x 12 8 37 Upper Motor Cover PEZP1313 1 38 Sound Isolation Pad PEDP1821A 2 39 Pedal 1 40 Plastic Pedal Fixing Knob PCFP1034 8 41 Truss Philips SelfTapping Screw Ø4 x 16 30 42 Lower Motor Cover PEZ7005065 1 43 Washer Drilling Philips ...

Page 25: ... 99 Silicon 1 100 Handrail Cover Left 1 101 Handrail Cover Right 1 102 Rubber Pad 20 x 50 x 1 0t 4 103 Wire Clip Knob UC 2 PCZUC2 1 104 Truss Philips SelfTapping Screw Ø5 x 15 5 105 Upright Fixing Plastic 2 106 Bushing 6 107 Power Cord 1 108 Base Assembly 1 109 Wheel PBK495215 2 110 Washer Ø19 x Ø6 x 1 5 4 111 Handrail Switch Decal Elevation 1 112 Handrail Switch Decal Speed 1 113 Handrail Switch ...

Page 26: ...10204M 26 14 EXPLODED DRAWING ...

Page 27: ......

Page 28: ... to the store nearest to you Our service operator will advise you of your repair procedure 2 Cost of Repairs 2 1 Under warranty Any items still under warranty will be repaired free of charge as long as it complies with the terms and conditions of the warranty refer to warranties section in this manual Any items that need to be repaired that are NOT covered in the warranty will be for the consumer ...

Reviews: