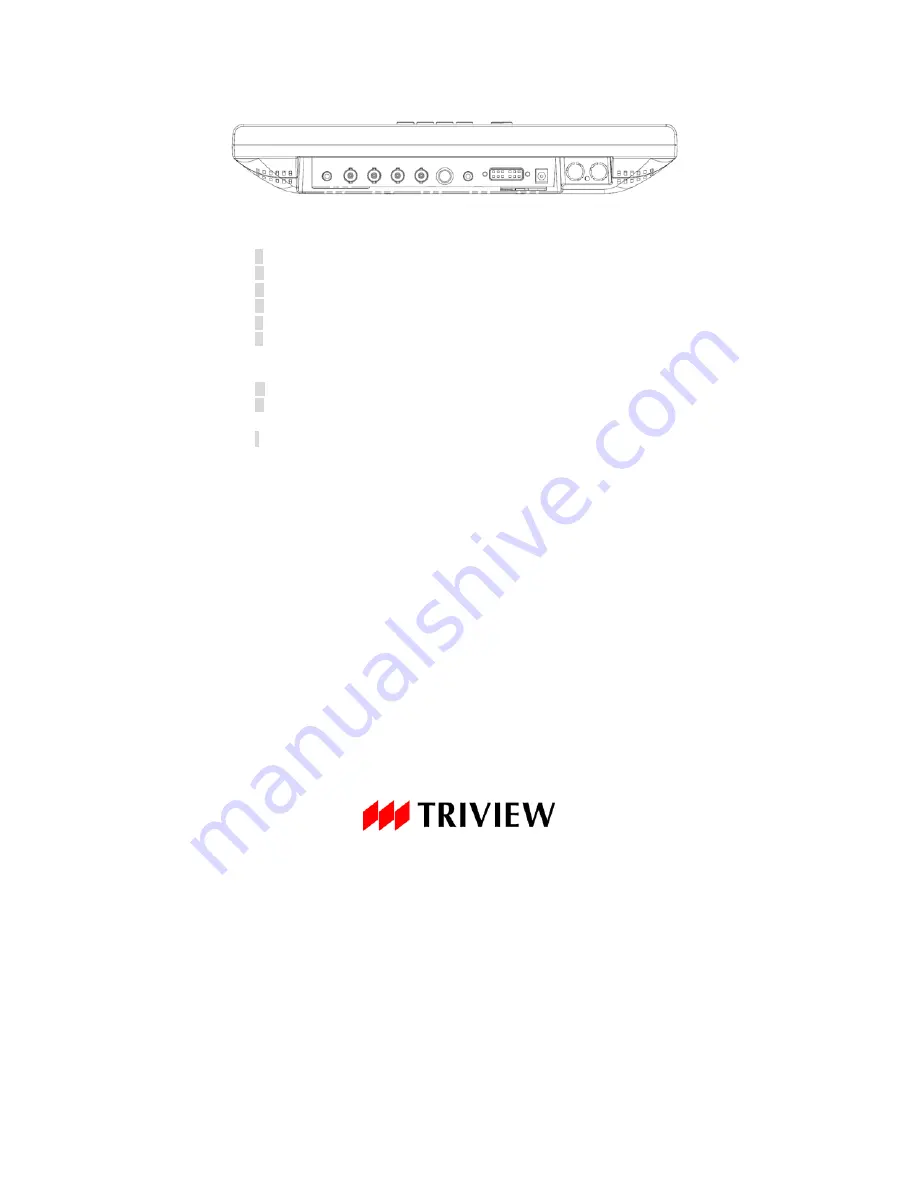
TRIVIEW THR15X Operating Instructions Manual Download Page 7


7

Connectors: 


                                A      B    C    D      E    F      G        H          I 


VIDEO: 
 

A    

AUDIO 1: Stereo phone jack input. 

B    

CVBS 1: BNC loop-through output. 

C    

CVBS 1: BNC input. 


D    

CVBS 2: BNC loop-through output. 

E    

CVBS 2: BNC input. 


F    

S-VIDEO (Y/C): Mini-DIN 4-pin, input only. 


PC: 
 

G

    AUDIO 2: Stereo phone jack input. 

H

        VGA + DVI: One (1) 24+5 pin DVI-I connector. 

POWER: 
 

I

     DC JACK: DC12V in,


3.5

Ø


Set up sequence: 

1. Make sure the power of PC and/or Video source were turned off. 
2. Plug the power adapter, video signal and DVI (or VGA) cable to monitor.


3. Turns the PC and/or Video source power on. 
4. Plug the AC power cord onto power adapter. 
[Use reverse sequence to teardown the monitor] 


Summary of Contents for THR15X

Page 1: ...OPERATING INSTRUCTIONS THR15X THR17X THR19X...

Page 2: ...ion 3 z CE information 3 z Safety Precautions 3 1 Scope 5 2 Functional specification 5 3 Controls and indication 8 4 OSD Menu 9 5 Regulatory Agency 27 6 Mechanical 27 7 Reliability 27 8 Appendix 28 9...

Page 3: ...t on a circuit different from that to which the receiver is connected Consult the dealer or an experienced radio TV technician for help Shielded interface cables and A C power cord if any must be used...

Page 4: ...MED BY THE SERVICE TECHNICIAN AS REQUIRED DURING NORMAL MAINTENANCE 11 Refer all servicing to qualified service personnel REMOVAL OF BACK COVER BY UNAUTHORIZED PERSONNEL MAY EXPOSE THE USER TO DANGERO...

Page 5: ...so provided to make this system easy to operate 2 Functional Specifications Power Supply The power supply spec is listed below AC INPUT AC power input range 100 240 VAC 60 50Hz 1 5Arms max Power consu...

Page 6: ...DVI auto detect Scrolling the cursor or Adjust value M Selects On Screen Display OSD Switch power On Off Indicators LED Power on Green Power Off Orange Suspend Mode VGA mode only Orange flash Freeze G...

Page 7: ...n input only PC G AUDIO 2 Stereo phone jack input H VGA DVI One 1 24 5 pin DVI I connector POWER I DC JACK DC12V in 3 5 Set up sequence 1 Make sure the power of PC and or Video source were turned off...

Page 8: ...buttons to adjust the value of selected function in sub OSD menu C Menu button z Press the button to show the main OSD menu z As a confirmation key during the OSD operation D LED indication z Green P...

Page 9: ...n to exit OSD menu FREEZE Press button to start up the freeze function press MENU or CH or or button to exit OSD menu MUTE When mute function on press button to pop up mute OSD OSD menu will go off in...

Page 10: ...ws in 2 sec once cable unplug or signal loss such as PC get into standby mode then shows GOING TO SLEEP in 2 sec Input signal can t support Under VGA or DVI mode the NON SUPPORT TIMING prompt will sho...

Page 11: ...RESET EXIT MAIN MENU Press or button to scrolling cursor up and down then press MENU button to enter the desired function BRIGHTNESS Press or button to adjust the brightness value then press MENU butt...

Page 12: ...to adjust the color value then press MENU button to return to the MAIN MENU TINT Press or button to adjust the tint value then press MENU button to return to the MAIN MENU Note The TINT adjustment is...

Page 13: ...13 3D COMB Press MENU button to enable 3D Comb setting then press or to set 3D Comb ON OFF then press MENU button to disable 3D Comb setting...

Page 14: ...14 NR Press MENU button to enable NR setting then press or to set the NR OFF LOW HIGH then press MENU button to disable NR setting...

Page 15: ...djust the phase value then press MENU button to return to the MAIN MENU CLOCK Press or button to adjust the clock value then press MENU button to return to the MAIN MENU AUTO ADJUST In VGA mode this f...

Page 16: ...g cursor up and down then press MENU button to enter the desired function 9300K Press MENU button to select this color temperature 6500K Press MENU button to select this color temperature USER PRESET...

Page 17: ...will change from cyan back to blue Perform the same procedures for GREEN and BLUE color adjustment EXIT Press MENU button to return to the COLOR TEMPERATURE menu RESET Press MENU button to reset the r...

Page 18: ...position value then press MENU button to return to the OSD ADJUST menu OSD V POSITION Press or button to adjust the OSD vertical position value then press MENU button to return to the OSD ADJUST menu...

Page 19: ...ss MENU button to return to the MAIN MENU ASPECT RATIO Press or button to scrolling cursor up and down then press MENU button to select the desired aspect ratio EXIT Press MENU button to return to the...

Page 20: ...UTE function setting the cursor color will change from blue to cyan then press or to switching the MUTE status between ON and OFF then press MENU button to disable the MUTE function setting the cursor...

Page 21: ...VIDEO1 audio channel setting the cursor color will change from blue to cyan then press or to set the VIDEO1 audio channel then press MENU button to disable the VIDEO1 audio channel setting the cursor...

Page 22: ...VIDEO2 audio channel setting the cursor color will change from blue to cyan then press or to set the VIDEO2 audio channel then press MENU button to disable the VIDEO2 audio channel setting the cursor...

Page 23: ...S VIDEO audio channel setting the cursor color will change from blue to cyan then press or to set the S VIDEO audio channel then press MENU button to disable the S VIDEO audio channel setting the curs...

Page 24: ...the PC audio channel setting the cursor color will change from blue to cyan then press or to set the PC audio channel then press MENU button to disable the PC audio channel setting the cursor color w...

Page 25: ...press or to adjust the volume value then press MENU button to disable the VOLUME adjustment the cursor color will change from cyan back to blue RESET Press MENU button to reset the mute function and v...

Page 26: ...U button to select the input signal channel EXIT Press MENU button to return to the MAIN MENU RESET Press MENU button to reset all of adjustment to default value except language aspect ratio audio con...

Page 27: ...inet Material Plastic Finish Black White 6 2 Dimensions Wall mountable option VESA standard 100mm x 100mm 15 Monitor Physical Dimension 340 W x 350 H x 190 D mm Packing Dimension 423 W x 435 H x 153 D...

Page 28: ...28 8 Appendix THR15X Outline Dimension...

Page 29: ...29 THR17X Outline Dimension...

Page 30: ...30 THR19X Outline Dimension...

Page 31: ...tibility Scanning Frequency NTSC 15750Hz 500Hz 60Hz PAL 15625Hz 500Hz 50Hz Input DVI I with converting cable DDWG compliant Single Link TMDS Digital Visual Interface and Analog RGB 0 707Vp p 75 Freque...

Page 32: ...32 TATUNG COMPANY OF AMERICA 2850 El Presidio Street Long Beach CA 90810 800 827 2850 www tatungusa com P N XXXX XXXXGXX...

Reviews: