background image

ROUTINE SERVICING

52

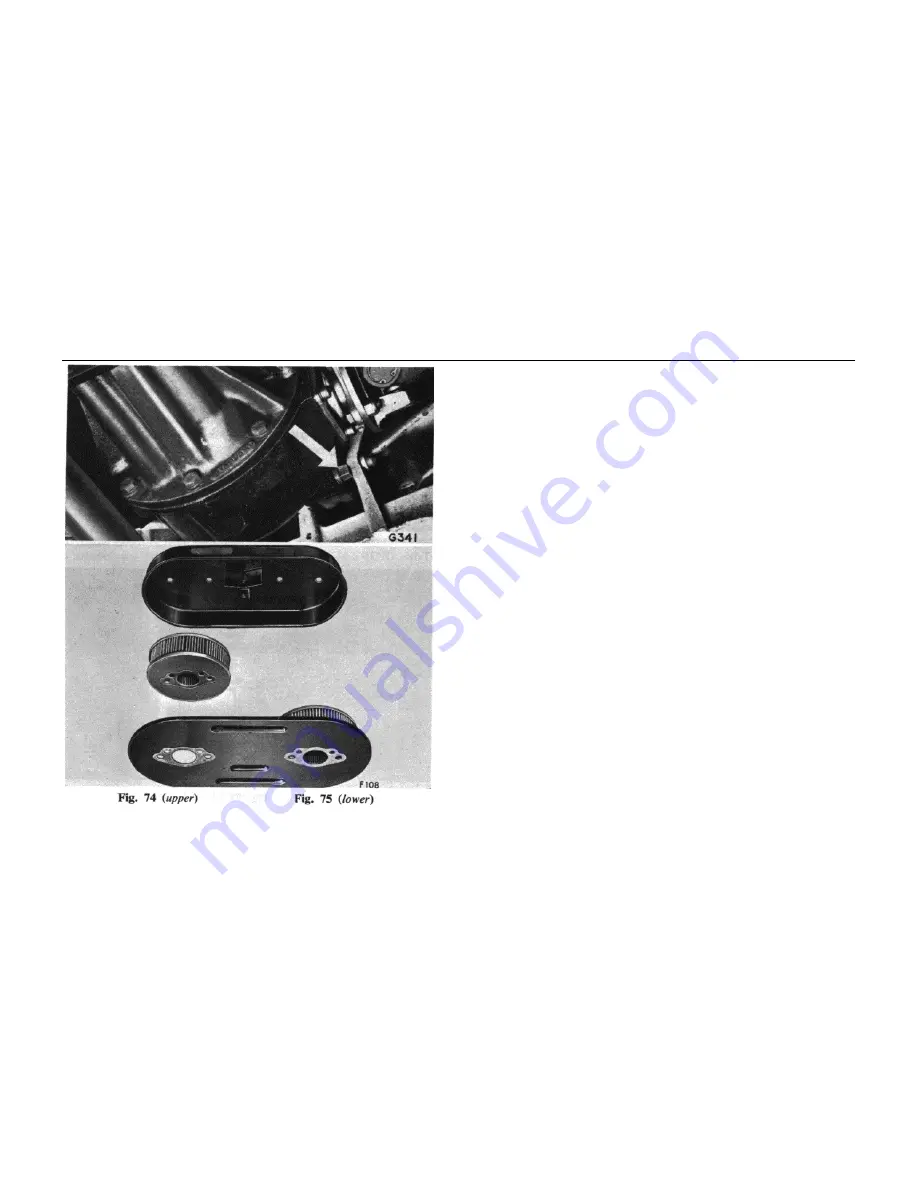
Top-up Rear Axle

 (Fig. 74)

Remove the oil level plug (arrowed) and, using the same

dispenser as used for topping-up the gearbox, and the same oil,
i.e., extreme pressure (Hypoid) lubricant, top up the rear axle
until the oil is level with the bottom of the filler plug threads.

Allow surplus oil to drain away before refitting the level plug

and wiping clean.

Air Cleaners

 (Fig. 75)

Remove and de-dust the paper elements.

Remove the bolts attaching the assembly to the carburettor

flanges, and detach the assembly.

Remove the centre bolt from the body, take off the cover plate
and lift out the element. Clean out the body and use a foot pump,
low pressure air line, or soft brush to remove foreign matter from
between the folds of the paper element.

Reverse the foregoing procedure to assemble the unit,

renewing the gaskets as necessary.

If the engine is operating in dusty conditions, clean the filters

more frequently.

Valve Rocker Clearances

 (Fig. 95)

Check the valve rocker clearances and, if required, reset

them to 0.0l0 (0.25 mm.) (cold). See page 61.

Summary of Contents for Spitfire MK3

Page 1: ......

Page 2: ......

Page 3: ......

Page 4: ...ly the contents of this book which gives in the simplest possible terms information vital to the proper operation care and regular maintenance of the car Should you be unable or prefer not to carry ou...

Page 5: ...s who in turn supply their Dealers Genuine spare parts are marketed under the trade mark Stanpart and carry the same guarantee as the original part The tame high quality material is used and the stric...

Page 6: ...ess Page Seats Locks and Keys Soft Top Hard Top Wheels and Tyres Driving from New Care of Bodywork Cooling System Electrical System Bulb Chart Routine Servicing Running Adjustments Recommended Lubrica...

Page 7: ...CONTROLS INSTRUMENTS AND INDICATORS RIGHT HAND STEERING 6...

Page 8: ...CONTROLS INSTRUMENTS AND INDICATORS LEFT HAND STEERING 7...

Page 9: ...riving lamps pull to second position to illuminate the instruments Refer to 8 below Tachometer 3 The tachometer indicates the engine speed in revolutions per minute and is calibrated in divisions of 5...

Page 10: ...to page 47 Lights Selector Switch 8 Move the switch lever to the upper position to operate side lamps only move the lever to the central position for high beam when the high beam is operating a monit...

Page 11: ...ed by a toggle switch may be used to boost the flow of hot or cold air Move the switch left to operate the motor and right to switch off Heat Control 16 The heat control operates a water valve which r...

Page 12: ...ttom of the dial glows green when the ignition is switched on and is extinguished when the engine runs in excess of idling speed Should the tight remain on at normal running speeds stop the engine and...

Page 13: ...elay by a two position switch mounted on the steering column Figs 9 and 10 Greatest benefit will accrue from judicious use of the overdrive the governing factor being that the vehicle continues to run...

Page 14: ...rough the strap attachment fit the crimped washer and collar as shown on Fig 11 and refit to the vehicle By means of the latched hooks fit the lap strap to the eye bolts Fig 13 The shoulder strap will...

Page 15: ...Pull the grey slide on the lower part of the lap strap upwards to shorten and downwards to lengthen Cleaning Badly stained safety belts may be dry cleaned The cleaner should be advised of the nature...

Page 16: ...o lock the door from the inside push the lever forwards to lock the door from the outside insert the key and turn it a quarter turn away from the shut face The key will return under the influence of s...

Page 17: ...To open the luggage compartment lid turn the unlocked handle counter clockwise to a vertical position and raise the lid to its limit before lowering it on to the telescopic support Close the lid by r...

Page 18: ...and remove the hood cover Fold the sides of the hood fabric outwards and pull the fabric rearwards over the luggage compartment lid Lifting the front hoodrail raise the assembly sufficiently to allow...

Page 19: ...e body Push the front hoodrail rearwards and slightly upwards while knocking the second hoodstick arrowed Fig 20 rearwards until the assembly begins to fold DO NOT PULL the second hood stick downwards...

Page 20: ...centre Attach the inner pillar fasteners and hook the three straps under the bottom hoodstick Tonneau Cover Optional Fig 26 The tonneau cover provides weather protection for the vehicle interior when...

Page 21: ...med head bolts securing the hard top side brackets to the door pillar brackets Fig 27 Remove the domed head bolts and washers securing the hard top to the windscreen header rail Fig 28 and the rear de...

Page 22: ...jack illustrated may be provided To remove the spare wheel lift off the cover and unscrew the retaining nut Fig 31 The Jack Figs 32 and 33 Locate the nut of the fixing bolts rearwards of the front whe...

Page 23: ...r off the nave plate as shown and slightly loosen the wheel nuts 4 Place the jack in position and lift the wheel clear of the ground Should it be necessary to lift the vehicle whilst it is on sloping...

Page 24: ...ation simultaneously screw on the retaining nut by hand until the wheel is felt to seat on the adaptor taper Restraining the wheel with one hand continue tightening by striking the spanner or the ears...

Page 25: ...treads and examine the tyres for sharp fins flats and other irregularities An upstanding sharp fin on the edge of each pattern rib is a sure sign of road wheel misalignment Fig 39 Fins on the inside o...

Page 26: ...flints or other road matter which may have become embedded in the treads Clean off any oil or grease which may be on the tyres by using a cloth moistened in petrol Repairs to Tubeless Tyres A temporar...

Page 27: ...ed of approximately 1 500 r p m This will cause the ignition and oil pressure warning lights to be extinguished thus indicating satisfactory performance of the generating and lubricating systems Shoul...

Page 28: ...responsive Avoid over revving particularly in the lower gears The driver is advised not to drive the car continuously at engine speeds over 6 000 r p m indicated by the beginning of an orange segment...

Page 29: ...recommended especially during the winter months when there is likelihood of corrosion through contamination with road salt Polishing After a period of use the formation of traffic film will cause the...

Page 30: ...ter control 16 Figs 2 and 3 to the hot position remove the radiator filler cap Fig 43 open the tap in the bottom of the radiator Fig 42 and the tap at the rear right hand side of the cylinder block Fi...

Page 31: ...Washer Fig 46 Examine the water level in the plastic windscreen washer container If required lift off the cap and replenish the container with clean water Under freezing conditions fill the screen wa...

Page 32: ...ol water solutions adopt a mushy state with a viscosity which impairs circulation and can immobilise or damage the water pump Therefore consult the following chart before adding anti freeze for the de...

Page 33: ...o be equipped with a radio connected to the car electrical system ensure that the radio is of NEGATIVE GROUND POLARITY or serious damage will result Care must he taken to ensure that replacement equip...

Page 34: ...ith a three bobbin type voltage and current regulator unit which automatically controls the charging rate to suit the needs of the battery A cut out device within the regulator unit prevents the batte...

Page 35: ...may be released by switching off the ignition selecting top gear and rocking the car to and fro or by turning the squared end of the starter motor shaft in a clockwise direction viewed from the end of...

Page 36: ...king lamp circuit and tail lamp and plate illumination lamp Circuit The bottom fuse 3 fed by a brown cable direct from the battery protects the horn circuit and headlamp flasher circuit Failure of a p...

Page 37: ...parking position may be adjusted by slackening the screws retaining the cover plate and rotating the domed cover the requisite amount Windscreen Wiper Arms To remove an arm prise off with a screwdrive...

Page 38: ...tank unit Flasher Unit Fig 56 The flasher unit mounted in a socket attached to the bulkhead below the facia contains an actuating wire which heats and cools alternately to operate a set of contacts T...

Page 39: ...uence to re assemble the lamp first engaging the bottom clip before pressing the rim home Headlamp Alignment Fig 59 The beam is aligned in the vertical plane by turning the screw B at the top of the l...

Page 40: ...rim and lens lifted away Tail Brake Stop Lamp Fig 61 Take out the screw and lift the lens away to gain access to the bulb Rear Direction Indicator Fig 62 Take out both screws and withdraw the lens to...

Page 41: ...to gain access to the bulb Instrument Illumination and Warning Lamp Bulbs The bulbs serving instrument illumination and warning lamps may be renewed by reaching up behind the facia and pulling the bul...

Page 42: ...weden After 1st September 1967 45 40 410 510218 U S A 50 40 54522231 Front parking lambs 6 207 57591 Front flasher lambs 21 382 502379 Tail Stop lambs 6 21 380 502287 Rear flasher lambs 21 382 502379...

Page 43: ...ELECTRICAL SYSTEM 42...

Page 44: ...e Stabilizer 26 Fuel Indicator 27 Fuel Tank Unit 28 Temperature Indicator 29 Temperature Transmitter 30 Heater Switch Optional 31 Heater Motor Optional 32 Flasher Unit 33 Direction Indicator Switch 34...

Page 45: ...ELECTRICAL SYSTEM 44...

Page 46: ...29 Temperature Transmitter 30 Heater Switch Optional 31 Heater Motor Optional 32 Flasher Unit 33 Direction Indicator Switch 34 L H Direction Indicator Lamb 35 R H Direction Indicator Lamp 36 Directio...

Page 47: ...s it is strongly recommended by the Royal Society for the Prevention of Accidents and the Manufacturers of brake components that the braking system be overhauled every 36 000 miles 60 000 km or 3 year...

Page 48: ...tick 2 pints imperial 1 l4 litres 24 pints U S A will be required for topping up via the cap Fig 67 Radiator Water Level Weekly Fig 68 The level of water visible through the translucent plastic reserv...

Page 49: ...two weeks and the losses due to diffusion are made good Correct tyre pressures are given on page 25 Adjust the pressures whilst the tyres are cold i e before a run As the tyres warm up their pressures...

Page 50: ...them and check the fluid level in the clutch 2 and brake 1 master cylinder reservoirs If necessary top up the fluid until it is level with the marking on the side of the reservoirs Ensure that the bre...

Page 51: ...Master cylinder Top up Hydraulic pipes Check for leakage TRANSMISSION Gearbox Overdrive Check level and top up Rear axle Check level and top up Universal joint coupling belts Check tightness STEERING...

Page 52: ...osity oil is recommended because of the increased oil temperature In all cases where unfavourable operating conditions exist you are advised to consult your Standard Triumph Distributor or Dealer Proc...

Page 53: ...nts Remove the bolts attaching the assembly to the carburettor flanges and detach the assembly Remove the centre bolt from the body take off the cover plate and lift out the element Clean out the body...

Page 54: ...ig 77 The fan belt should be sufficiently tight to drive the water pump and generator without unduly loading the bearings Adjust the belt by slackening the adjusting bolt 1 and the generator pivot bol...

Page 55: ...oints as described on page 60 Engine Oil Filler Cap Fig 67 Clean the filler cap with petrol or paraffin allow to dry and replace Do not oil Engine Slow Running Check and adjust if necessary Page 63 St...

Page 56: ...Apply grease around the cable guides Fig 80 and the com pensator sector Fig 81 Tyres and Wheel Nuts Examine tyres page 24 take appropriate remedial action if necessary and have the front and rear whe...

Page 57: ...s 82 and 84 Clean out the fuel pump Access to the fuel pump bowl and filter is gained by unscrewing the bolt 1 and removing the domed cover 3 Lift the filter gauze 5 from its seating and wash it in pe...

Page 58: ...lve body 1 and lift out the diaphragm 4 and spring 2 Clean the components by swilling them in methylated spirits denatured alcohol Ensure that the breather pipe is clean and serviceable Reverse the di...

Page 59: ...ums Examine the brake linings and if one or more shoes are excessively worn or contaminated with oil or grease renew the complete set to ensure braking stability Using a high pressure air line or a fo...

Page 60: ...is felt Slacken the nut by one half flat and insert a new split pin Replace the dust cap road wheel and nave plate If the car is being used for competition work re pack the front hubs with grease ever...

Page 61: ...mes excessive If premium grade fuels and high quality lubricants are used in modern high compression engines carbon deposit is so minimised that frequent decarbonising is unnecessary Carbon removal ma...

Page 62: ...e in a running direction proceed as follows Adjust Nos 1 and 3 valves with Nos 8 and 6 valves open 5 2 4 7 8 6 1 3 4 7 5 2 Cylinder Head Nuts Fig 96 Tighten the cylinder head nuts in the order shown S...

Page 63: ...from the rear Turn the crankshaft in a running direction almost two complete revolutions until the white paint spot coincides with the tip of the pointer Slacken the distributor clamp plate and switch...

Page 64: ...he suction chambers and pistons Screw up the jet adjusting nuts 3 until each jet is flush with the bridge of its car burettor or as near to this as possible Replace the pistons and suction chamber ass...

Page 65: ...sting screws a little each by the same amount to reduce the speed Lift the piston of the front carburettor approximately 1 32 0 75 mm a If the engine speed increases the mixture strength of the front...

Page 66: ...sed throttle adjust the screw 5 to give a clearance of 0 0l5 0 4 mm between the end of the screw and rocker lever Always check this adjustment when the throttle stop screw 1 is altered Cleaning Suctio...

Page 67: ...k when the jet adjusting nut 3 is screwed to its topmost position If a click is audible only when the jet is in the fully lowered position the jet should be centralised as follows Disconnect the rod b...

Page 68: ...renewed if of insufficient thickness to ensure safe braking for a further 6 000 miles 10 000 km Periodically check the tightness of the caliper securing bolts Fig 108 Pad Renewal Fig 109 Pad renewal...

Page 69: ...dbrake mechanism If cable slackness remains re adjust the handbrake clevis on each rear brake assembly Do not overtighten the cable 1 Unhook the spring 1 2 Remove split pin and clevis pin 2 3 Slacken...

Page 70: ...that the level does not fall below half full by constantly replenishing with fluid that has been stored in a container sealed from atmosphere Immediately bleeding is completed re seal residual fluid i...

Page 71: ...RECOMMENDED LUBRICANTS BRITISH ISLES ANTI FREEZE SOLUTIONS 70...

Page 72: ...RECOMMENDED LUBRICANTS OVERSEAS ANTI FREEZE SOLUTIONS 71...

Page 73: ...LUBRICATION CHART 72...

Page 74: ...x Top up 51 6 10 G Rear axle Top up 52 6 10 H Rear hubs Grease 59 12 20 J Handbrake cable guides Grease 55 6 10 K Fuel pump Clean 56 12 20 L Distributor Oil 54 6 10 M Generator rear bearing Oil 57 12...

Page 75: ...0 60 p s i 2 8 4 2 Kg cm2 Cooling System No loss system incorporating plastic overflow reservoir Circulation Pump driven by Vee belt thermostatically controlled flow Fan Four blade l2 l25 in dia 308 m...

Page 76: ...rubber mounted to chassis Hypoid bevel drive Ratio 4 1l to 1 Wheels Pressed steel disc type 3 D rim Wire spoked wheels optional Tyres 5 20S 13 Tubeless 1 45 l3 Radial ply optional Pressures See Page...

Page 77: ...2 38 pints l 35 litres 2 85 pints Rear axle 1 pint 0 57 litres 1 2 pints Cooling system inc water bottle 7 pints 4 0 litres 8 4 pints Cooling system inc water bottle with heater 8 pints 4 5 litres 9 6...

Page 78: ...moval 60 Carburettor 53 63 Care of bodywork 28 Choke control 10 Chromium plating 28 Clutch master cylinder 49 Commission number 4 page Compression pressures 60 Contact breaker points 54 60 Control box...

Page 79: ...10 Hard top 20 Headlamp alignment 38 light units 10 Heater blower switch 10 control 9 Horn push 35 62 page H T cables 59 Hubs front 59 rear 59 Ignition distributor 54 switch 8 timing 62 warning light...

Page 80: ...4 Reversing lamps 39 Rocker clearances 52 60 Routine servicing 46 Running adjustments 60 Running in 26 page Safety harness 13 Screen washer 30 48 Seats 14 Servicing routine 46 periodic 47 free 50 6000...

Page 81: ...er 37 Voucher scheme 46 Washing 28 page Water control valve 10 Water pump 58 Water temperature gauge 9 37 Weekly checks 47 Weights 76 Wheels alignment 24 pressed steel 22 spare 21 wire spoked 23 Winds...

Reviews: