background image

6

GB

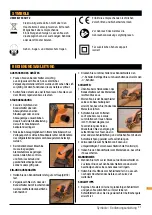
UNPACKING YOUR TOOL

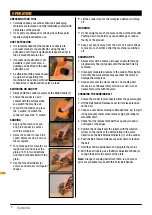
•  Carefully unpack your sander. Ensure all packaging 

materials are removed and fully familiarise yourself with 

all features of the product.

•  If any parts are damaged or missing, have these parts 

repaired or replaced before use.

DUST EXTRACTION

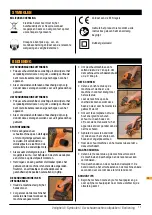
•  It is recommended that the sander is connected to 

a vacuum cleaner or dust extractor, using the dust 

extraction port. This will significantly reduce the dust in 

the air around the work area.

•  If vacuum dust extraction is not 

available in your work area, a 

dustbag can be fitted to the dust 

extraction port.

•   A suitable breathing mask should 

be worn when operating this 

machine. All wood and paint dust 

is hazardous to health and may also be toxic.

SWITCHING ON AND OFF

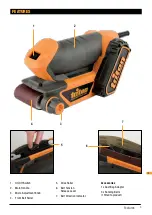
•  Always hold the sander securely by the Main Handle (2)
•  Ensure the sander is not in 

contact with the surface when 

you switch the machine on

•  To switch the sander on, press 

the 'I' switch. To switch the 

sander off, press the '0' switch.

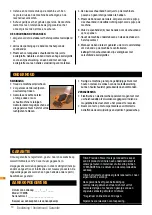
SANDING

•  Apply light pressure as you 

bring the sander in contact 

with the workpiece

•  Allow the sander to reach full 

speed before moving it across 

the workpiece

•  

To remove paint or smooth very 

rough wood, sand across the 

grain at 45° in two directions 

and then finish parallel with the 

grain.

•  

Use the Front Belt Roller (4) 

only to sand corners or irregular 

shapes.

•  

Lift the sander clear of the workpiece before switching 

off.

WARNING:

  Do not apply too much pressure on the palm belt sander. 

Pushing down too hard may cause damage or reduce 

the life of the product

•  

Keep your hands away from the belt, as it will continue 

to move for a short time after the machine is switched 

off.

SANDING TIPS
•  

Always start with a coarse grit paper and work through 

progressively finer grit papers until the desired finish is 

achieved.

•  Only apply moderate pressure to the sander. Pressing too 

hard onto the work surface may overheat the motor, or 

damage the workpiece.

•  Sand evenly over the work surface. The sanding belt 

moves in a continuous rotary motion, as such it is not 

necessary to work with the grain

CHANGING THE SANDING BELT

1.


Ensure the sander is disconnected from the power supply 

2.  Lift the Belt Tension Release Lever (6) to release tension 

on the belt 

3.  Choose a new belt according to intended task, eg; low grit 

rating produces faster stock removal, high grit rating for 

smoother finish 

4.  Check that the replacement belt has a good join and is 

not frayed at the edges 

5.  Position the new belt over the rollers, with the rotation 

arrows on the inside of the belt pointing in the same 

direction as the Belt Direction Indicator (7) on the sander. 

6.  Push the Belt Tension Release Lever (6) down to tension 

the belt 

7.  Hold the sander upside down and plug into the mains 
8.  With the belt running, use the Micro Adjustment Knob (3) 

to align the belt to the centre of the plate

Note:

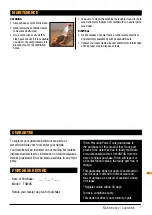
 A range of sanding belts from Triton, in a choice of 

grits, are available for use with this Palm Belt Sander

.

Operation

OPERATION

Summary of Contents for 57819

Page 1: ...TCM BS Operating and Safety Instructions Bedienings en veiligheidsvoorschriften Instructions d utilisation et consignes de s curit Gebrauchs und Sicherheitsanweisung Istruzioni Per L uso E La Sicurezz...

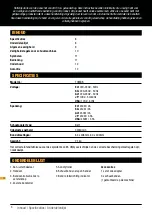
Page 2: ...t no TCMBS Voltage EU 220 240V 50Hz SA 220 240V 50Hz AU 220 240V 50Hz JP 100V 50 60Hz USA 120V 60Hz Power EU 450W 2A SA 450W 2A AU 450W 2A JP 3 5A USA 3 5A Sandpaper type Belt No load belt speed 340m...

Page 3: ...4 2 1 On Off Switch 2 Main Handle 3 Micro Adjustment Knob 4 Front Belt Roller 5 Drive Roller 6 Belt Tension Release Lever 7 Belt Direction Indicator Accessories 1 x Dust Bag Adaptor 3 x Sanding Belts...

Page 4: ...nd use common sense when operating a power tool Do not use a power tool while you are tired or under the influence of drugs alcohol or medication A moment of inattention while operating power tools ma...

Page 5: ...ods such as beech oak mahogany and teak as the dust produced is toxic and can cause extreme reactions Do not sand magnesium or alloys containing a high percentage of magnesium Be aware of paint finish...

Page 6: ...ng off WARNING Do not apply too much pressure on the palm belt sander Pushing down too hard may cause damage or reduce the life of the product Keep your hands away from the belt as it will continue to...

Page 7: ...ur web site at www tritontools com and enter your details Your details will be included on our mailing list unless indicated otherwise for information on future releases Details provided will not be m...

Page 8: ...bij de hand en zorg ervoor dat alle gebruikers van dit gereedschap de handleiding hebben gelezen en volledig hebben begrepen 1 Aan uitschakelaar 2 Handvat 3 Bandcentralisatie micro verstelknop 4 Voors...

Page 9: ...is voor gebruik buitenshuis om het risico op een elektrische schok te verminderen f Indien het onvermijdelijk is elektrisch gereedschap te gebruiken in een vochtige omgeving gebruik dan een energiebr...

Page 10: ...een identieke vervangstukken Zo bent u er zeker van dat de veiligheid van het elektrische gereedschap gewaarborgd blijft BIJKOMENDE VEILIGHEIDSREGELS VOOR SCHUURMACHINES Voor de veiligheid met betrekk...

Page 11: ...Om de schuurmachine aan te zetten drukt u de I knop in Om de machine uit te schakelen drukt u de O knop in HET SCHUREN Oefen een lichte druk op de machine uit wanneer u de machine in contact brengt me...

Page 12: ...jdering van materiaal 4 De nieuwe schuurband hoort juist op de machine te passen en geen rafelige randen te hebben 5 Plaats de band over de rollers Zorg ervoor dat de pijl op de schuurband in dezelfde...

Page 13: ...Entretien 17 Garantie 17 Table des mati res Caract ristiques techniques Nomenclature NOMENCLATURE 1 Interrupteur 2 Poign e principale 3 Bouton de r glage microm trique du centrage de la bande 4 Roulea...

Page 14: ...e utilisation en ext rieur Cela r duit le risque de d charge lectrique f Si une utilisation de l appareil lectrique dans un environnement humide ne peut tre vit e utiliser une alimentation prot g e pa...

Page 15: ...ppareil lectrique CONSIGNES DE SECURITE SUPPLEMENTAIRES RELATIVES AUX PONCEUSES AVERTISSEMENTS Pour les aspects de s curit concernant les quipements et l habillement de protection ainsi que les danger...

Page 16: ...cation I Pour l teindre appuyez sur 0 PON AGE Laissez la machine atteindre son plein r gime avant de l appliquer sur la pi ce poncer Exercez une l g re pression lors de l application de la ponceuse su...

Page 17: ...amais les orifices de ventilation s obstruer Pour nettoyer la ponceuse utilisez une brosse souple ou un chiffon sec Si possible nettoyez les orifices de ventilation l air comprim propre et sec Faites...

Page 18: ...Bedienungsanleitung 21 Wartung 22 Garantie 22 Inhalt Technische Daten Ger te bersicht Ger te bersicht 1 Ein Ausschalter 2 Hauptgriff 3 Bandlaufeinstellung 4 Frontrolle 5 Antriebsrolle 6 Bandspannhebe...

Page 19: ...bels verringert das Risiko eines elektrischen Schlages f Wenn der Betrieb des Elektrowerkzeuges in feuchter Umgebung nicht vermeidbar ist verwenden Sie einen Fehlerstromschutzschalter Der Einsatz eine...

Page 20: ...SICHERHEITSHINWEISE F R SCHLEIFGER TE Sicherheitshinweise bez glich Schutzkleidung ausr stung und allgemeinen von Elektrowerkzeugen ausgehendenden Gefahren finden sich unter Allgemeine Sicherheitshinw...

Page 21: ...ifer seine volle Geschwindigkeit erreicht hat bevor Sie ihn ber das Werkst ck f hren Schleifen Sie zum Entfernen von Farbe bzw Lack sowie zum Gl tten sehr rauen Holzes im 45 Winkel diagonal zur Faserr...

Page 22: ...hleifband auf die Rollen wobei die Pfeile auf der Bandinnenseite in dieselbe Richtung wie die Drehrichtungsanzeige 7 am Bandschleifer zeigen m ssen 6 Legen Sie den Bandspannhebel 6 wieder um damit das...

Page 23: ...di Sicurezza 24 Simboli 26 Funzionamento 26 Manutenzione 27 Garanzia 27 Indice Dati Tecnici Lista dei Pezzi LISTA DEI PEZZI 1 Interruttore On Off 2 Maniglia principale 3 Micro monopola di regolazione...

Page 24: ...le utilizzare una fonte di alimentazione protetta da un dispositivo differenziale L uso di un dispositivo differenziale riduce notevolmente il rischio di scosse elettriche NOTA Il termine dispositivo...

Page 25: ...ZE Per motivi di sicurezza relativi agli indumenti protettivi attrezzature e rischi per la salute generale relative agli strumenti di potere fare riferimento alle sezioni generali di sicurezza elettri...

Page 26: ...n Off 1 per accendere e spegnere la levigatrice 1 Per accendere la levigatrice premere l interruttore marcato I ON 2 Per spegnere la levigatrice premere l interruttore marcato 0 OF SMERIGLITATURA Appl...

Page 27: ...a Pi bassa la classe della grana pi veloce la capacit di rimozione 4 Controllare che la cinghia di ricambio ha una buona giuntura e non sfilacciato ai bordi 5 Posizionare la nuova cinghia al di sopra...

Page 28: ...o de accionamiento 6 Palanca de tensado de la banda 7 Indicador de rotaci n de la banda Accesorios 1 x adaptador para bolsa recoge polvo 3 x bandas de lijado una instalada Caracter sticas t cnicas 28...

Page 29: ...une utilisation en ext rieur Cela r duit le risque de d charge lectrique f Si une utilisation de l appareil lectrique dans un environnement humide ne peut tre vit e utiliser une alimentation prot g e...

Page 30: ...echange identiques Cela permet de maintenir la s curit d utilisation de l appareil lectrique NORMAS DE SEGURIDAD ADICIONALES PARA LAS LIJADORAS Para m s informaci n sobre los requisitos de seguridad r...

Page 31: ...ra o suavizar una madera muy rugosa lije transversalmente con el grano en 45 en dos direcciones y a continuaci n realice el acabado en paralelo con el grano Utilice el rodillo delantero 4 para lijar e...

Page 32: ...de ventilaci n Tenga especial cuidado en limpiar la m quina a fondo si se utiliza tanto para madera como para metal Las chispas que genera el lijado de metal pueden provocar f cilmente la ignici n del...

Page 33: ...t BAUART SERIENNUMMER TCMBS BEZEICHNUNG GER TETYP 64 mm Einhand Bandschleifer Installierte Nutzleistung 450 W MIT DEN FOLGENDEN RICHTLINIEN BEREINSTIMMT Niederspannungsrichtlinie 2006 95 EG Maschinenr...

Reviews: